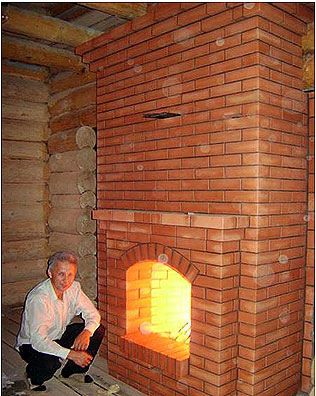
Ka shumë dizajne të ndryshme furrat. Disa janë të destinuara për ngrohje, të tjerët për gatim, dhe të tjerët janë instaluar për qëllime thjesht dekorative. Në të njëjtën kohë, ka edhe soba të kombinuara që kryejnë disa funksione në të njëjtën kohë. Po flasim për strukturat e ngrohjes dhe gatimit.
Një furrë e ngjashme quhet gjerësisht "sobë suedeze". Nëse gjithçka është bërë si duhet, furra jo vetëm që do të kryejë funksionet e mësipërme - madje mund të piqni bukë me ndihmën e saj.

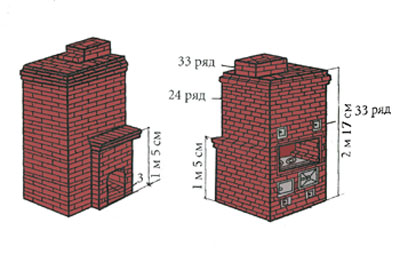
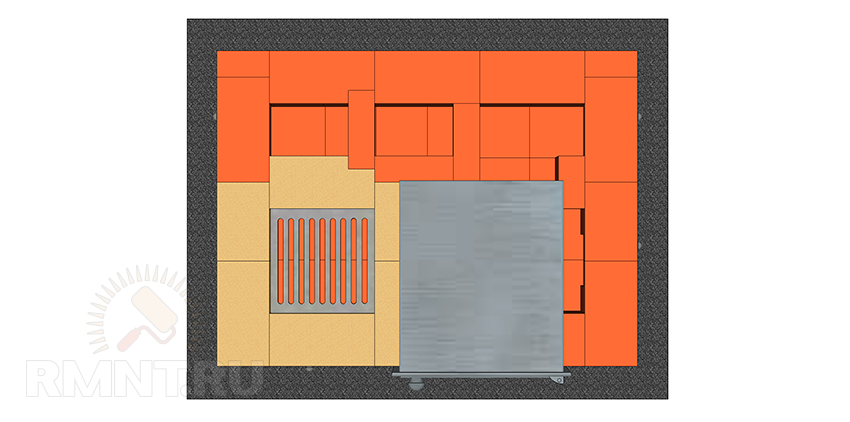
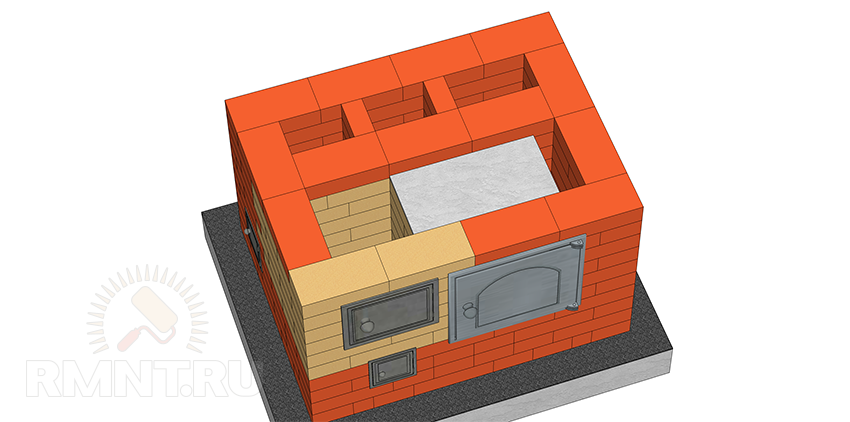
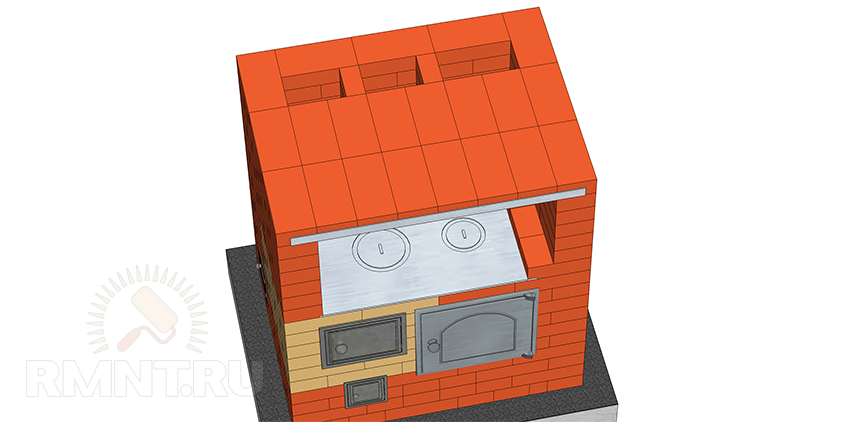
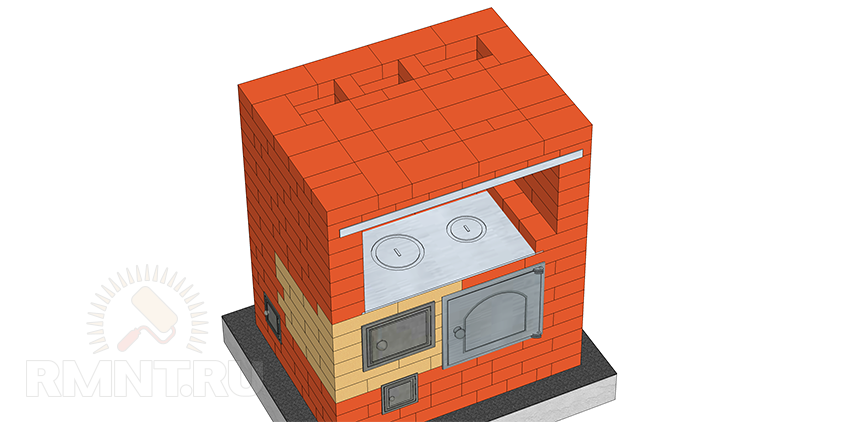
Ky është opsioni që do të diskutohet në artikullin e sotëm. Më poshtë është një vizatim dhe urdhri i "suedezit".
Njerëzit e ditur do të vënë re menjëherë se kjo marrëveshje është në shumë mënyra e ngjashme me sobën ruse, por gjithashtu ka elementë të një oxhaku. Nuk ka asgjë për t'u habitur këtu, sepse pavarësisht nga emri i huaj, ato "suedeze" në interpretimin e brendshëm synohen, para së gjithash, për përdorim në shtëpitë tona.

Para se të filloni instalimin, kontrolloni që i keni të gjitha materialet e nevojshme.

Faza 1. Përgatitja
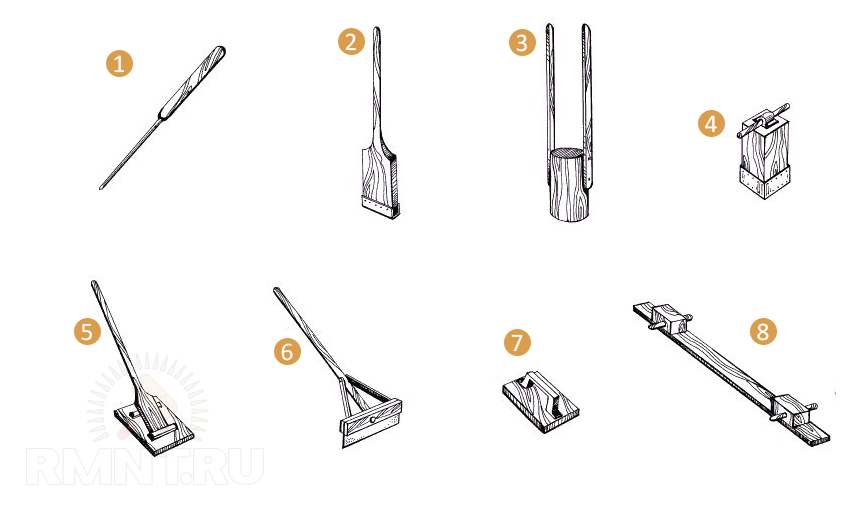
Për të ndërtuar një "suedeze" do t'ju duhet:

Përveç kësaj, do t'ju nevojiten materialet e mëposhtme:
- niveli i montimit;
- sitë rrjetë e imët (ø2-3 mm);
- linjë plumbash;
- enë për përzierjen e tretësirës;
- Master OK;
- lopatë;
- çekiç.
Faza 2. Themelimi dhe fillimi i ndërtimit
Së pari përzieni tretësirën, më pas ndiqni udhëzimet.
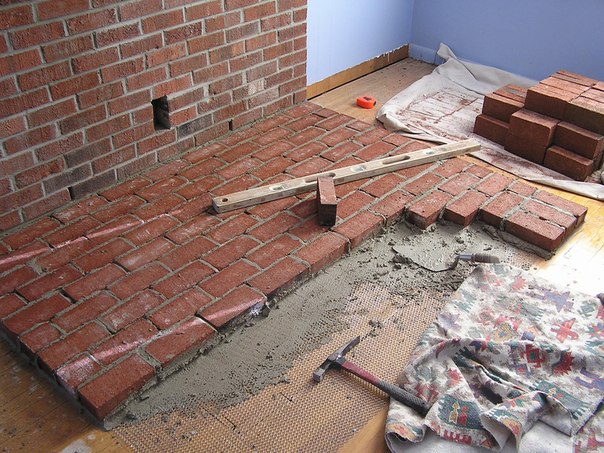

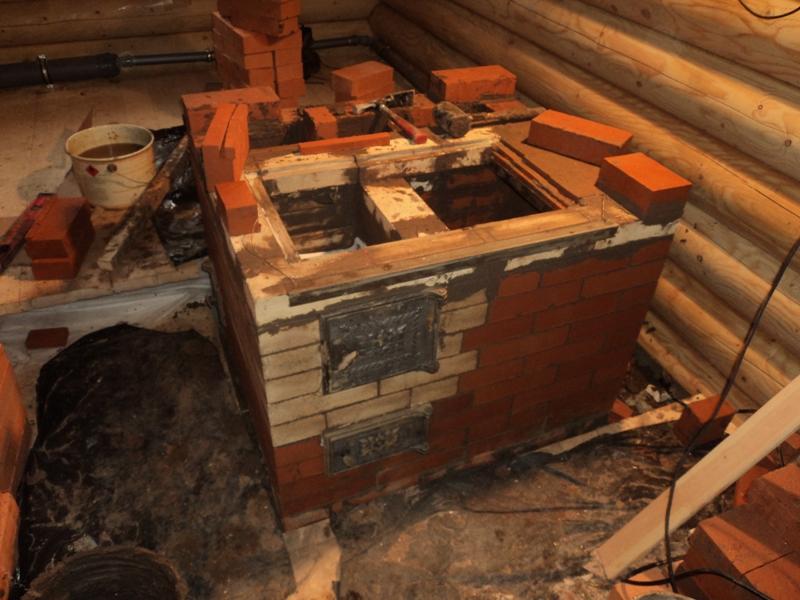
Rreshti nr. 1. Shtrimi i rreshtit të parë është faza më e rëndësishme dhe kritike e ndërtimit. Mbajeni në nivel, përdorni katrorin e montimit për kontroll.
Informacion i rendesishem! Në pjesën e përparme të sobës përballë ventilatorit përdoret ¾ e tullës. Për më tepër, tulla mund të pritet në një kon (duhet të drejtohet drejt dhomës së djegies) - kjo do ta bëjë më të përshtatshëm heqjen e hirit gjatë funksionimit.
Rreshti nr. 2. Ngjashëm me atë të mëparshmin.
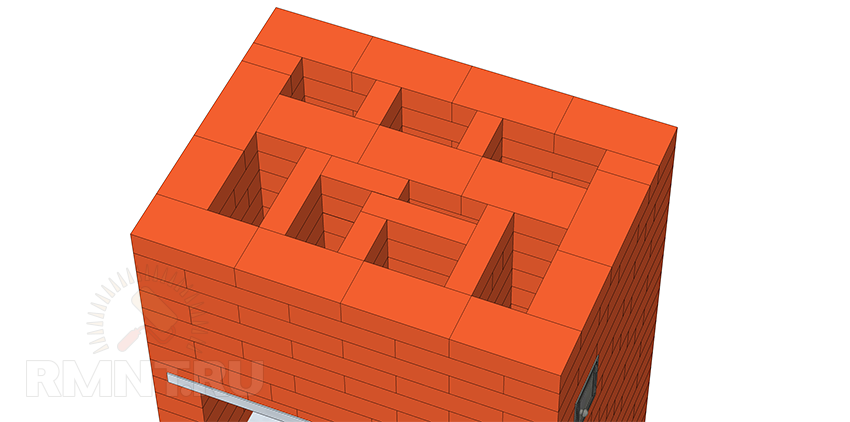
Rreshti nr. 3. Shtroni rreshtin e tretë sipas renditjes. Kur formoni ventilatorin, qepni të dy anët e tullave. Është tipike që lartësia e rreshtit të tretë duhet të jetë e barabartë me lartësinë e derës.
Rreshti nr. 4. Vendoseni këtë shtresë nga e majta në të djathtë, por së pari instaloni derën e pastrimit. Më pas, mbyllni derën e hirit dhe lini një vrimë drejtkëndëshe sipër tavës së hirit (për ta bërë këtë do t'ju duhet të prisni një tullë).
Rreshti nr. 5. Ngjashëm me atë të mëparshëm, vetëm vrima mbi dhomën e hirit duhet të bëhet më e ngushtë.
Rreshti nr. 6. Për nivelin e gjashtë, përdorni tulla zjarrduruese; vendosni tullat në përputhje me hijezimin në diagram. Lini një hendek të vogël midis grilës dhe tullave - jo më shumë se 1.5 cm - dhe mbusheni me rërë. Ky hendek është i nevojshëm për të kompensuar zgjerimin e metalit, i cili do të ndodhë në mënyrë të pashmangshme në temperatura të larta.
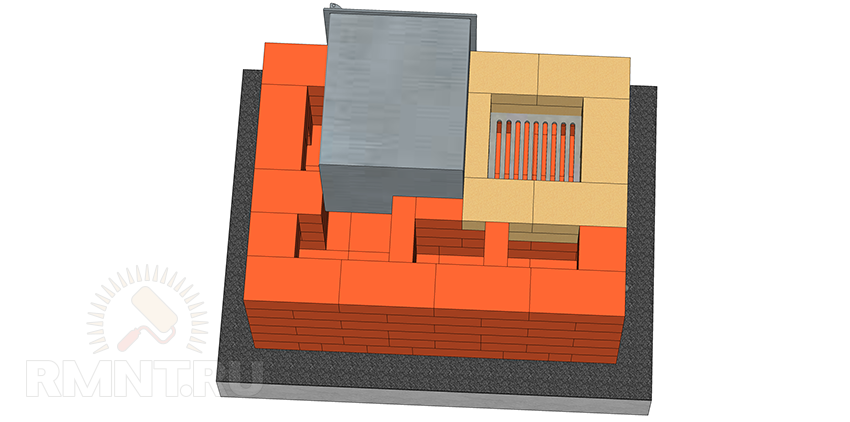
Rreshti nr. 7. Mbyllni kanalin vertikal në mënyrë që të formohen tre të reja menjëherë. Për dhomën e djegies, instaloni një derë që mbështetet në shtresën e mëparshme.

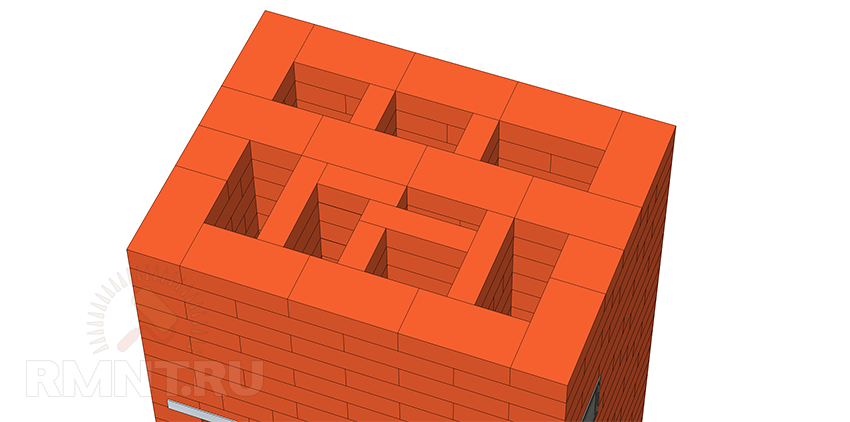
Rreshti nr. 8, 9. Ngjashëm me atë të mëparshëm.
Informacion i rendesishem! Rreshti i nëntë duhet të jetë në nivelin e derës nga dhoma e djegies.
Qepni skajet e tullave që do të mbulojnë kanalin e majtë dhe kutinë e zjarrit - kjo do ta bëjë më të butë kalimin e gazrave të tymit.
Rreshti nr. 10. Përdorni edhe tulla prej balte për këtë. E gjithë niveli duhet të jetë rreptësisht horizontal; për këtë ju mund të përdorni një nivel ndërtimi. Kjo nevojë mund të shpjegohet mjaft thjesht: kjo rregullim përfshin shtrimin e një dyshemeje gatimi.
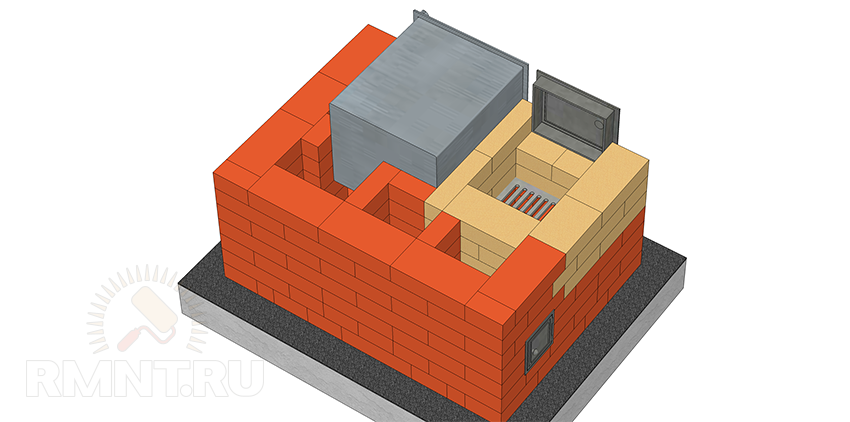
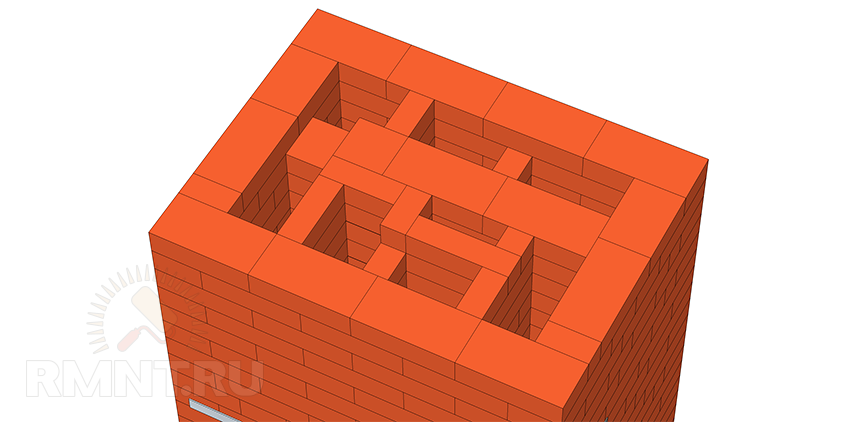
Faza 3. Ndarja e pirjes
Rreshti nr. 11. Përdorni një tullë të zakonshme të kuqe për të. Mbuloni kutinë e zjarrit me një dysheme gatimi, duke lënë, siç u përmend tashmë, vetëm dy kanale. Skajet e tullave në kontakt të drejtpërdrejtë me dyshemenë duhet të zbuten në mënyrë që të ketë një hendek prej afërsisht 2 cm.

Informacion i rendesishem! Vetë dyshemeja duhet të qëndrojë në nivelin nr. 10.
Pajisni gjithashtu një derë për dhomën e gatimit. Kjo do t'ju lejojë të përdorni kamerën si furrë nëse është e nevojshme. Këshillohet që të instaloni një kornizë hekuri dhe të bëni një amortizues të veçantë, por kjo nuk është e nevojshme. Je e thjeshte struktura e ngrohjes ky element nuk parashikohet në urdhër.
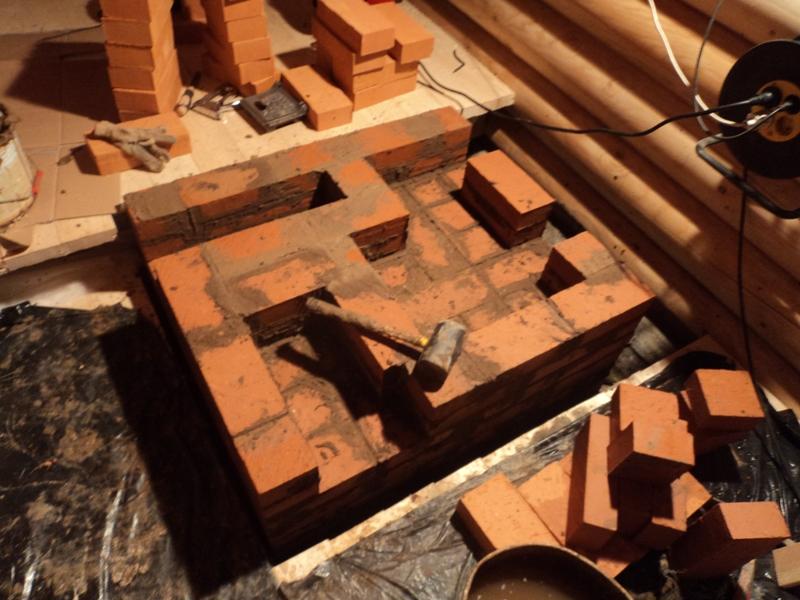
Rreshti nr. 12. Kur vendosni rreshtin e dymbëdhjetë, kombinoni dy kanalet e mbetura.
Rreshti nr. 13. Mbyllni kanalin e krijuar në mënyrë që të keni përsëri dy kanale të veçanta në formë katrore.
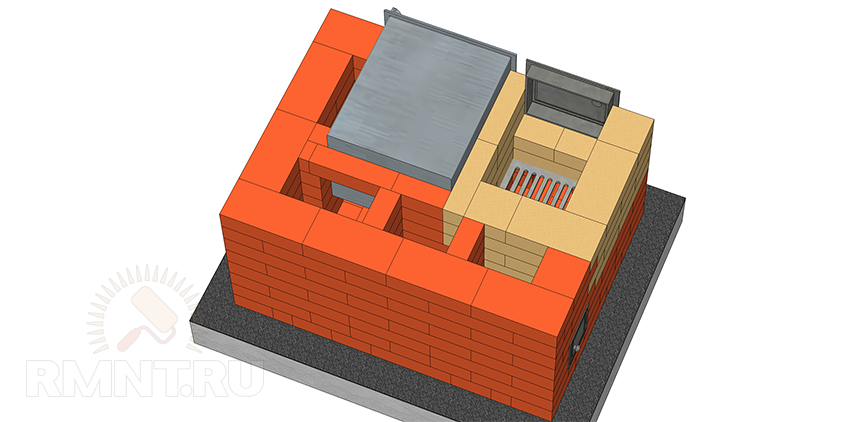
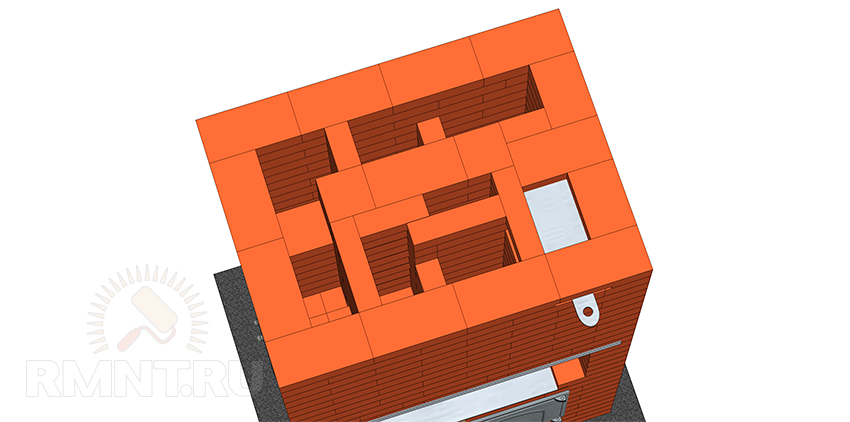
Rreshti nr. 14. Postojeni në të njëjtën mënyrë si më parë. Për të përdorur pianurën pa rritur temperaturën e të gjithë strukturës, instaloni një damper. Kjo është shumë e përshtatshme, veçanërisht në verë, sepse me damperin të hapur, pajisja do të funksionojë si një sobë e thjeshtë ngrohëse.
Rreshti nr. 15. Mbyllni valvulën.
Rreshti nr. 16. Mbyllni dyert e ndarjes së pijeve. Në anën e majtë, instaloni një derë tjetër që do të kryejë dy funksione në të njëjtën kohë:
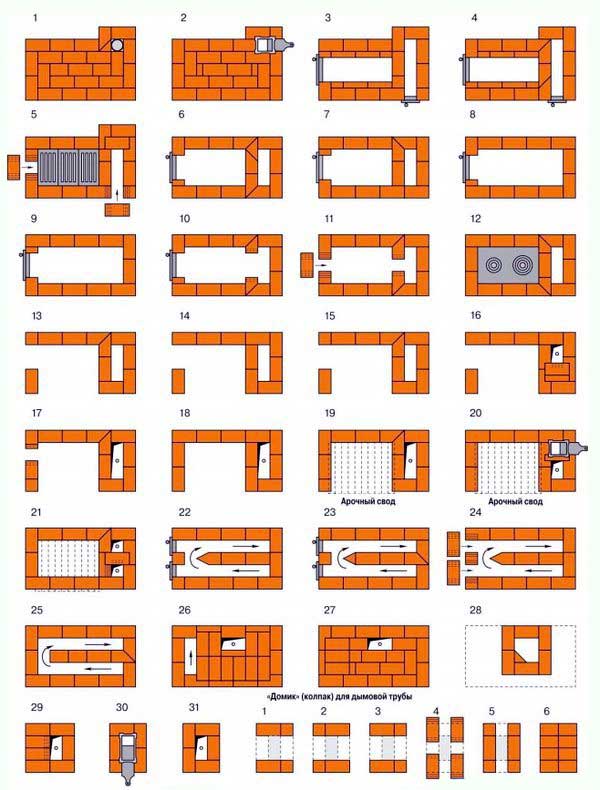
Rreshti nr. 17. Këtu mbyllni derën e instaluar në hapin e mëparshëm. Kryeni instalimin në rregull dhe vendosni shirita çeliku mbi ndarjen e birrës (ato do të nevojiten për të mbuluar dhomën).
Informacion i rendesishem! Në shumicën e porosive "suedeze", një mbivendosje e tillë nuk ofrohet; zakonisht, në vend të saj, bëhet një lloj kube. Por në këtë version të rendit kërkesat janë paksa të ndryshme.
Rreshti nr. 18, 19. Mbyllni ndarjen e birrës duke lënë disa kanale katrore.
Rreshti nr 20. Lini vetëm një kanal në të majtë. Instaloni dy dyer - njëra për pastrim, tjetra për tubin e samovarit. Mbuloni dhomën me dy tulla, duke i vendosur ato në buzë. Është e rëndësishme që distanca midis tyre dhe murit të pasmë të strukturës të jetë 4 cm.
Rreshti nr. 21. Plotësisht i ngjashëm me atë të mëparshëm.
Rreshti nr 22. Mbyllni të gjitha dyert e pajisura në hapat e mëparshëm. Në të majtë, rregulloni përsëri disa kanale katrore. Krijoni tre kanale horizontale mbi ndarjen e gatimit - ato anësore janë 11 cm të gjera, të mesit janë 5 cm të gjera.
Rreshti nr. 23. Lini kanalet në të majtë dhe bllokoni ato gjatësore. Sigurohuni që ta bëni këtë përtej, vendoseni tullën "në buzë" në të njëjtën distancë nga muri si në shtresën nr. 20.
Rreshti nr 24. Bëni gjithçka njësoj si në atë të mëparshme.
Rreshti nr 25, 26. Këtu gjithçka është e ngjashme me rreshtin nr. 22.
Rreshti nr 27. Vendosni tre tulla "në buzë" në të njëjtën distancë nga muret e strukturës dhe nga njëra-tjetra. Lini një kanal në formë katrore.
Rreshti nr 28. Vendoseni këtë shtresë në mënyrë identike me atë të mëparshme. Në këtë rast, kushtojini vëmendje të madhe veshjes së duhur të qepjeve.
Rreshti nr 29. Lini një kanal katror dhe vendosni dy tulla më afër përpara. Instaloni ato afër murit të përparmë dhe futini ato me trashësi ½. Ata do të mbështeten në tulla që janë instaluar "në buzë".
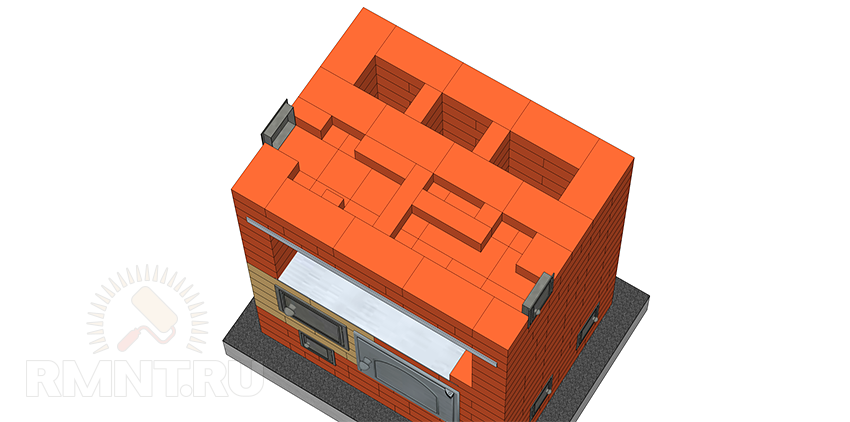
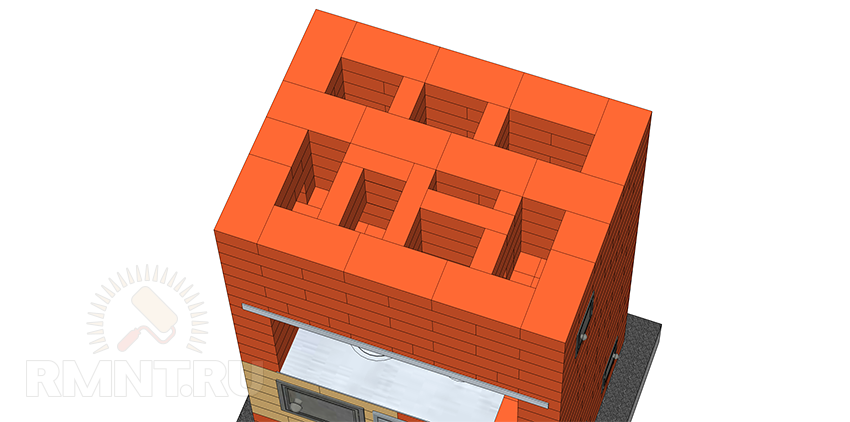
Rreshti nr 30. Mbyllni dhomën termike. Lëreni vetëm kanalin e shkarkimit të tymit dhe instaloni një valvul atje.
Rreshti nr 31, 32. Vendi në përputhje me porosinë. Si rezultat, do të ketë tre rreshta mbi kamerën - kjo është mjaft e mjaftueshme për sigurinë nga zjarri.

Mbetet vetëm për të sjellë oxhakun në lartësinë e duhur. Nuk ka asgjë të komplikuar në këtë procedurë; oxhaku në të gjithë gjatësinë e tij duhet të ketë një seksion kryq katror. Gjëja kryesore është të siguroheni që qepjet të jenë fashuar siç duhet.
Suedezët dhe variantet e tyre
Furra e përshkruar për gatim dhe ngrohje është një nga më të mirat opsione të thjeshta dizajne. Nëse dëshironi, një sobë e tillë mund të përmirësohet me dyer xhami - kjo jo vetëm që do të përmirësohet pamjen, por gjithashtu do të mbrojë dhomën nga erërat e ushqimit.
Një variant tjetër i "suedezit" mund të konsiderohet një strukturë me një fireplace të instaluar midis dhomës së ndenjes dhe kuzhinës. Në këtë rast, në kuzhinë do të ketë një sobë të plotë me një furrë, një tharëse dhe një pianurë, dhe në dhomën e ndenjes do të ketë një oxhak origjinal, i cili jo vetëm që do të ngroh dhomën, por do të shërbejë edhe si një shtesë element dekorativ brendshme Për këtë qëllim përdoret një oxhak i përbashkët, për këtë arsye nuk do të kërkohen kosto shtesë.
Informacion i rendesishem! Një nga avantazhet kryesore të "suedezit" është aftësia trajtim efektiv ftohjet dhe gripi. Thjesht duhet të flini në tulla të nxehta (por jo të nxehta), pas së cilës sëmundja do të kalojë shumë shpejt.
Në të njëjtën mënyrë, ju mund të shëroni kyçet tuaja dhe të shpëtoni nga dhimbjet e shpinës. Për ta bërë këtë, ju duhet të pajisni sobën me një stol sobë. Për herë të parë, një dizajn i tillë u zhvillua nga Henry Reznik dhe përbëhej nga një sobë me përmasa 3x4.5 tulla dhe një stol sobë - përkatësisht tulla 2.5x7. Kjo sobë mund të funksionojë në dy mënyra - dimër dhe verë - dhe ngroh një dhomë deri në 40 m².
Video - Sobë me një stol sobë
Së fundi. Rreth rendit dhe parimeve
Megjithë kompleksitetin e dukshëm të dizajnit, nëse keni rregullin e duhur dhe respektoni të gjitha kërkesat për ndërtimin, mund të ndërtoni një sobë me duart tuaja. Sigurisht, furra e përshkruar është disi e ndryshme nga ajo tradicionale, por ato kanë të njëjtin parim funksionimi.
Ky artikull shqyrtoi parimet dhe teknologjinë e ndërtimit të një strukture të kombinuar që mund të përdoret si për ngrohje ashtu edhe për gatim. Mbetet vetëm për ta përfunduar, por kjo është një temë për një artikull tjetër.

Prodhuesit profesionistë të sobave dhe mjeshtrit popullorë kanë zhvilluar shumë modele të sobave për ngrohje dhe gatim. Hartime të tilla janë shumë të përshtatshme. Ato ju lejojnë të ngrohni shtëpinë tuaj dhe të gatuani ushqim në të njëjtën kohë.
Dëshironi të ndërtoni vetë një sobë për ngrohje dhe gatim? Nuk ka problem! Udhëzimet hap pas hapi për ndërtimin e dy modeleve të suksesshme do t'ju ndihmojnë me këtë: një "suedez" dhe një sobë me dy zile. Kontrollojeni dhe filloni.
Pavarësisht nga modeli i sobës, ajo ka nevojë për një bazë të besueshme dhe të qëndrueshme. Kjo fondacioni do të bëjë si për suedezin ashtu edhe për modelin me dy kapele.
Sekuenca e rregullimit të mbështetjes është si më poshtë.
Hapi i parë
Ne hapim një gropë rreth gjysmë metër të thellë.
Hapi i dytë
E ngjeshim pjesën e poshtme të vrimës dhe e mbushim me një shtresë rëre 15-20 cm. Hidhni ujë mbi rërë dhe ngjeshni tërësisht.
Hapi i tretë
Ne instalojmë kallepin.
Hapi i katërt
Duke e shtrirë kafaz përforcimi.
Hapi i pestë
Ne përgatisim një zgjidhje nga një pjesë e çimentos, pesë pjesë guri të grimcuar, tre pjesë të rërës së lumit të situr dhe ujit. Mbushni afërsisht gjysmën e hapësirës së lirë horizontale të gropës me këtë zgjidhje. Lëreni mbushjen të thahet.
Hapi i gjashtë
Ne përgatisim një zgjidhje nga një pjesë e çimentos dhe tre pjesë të rërës. Mbushni hapësirën e mbetur të gropës me përzierjen. Niveloni me kujdes pjesën e sipërme të mbushjes duke përdorur një rregull.
Hapi i shtatë
3-4 javë pas derdhjes, mbuloni themelin e ngrirë me një shtresë mbulimi.
Shtrojmë "suedishten" me pllakë dhe furrë
Ne po ndërtojmë një version të modifikuar të modelit suedez me një furrë. Një opsion shumë i përshtatshëm - mund të ngrohni shtëpinë, të gatuani ushqim dhe të piqni pjata të ndryshme.
Le të fillojmë shtrimin.
Postimi rreshti i parë. Kjo është faza më kritike. I vendosim tullat me sa më shumë kujdes, duke kontrolluar secilën prej tyre me një nivel.
Në këtë suedez, fryrësi do të jetë në të majtë. Së pari shtrojmë tulla prej tre të katërtat. Për ta bërë më të lehtë heqjen e hirit në të ardhmen, ne shkurtojmë anët e brendshme të tullave drejt dhomës së brendshme. Për këtë përdorim një mulli.
Ne instalojmë derën e ventilatorit dhe shtrojmë Rreshti i 2-të në përputhje me urdhrin. Para instalimit, ne e mbështjellim derën me kordon azbesti. Ne përdorim tela për të siguruar derën. Më pas, mund ta fusim në gropa të përgatitura paraprakisht në tulla dhe ta futim në muraturë.
Postimi Rreshti i 3-të soba në rregull. Ne i shkurtojmë tullat, duke siguruar formën e kërkuar të ventilatorit. Lartësia e kësaj rreshti të muraturës do të përkojë me derën e instaluar më parë.
Rreshti i katërt Ne fillojmë të shtrojmë nga buza e djathtë. Ne fillimisht instalojmë derën e pastrimit. Kur shtrojmë këtë rresht, mbyllim derën e ventilatorit. Duhet të bëni një vrimë katrore sipër tavës së hirit. Për ta bërë këtë, ne presim tullat në përputhje me rrethanat.
Rreshti i pestë E shtrojmë njësoj si të katërtin, por e ngushtojmë edhe më shumë vrimën e tavës së hirit.
Postimi rreshti i gjashtë në rregull. Në diagram ju shihni një zonë me hije. Në këtë vend muratura duhet të bëhet me tulla zjarri. Për lehtësi më të madhe të shtrimit të mëtejshëm të karburantit në grilë, ne presim skajin e tullave përpara vendit të instalimit të tij. E shtrojmë hekurën në rreshtin e pestë.
Gjatë përdorimit të furrës, metali do të zgjerohet kur ekspozohet ndaj temperaturave të larta. Ne veprojmë me maturi dhe lëmë një hendek prej 1-1,5 centimetrash midis grilës dhe rreshtit të gjashtë të muraturës. Më vonë do ta mbushim me rërë.
NË rreshti i shtatë instaloni derën e kutisë së zjarrit. Më pas bllokojmë kanalin e duhur në mënyrë që të kthehet në 3 kanale më të vogla.
Dy rreshtat e ardhshëm vendoseni në të njëjtën mënyrë si i shtati. Lartësia e muraturës do të jetë në të njëjtin nivel me derën e zjarrit. Për të siguruar që gazrat e gripit të shkarkohen më mirë, ne shkurtojmë skajet e tullave të vendosura në ndarjen e kanalit të duhur dhe dhomës së djegies.
Rreshti i dhjetë E shtrojmë nga tulla zjarrduruese. Punojmë me sa më shumë kujdes. Ne kontrollojmë njëtrajtësinë e vendosjes së secilit element me një nivel. Ne do të vendosim panelin e gatimit në këtë rresht, kështu që nuk duhet të ketë shtrembërime apo edhe parregullsi më të vogla. Në të njëjtën rresht mbyllim derën e kutisë së zjarrit. Do të mbeten disa kanale në anën e djathtë. Ata kanë një prerje tërthore katrore.
Rreshti i njëmbëdhjetë Mund ta shtrojmë me tulla të thjeshta qeramike. Ne punojmë në rregull. Duke e shtrirë pianurë, duke e mbështetur në rreshtin e 10-të. Ne shkurtojmë skajet e tullave të rreshtit të 11-të në kufi me pllakën. Kjo do të krijojë një hendek prej 2 cm midis tyre.
Rreshti i njëmbëdhjetëËshtë gjithashtu interesante në atë që gjatë procesit të vendosjes së tij është instaluar korniza për prishësin e ndarjes së birrës. Amortizuesi mund të mbyllet në çdo kohë, duke krijuar një furrë.
Në urdhrat e "grave suedeze" tipike ky element zakonisht nuk është i pranishëm.
Kur shtroni Rreshti i 12-të lidhni kanalet e duhura. Ne punojmë në rregull.
Shtrimi jashtë Rreshti i 13-të, bllokoni kanalin e duhur dhe krijoni një çift kanalesh të reja.
Kur shtroni Rreshti i 14-të instaloni një damper për të bllokuar gazrat e shkarkimit. Falë një amortizuesi të tillë, do të jetë e mundur të përjashtohet ngrohja e të gjithë strukturës gjatë procesit të gatimit. Kjo do të thotë, në verë mund të gatuani me siguri ushqimin në furrë pa ngrohur shtëpinë. Përndryshe, kjo rresht përsërit atë të vendosur më parë.
Kur shtroni Rreshti i 15-të mbyllni damperin.
Në rreshtin e 16-të instaloni derën. Do të veprojë si një lloj kapuçi për të hequr aromat e gatimit dhe djegies.
Kur shtroni Rreshti i 17-të Ne instalojmë 2 shirita mbështetës metalikë sipër dhomës së gatimit. Mbyllni derën e ventilimit.
Në një sobë tradicionale, tavani bëhet më shpesh në formën e një kube, por ne e bëjmë atë pak më ndryshe. Le të shohim diagramin.
Ne kemi vënë Rreshtat e 18-të dhe të 19-të me mbivendosje të plotë të ndarjes së birrës. Shiritat e instaluar më parë prej metali do të bëhen një mbështetje e besueshme për tavanin.
Kur shtroni Rreshti i 20-të Ne instalojmë disa tulla në buzë në tavanin e rregulluar më parë. Një hendek prej 4 centimetrash duhet të lihet midis murit fundor dhe këtyre tullave. Instalojmë derën e pastrimit dhe damperin e dhomës së gatimit.
Në të njëjtën mënyrë kemi vënë rreshtin tjetër.
Kur shtroni Rreshti i 22-të mbuloni dyert e instaluara më parë. Në të djathtë do të kemi kanale. Seksioni kryq i kanalit të mesëm mbi dhomën e gatimit do të jetë 5 cm, i jashtëm - 11 cm.
Kur shtroni Rreshti i 23-të Bllokim kanalet mbi dhomën e gatimit. Ne vendosim tullat në buzë në të njëjtën mënyrë si rreshti i 20-të.
Postimi Rreshti i 24-të ngjashëm me atë të mëparshëm.
I shtrojmë dy rreshtat e radhës në mënyrë të ngjashme me rreshtin që sapo shtruam.
Kur shtroni Rreshti i 27-të Ne instalojmë 3 tulla në një skaj me një hap të tillë që distancat nga muret e sobës dhe midis tullave ngjitur të përkojnë. Në të djathtë marrim një kanal me një seksion kryq katror.
Ne kemi vënë Rreshti i 28-të, kryerja e kujdesshme e veshjes së shtresave të muraturës. Vetë shtrimi kryhet në mënyrë të ngjashme me rreshtin e hedhur më parë.
NË rreshtin tjetër ne shohim kanalin 1 në të djathtë. Ne shtrojmë disa tulla afër anës së përparme të këtij kanali. Tullat i fusim në muraturë me 50% të trashësisë së tyre. Nga njëra anë do të mbështeten mbi tullat që i shtruam buzë në rreshtin e fundit.
Kur shtroni Rreshti i 30-të mbyllni ndarjen e ngrohjes. Ne instalojmë valvulën e kanalit të tymit.
Vendosni në rend dy rreshtat e ardhshëm. Mbi ndarjen e ngrohjes marrim 3 rreshta murature. Falë kësaj, do të sigurohen tregues të mirë të sigurisë dhe kapaciteti i nxehtësisë së sobës.
Në këtë pikë suedezi është gati. Mund ta përdorni për të ngrohur shtëpinë tuaj, për të gatuar ushqime dhe për të bërë produkte të shijshme furre.
Po ndërtojmë një sobë për ngrohje dhe gatim me dy zile
Një sobë e tillë do të sigurojë ngrohje efektive prej 40-45 m2 hapësirë, e cila është një shifër mjaft mbresëlënëse për një strukturë me përmasa kaq modeste. Dimensionet e bazës janë tulla 5x3,5, d.m.th. rreth 128x89 cm Lartësia e një sobë të tillë është 2.25 m.
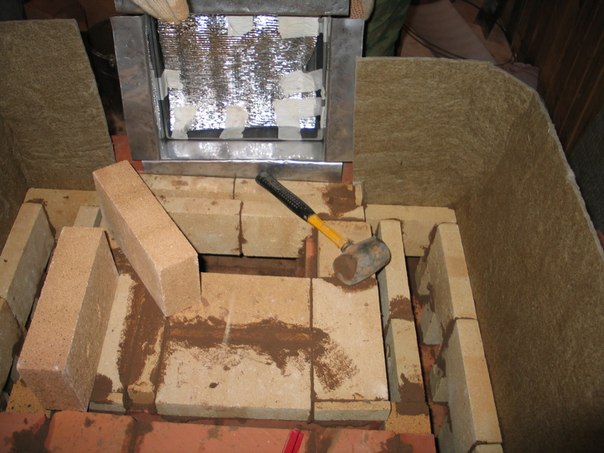
Në të njëjtën fazë ne instalojmë kutinë e furrës. Mes muraturës dhe kutisë së furrës lëmë një hendek 5 mm. Për të krijuar boshllëkun e kërkuar, kutinë e furrës e mbështjellim me kordon asbesti në pikat e kontaktit të saj me tullat. Ne gjithashtu lëmë një hapësirë të lirë 20 mm pas murit të pasmë të kutisë.
Kur shtroni rreshti i shtatë Ne instalojmë derën e dhomës së djegies. Është më mirë të përdorni një derë xhami me aftësinë për të rregulluar rrjedhën e ajrit, megjithatë, një produkt i zakonshëm prej gize do të funksionojë mirë.
Duke e shtrirë rreshti i tetë të ngjashme me të shtatën.
Postimi rreshti i nëntë në përputhje me skemën e porositjes.
Kur shtroni rreshti i dhjetë Mbyllim kutinë e furrës dhe derën e djegies.
Aktiv Rreshti i 11-të formojmë një zonë për pianurën. Në këtë rast, tullat e shtruara nga buza e përparme e sobës duhet të zhvendosen pak nga jashtë.
Në muratura e rreshtit të 13-të tulla ne bëjmë një lëvizje "verë" në gjysmë tullë.
Rreshti tjetër Ne e shtrojmë atë në mënyrë të ngjashme me datën 13.
Kur shtroni Rreshti i 15-të Ne fillojmë të formojmë një hark. Lartësia e saj do të jetë rreth 260 mm. Për të shtruar harkun, i grijmë tullat në formë konike. Madhësia e pjesës së gjerë të një koni të tillë do të jetë 140 mm, dhe pjesa e ngushtë - 45 mm.
Aktiv Rreshti i 16-të mbuloni kapakun e poshtëm. Në të njëjtën fazë, ne instalojmë një valvul në anën e djathtë të kalimit tonë "veror", duke e fiksuar atë në prerjet e përgatitura më parë. Presim tullat duke bashkuar harkun në këndin e kërkuar.
Rreshti tjetër E shtrojmë si të 16-ën.
Kur shtroni Rreshti i 18-të Le të fillojmë të formojmë kapakun në krye. Ne instalojmë një palë dyer pastrimi.
Kur postoni Rreshti i 19-të Ne shtrojmë tullat në mënyrë të ngjashme me rreshtin e 18-të.
Aktiv rreshtin tjetër formoni një kapak në krye. Ne instalojmë qoshet mbështetëse metalike. Mbi to do të vendoset një rresht murature, duke mbuluar hapjen e vendosur sipër pllakës.
Kur shtroni Rreshti i 23-të ngrini kapuçin në krye dhe filloni të ndërtoni dhomën e tharjes. Instaloni derën e pastrimit.
Aktiv Rreshti i 24-të të muraturës në të djathtë të ndarjes së tharjes projektojmë një kanal të artikuluar me të. Do të nxisë qarkullimin shtesë të ajrit.
Rreshtat 25 deri 27 E vendosim në të njëjtën mënyrë si rreshti i 24-të.
Kur shtroni Rreshti i 28-të Ne instalojmë 2 valvola në prerje të para-krijuara.
Në rreshtin e 29-të Muratura kombinon aspiratorët e ndarjes së tharjes, dhomës së gatimit dhe kanalit të tymit.
Me rastin e regjistrimit Rreshti i 30-të mbuloni plotësisht dhomën e tharjes.
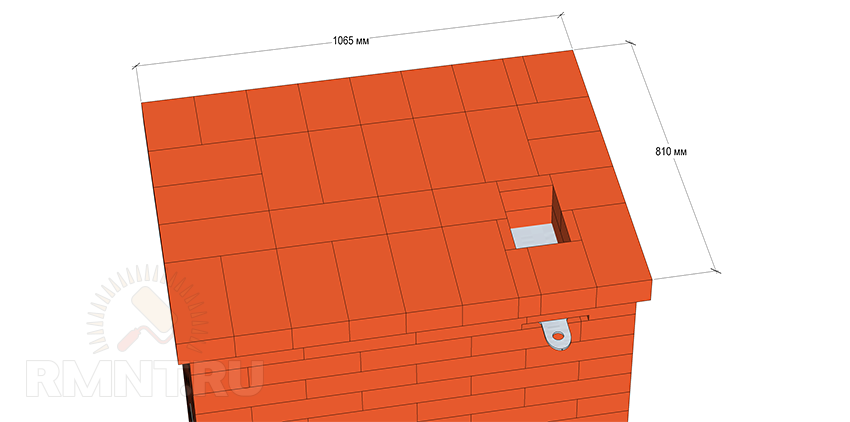
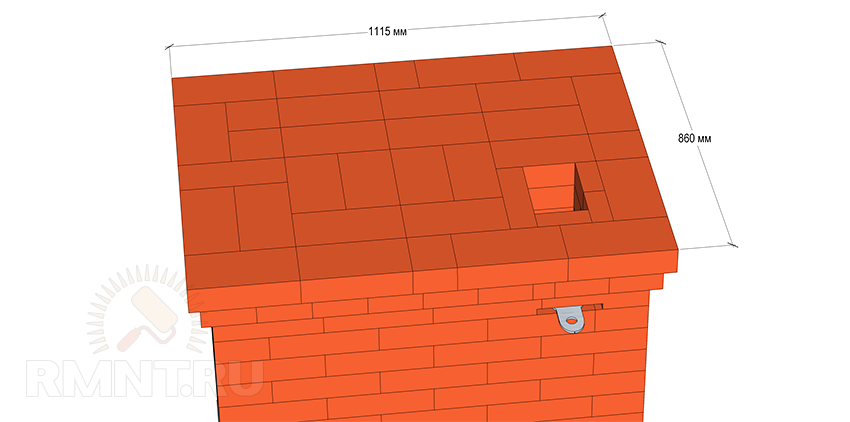
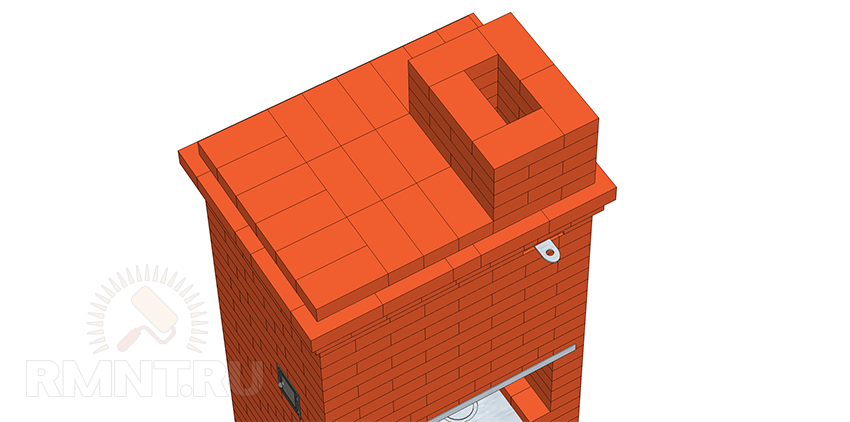
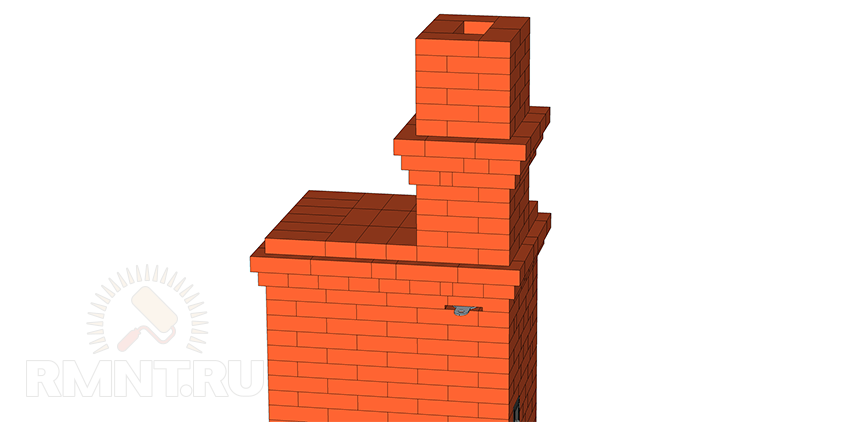
Aktiv Rreshti i 31-të Mbulojmë të gjithë avionin, duke lënë të hapur vetëm një vrimë për heqjen e tymit. Ky rresht duhet të ketë një zonë të rritur. Tullat e jashtme i shtrojmë me një dalje 40 mm nga jashtë.
Kur shtroni Rreshti i 32-të ktheni sipërfaqen në vlerën e mëparshme.
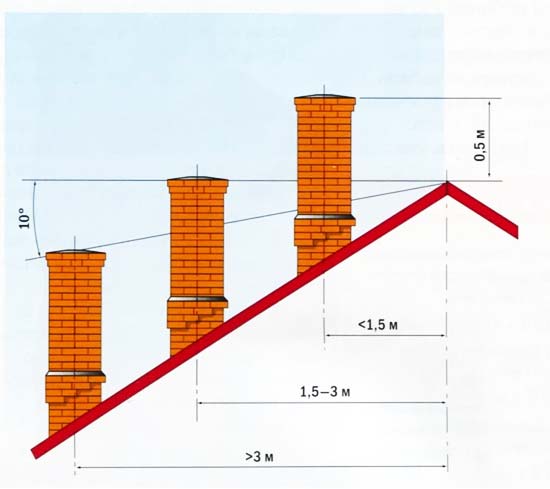
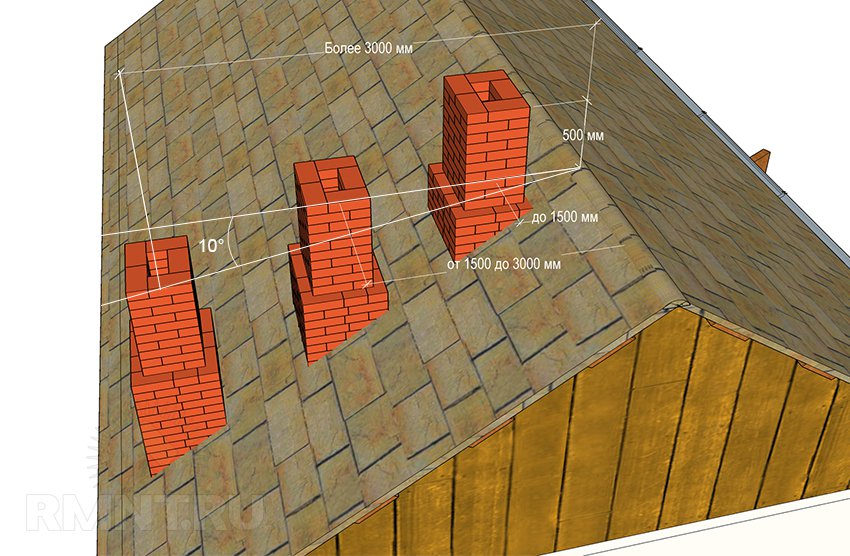
Aktiv 33-34 rreshta Ne fillojmë të shtrojmë tubin e oxhakut. Ne e sjellim atë përmes çatisë në lartësinë e dëshiruar. Ky tregues përcaktohet individualisht. Sipas rregullave, oxhaku duhet të ngrihet mbi pikën më të lartë të çatisë me të paktën 0.5 m.
Paç fat!
Video - Ngrohni dhe gatuani vetë soba
Idetë për krijimin e sobave ultra-ekonomike nga I.V. Kuznetsov janë huazuar në të gjithë botën, përfshirë SHBA-në dhe Evropën. Me një qasje të përgjegjshme, ju mund të bëni një nga sobat sipas modelit Kuznetsov me duart tuaja.
Aplikimi i furrës Kuznetsov
Gjatë shumë viteve të veprimtarisë krijuese, I.V. Kuznetsov ka zhvilluar rreth 150 modele furrash, të dizajnuara për përdorim në të gjitha fushat e veprimtarisë njerëzore pa përjashtim, ku kërkohet gjenerimi i nxehtësisë. Sipas llojit të specializimit, "farkëtaria" është:
- ngrohje;
- gatim;
- ngrohje dhe gatim;
- banjat
- në natyrë, të destinuara për pirjen e duhanit, pjekjen në skarë dhe pjekjen në skarë;
- zjarrit me një kuti zjarri të hapur, duke ju lejuar të admironi flakët.
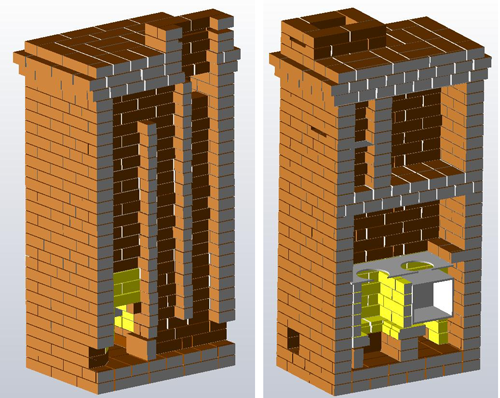
Siç mund ta shihni, kapakët janë të lidhur në seri, domethënë nxjerrja e nxehtësisë gazrat e gripit ndodh sipas një skeme me dy faza. Më parë, ndërtimi i sobave me një dizajn të tillë nuk ishte ndërmarrë me shumë dëshirë - jo vetëm për shkak të kompleksitetit, por edhe për shkak të disa veçorive të padëshirueshme. Kështu, për shembull, rryma në zilen e dytë mund të thyejë lehtësisht prizën e gazit në të parën, duke mohuar efektin e "pamjes së gazit".
Mjeshtri e trajtoi këtë pengesë në mënyrën e mëposhtme. Furra ishte e pajisur me të ashtuquajturat kanale në rrjedhën e poshtme, të vendosura për të anashkaluar pjesët që grumbullojnë nxehtësinë e grupit. Ndërsa flaka digjet në kutinë e zjarrit, rrjedha konvektive që krijon siguron që rryma të funksionojë si zakonisht. Kur karburanti konsumohet dhe konvekcioni ndalon, rryma e ajrit të ftohtë do të rishpërndahet në mënyrë të tillë që rrjedha e ajrit të ftohtë të ndjekë përmes kanaleve në rrjedhën e poshtme, dhe jo përmes trupit të nxehtë të furrës.
Kjo zgjidhje jo vetëm që kompensoi paqëndrueshmërinë e spirales së gazit, por gjithashtu doli të ishte më e besueshme: një prizë e formuar nga gazrat mund të tërhiqet nga një shpërthim i fortë ere, ndërsa në furrën Kuznetsov, rryma ridrejtohet larg nga masën e nxehtë në çdo kusht. Përveç kësaj, falë pranisë së kanaleve në rrjedhën e poshtme, nuk ka nevojë të organizoni ventilim të dhomës.
Si punon
Kjo është sekuenca në të cilën ndodhin proceset në furrën e Kuznetsov:
- Për shkak të hyrjes së ajrit përmes ventilatorit (pika 1), karburanti digjet në kutinë e zjarrit (pika 2) dhe përzierja që rezulton e gazrave të tymit dhe pirolizës ngrihet në kapuçin e poshtëm (pika 3). Nën çatinë e tij (pozicioni 4), gazi i pirolizës më në fund shpërbëhet në përbërës të ndezshëm, të cilët digjen këtu. Ky dizajn siguron një efekt vetërregullues: kur flaka digjet fort, priza e gazit rritet dhe bllokon rrymën; për shkak të dobësimit të rrymës, edhe djegia në furrë dobësohet, priza e gazit, ftohja, zvogëlohet dhe rryma rifillon.
- Gazrat e ftohta me kusht nga zilja e poshtme hyjnë në atë të sipërme (pozicioni 5). Nëse sobë është e rrumbullakët (kjo është forma ideale për një dizajn me dy zile), atëherë roli i kapuçit të sipërm luhet nga trupi i tij. Në pjesën e sipërme të tij (pozicioni 6), monoksidi i karbonit dhe oksidi i azotit oksidohen, kështu që shkarkimi që hyn në oxhak (pozicioni 7) përbëhet kryesisht nga dioksidi i karbonit dhe avujt e ujit. Gazrat që hyjnë në kambanën e dytë nuk janë më super të nxehta - temperatura nga 200 në 400 gradë - dhe kimikisht agresive, kështu që këtu mund të instalohet një shkëmbyes nxehtësie uji i bërë nga çeliku strukturor i zakonshëm. Nxjerrja e nxehtësisë nga uji nuk ndryshon në asnjë mënyrë mënyrën e funksionimit të furrës, pasi pjesa me temperaturë të lartë - kutia e zjarrit + kapuçja e poshtme - është e izoluar me një mur me tulla.
Për shkak të temperaturës së lartë të djegies, kutia e zjarrit në furrat Kuznetsov duhet të bëhet e izoluar nga masa kryesore ose, siç thonë ata gjithashtu, lundrues. Asnjë nga elementët e tij nuk duhet të futet në tullat qeramike, përndryshe kjo e fundit, edhe nëse ka fuga zgjerimi, do të prishet gjatë pjekjes - ndryshimi në koeficientët e zgjerimit termik të këtyre materialeve do të ndikojë në të.
Kutia e zjarrit duhet të rrethohet nga një shtresë e ashtuquajtur e thatë. Kjo është një shtresë midis tullave prej balte dhe qeramike, e cila, në vend të llaçit prej balte, është e mbushur me një copë litari të bërë nga kartoni azbesti ose bazalt.
Ekziston një hendek unazor (L1) midis kutisë së zjarrit dhe kapuçit të poshtëm, dhe një tjetër (L2) midis kapuçëve. Nëse gjerësia e L2 bëhet më e madhe se ajo e L1, pamja e gazit do të jetë më e qëndrueshme.
Llogaritja e furrës Kuznetsov
"Kuznetsovka" - shumë e vështirë pajisje ngrohëse dhe përpjekjet për ta llogaritur dhe projektuar vetë nuk do të çojnë në asgjë të mirë. Thjesht duhet të zgjidhni nga të gjitha opsionet e disponueshme më të përshtatshmet për veten tuaj - autori nuk i fsheh zhvillimet e tij. Nëse karakteristikat e modelit që ju pëlqen nuk tregojnë fuqinë e transferimit të nxehtësisë, mund të llogaritet afërsisht: një sobë që nxehet dy herë në ditë, çdo katror. m i sipërfaqes së tij lëshon afërsisht 500 W nxehtësi.
Furra OVIK-9, procedura e prodhimit të së cilës do të shqyrtojmë, me përmasa 1015x630x2100 mm, ka një fuqi të transferimit të nxehtësisë prej madhësia 3.6 kW.

Modeli OVIK-9: pamje e përgjithshme
Punë përgatitore
Para së gjithash, ju duhet të zgjidhni një vend për të ndërtuar një furre. Mënyra më e lehtë për ta bërë këtë është përpara se të ndërtoni një shtëpi - atëherë si sobë dhe ndërtesa janë projektuar së bashku në mënyrë që tre ose të paktën dy dhoma të ngrohen. Që tashmë gati ne shtepi situata është më e ndërlikuar. Në këtë rast, ata tentojnë të ndërtojnë furrën në ndarje e brendshme, që nga zbatimi i tij në mur mbajtës kërkon llogaritje komplekse dhe punë të rrezikshme intensive të punës (një pjesë e murit do të duhet të çmontohet, duke mos lejuar që ngarkesa të bllokohet nga një sistem arkivash dhe kolonash).
Ju, sigurisht, mund të kufizoni veten në një rregullim të thjeshtë të montuar në mur, por atëherë vetëm një dhomë do të nxehet.
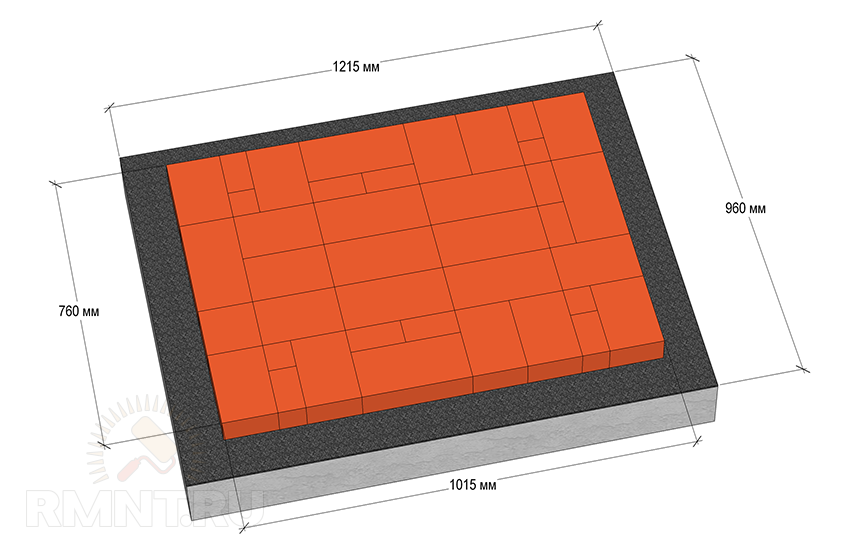
Ju duhet të ndërtoni në vendin e zgjedhur themel i betonit të armuar. Dimensionet e saj duhet të kalojnë përmasat e furrës me të paktën 100 mm nga secila anë. Nuk lejohet kombinimi i themelit të furrës me themelin e ndërtesës - të dyja strukturat japin vendbanime të ndryshme dhe njëri nga themelet do të tërheqë tjetrin së bashku me të, duke bërë që ajo të anohet.
Një themel i betonit të armuar duhet të instalohet nën furre.
Thellësia e themelit varet nga aftësia mbajtëse e tokës, thellësia e ngrirjes së saj dhe mënyra e funksionimit të ndërtesës (në mënyrë periodike/vazhdimisht). Në mënyrë tipike, në ndërtesat me banim gjatë gjithë vitit të njerëzve të vendosur në tokë të qëndrueshme, themeli thellohet me 400-600 mm. Guri i grimcuar duhet të derdhet në pjesën e poshtme të gërmimit si një shtresë përforcuese dhe një jastëk rëre duhet të vendoset mbi të.
Pastaj gjithçka bëhet duke përdorur teknologjinë tradicionale - ata instalojnë kallepin, rregullojnë kornizën e përforcimit dhe e mbushin me beton. Ju duhet të vazhdoni me ndërtimin e furrës vetëm pasi betoni të jetë pjekur plotësisht dhe të ketë fituar forcë të mjaftueshme - kjo zakonisht zgjat rreth një muaj.
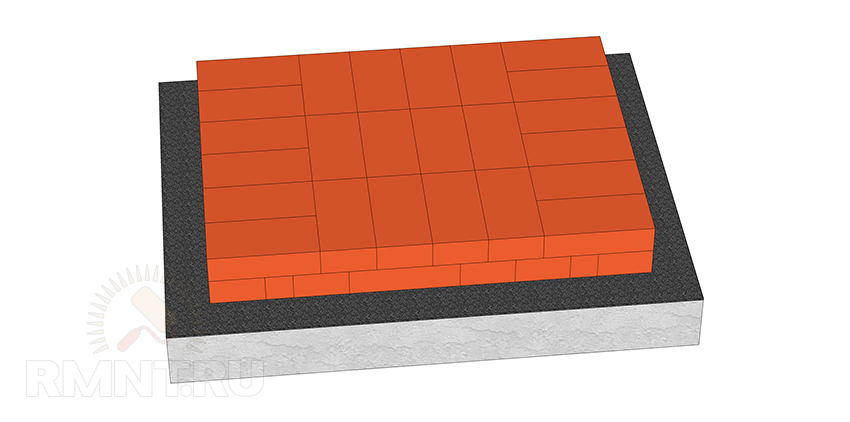
Para vendosjes së rreshtit të parë, hidroizolimi i dy shtresave të shamisë për çati ose shamia për çati duhet të vendoset në majë të themelit. Konturet e furrës së ardhshme vizatohen mbi të me shkumës - kjo do ta bëjë më të lehtë lundrimin.
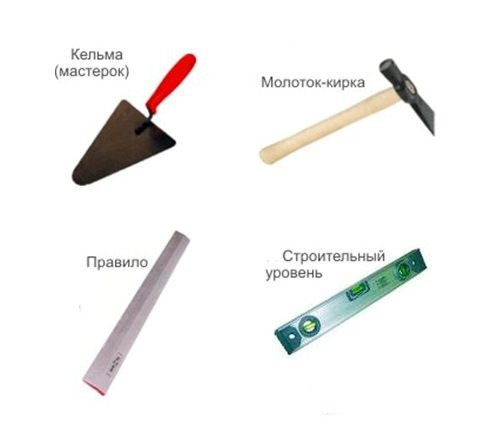
Materialet dhe mjetet
Për të punuar do t'ju duhet:
- mistri;
- niveli;
- çekiç çekiç dhe vegla të tjera ndërtimi.
Për të ndarë tulla, do t'ju duhet një çekiç dhe një mulli me një rrotë diamanti.
Ky grup mjetesh do të nevojiten për punë
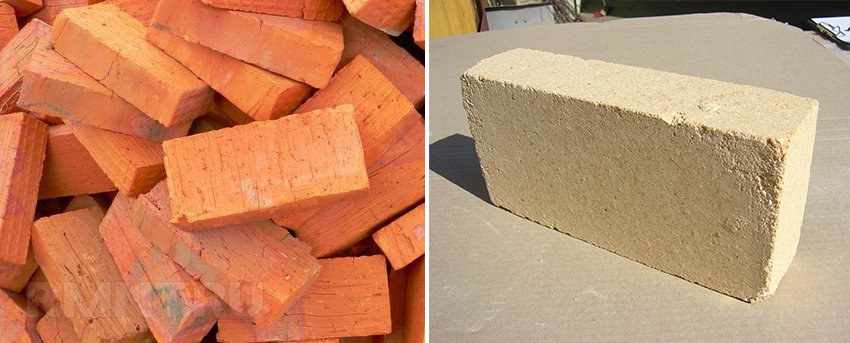
Furra do të ndërtohet nga dy lloje tullash: qeramika konvencionale e ngurtë me një shkallë M150 (250x120x65 mm) dhe klasa e argjilës së zjarrit ShB-8 (250x123x65 mm) ose Sh-5 (230x114x40 mm). Muret e kutisë së zjarrit do të jenë të veshura me tulla prej balte.
Kur blini tulla me balte zjarri, duhet të jeni shumë të kujdesshëm. Shitësit e paskrupull mund ta kalojnë atë si tullë rezistente ndaj acidit, e cila është e ngjashme në pamje, por nuk mund t'i rezistojë temperaturave të larta. Kështu që nuk do të dëmtojë të kërkoni të shihni një certifikatë.

Tulla për shtrimin e furrës
Shpesh rekomandohet të zgjidhni tulla me baltë zjarri sipas ngjyrës - sa më të errëta, aq më mirë. Por ky rregull nuk zbatohet gjithmonë. Nëse është përdorur argjila e marrë nga depozita të ndryshme, atëherë karakteristikat e tullave të lehta mund të jenë më të larta se ato të tullave të errëta. Është më e saktë të vlerësohet cilësia e tullave të zjarrit sipas kritereve të mëposhtme:
- struktura duhet të jetë uniforme dhe me grimca të imta - pa pore dhe përfshirje të dukshme me sy të lirë;
- kur goditet me një objekt metalik (çekiç i lehtë ose pikëllim), tulla duhet të prodhojë një tingull të qartë, të papritur dhe kumbues;
- kur të bjerë, duhet të copëtohet në copa të mëdha (ato me cilësi të ulët shkërmoqen në copa të vogla deri në rërë).
Për një strukturë me dimensione 1015x630x2100 mm, do t'ju nevojiten 430 tulla qeramike (me përjashtim të oxhakut) dhe 22 tulla prej balte.
Si të përgatisni tretësirën
Zgjidhja e përdorur është balta. Balta dhe rëra e përdorur për përgatitjen e saj nuk duhet të përmbajnë papastërti organike që mund të çojnë në çarje të shtresave. Në argjilë, prania e këtyre papastërtive mund të njihet nga një erë qartësisht e dëgjueshme (madje mund të jetë e këndshme) - normalisht balta nuk ka pothuajse asnjë erë.
Rëra duhet të përdoret ose nga rëra malore ose e bërë duke bluar tulla të thyera - në këto varietete përmbajtja e papastërtive organike është minimale, ose ato mungojnë plotësisht. Rëra e tullave zakonisht kushton më pak se rëra malore, por nuk është inferiore në cilësi. Thjesht kushtojini vëmendje rrethanës së mëposhtme: për llaç qeramike ju nevojitet rërë nga tulla qeramike, dhe për balta zjarri - në përputhje me rrethanat, nga balta e zjarrit.
Kushtojini vëmendje shkallës së argjilës. Llaçi për muraturë me balte zjarri duhet të përgatitet në bazë të kaolinës së bardhë ose merlës prej balte zjarri. Çdo argjilë me veti rezistente ndaj zjarrit është e përshtatshme për muraturë qeramike, për shembull, kaolinë gri ose blu, kambriane gri.
Balta e së njëjtës klasë, por nga depozita të ndryshme, mund të ndryshojë shumë në viskozitet, përmbajtje yndyre dhe vetitë ngjitëse. Prandaj, receta e zgjidhjes, përkatësisht raporti optimal i rërës dhe argjilës në të, duhet të zgjidhet eksperimentalisht. Në rastin e përdorimit të rërës me tulla, kjo bëhet si më poshtë:
- Një pjesë prej 1 kg balte duhet të mbushet deri në majë me ujë dhe të lihet për një ditë.
- Pas kësaj, balta e lagur përzihet me shtimin e ujit derisa të duket si plastelinë ose brumë i trashë dhe të ndalojë ngjitjen në duar.
- e para - 10% e vëllimit të argjilës;
- në 2 - 25%;
- në 3 - 50%;
- në 4 - 75%;
- në 5 - 100%.
Çdo pjesë duhet të përzihet plotësisht derisa të jetë e qetë dhe të thahet për 4 orë. Mos harroni të shënoni se ku ka rërë.
Pas kësaj, çdo pjesë e tretësirës duhet të hapet në formën e një cilindri 30 cm të gjatë dhe 1-1,5 cm në diametër. Të gjitha mbështillen rreth një boshe të rrumbullakët me një diametër rreth 5 cm. Tani mostrat e provës duhet të thahet për dy javë në kushte temperatura e dhomës dhe mungesa e drafteve.
Pas kësaj, mbetet për të vlerësuar secilën nga opsionet:
- Nëse në cilindër nuk ka fare të çara ose janë të pranishme në formën e një rrjete shumë të imët, një zgjidhje e tillë mund të përdoret për çdo pjesë të furrës.
- Nëse thellësia e çarjeve arrin 1-2 mm, tretësira mund t'i rezistojë temperaturave deri në 300 gradë. Kjo përzierje mund të përdoret për muraturë fireplace fshati ose Barbecue.
- Nëse ka çarje ose thyerje të thella, zgjidhja konsiderohet e papërshtatshme për përdorim - përqindja e rërës në të është e tepërt.
Në mënyrë tipike, rreth 0.2 metra kub konsumohen për një shtrimin prej 500 tullash. m përzierje balte dhe rërë.
Shënim! Nëse nuk ju shqetësojnë kostot shtesë, mund ta blini në një dyqan të specializuar. përzierje e gatshme për përgatitjen e solucionit të furrës.
Duke përcaktuar kështu kombinimin optimal të argjilës dhe rërës, ne fillojmë të përgatisim zgjidhjen:
- sasia e kërkuar e argjilës (afërsisht 40 kg për 100 tulla) ngjyhet përsëri për 24 orë, gatuhet deri në konsistencën e brumit, por më pas fërkohet përmes një sitë me madhësi rrjetë 3x3 mm;
- pastaj shtohet rëra sipas recetës së zgjedhur eksperimentalisht;
- duke shtuar gradualisht ujë, përziejeni tretësirën derisa të bëhet krem;
- vlerësoni se si zgjidhja e lag mistrin dhe, nëse është e nevojshme, rregulloni përbërjen e saj duke shtuar një sasi të vogël balte ose rërë.
Çfarë tjetër nevojitet?
- Një derë zjarri, për shembull, e markës DT-3, me përmasa hapëse 250x210 mm.
- Dera e ventilatorit, për shembull, e markës DPK, me një hapje 250x140 mm.
- Madhësia e grilës 250x252 mm.
- Pllakë prej gize me dy ndezës, madhësia - 586x336 mm.
- Dyer me përmasa 510x340 mm, 2 copë. – për dhomën e gatimit.
- Valvulat e portës me një sipërfaqe rrjedhje 130x130 mm, 2 copë. – për dhomën e gatimit dhe për kalimin ndërmjet modalitetit të funksionimit veror dhe dimëror.
- Valvula me një hapësirë prej 250x130 mm - për një oxhak.
- Pjesë me kënd të barabartë 36x4, 600 mm të gjata (4 copë).
- Një copë shirit çeliku 40x4 mm, 600 mm i gjatë.
- Fletë çeliku 3 mm e trashë, madhësia 600x550 mm.
- Fletë çeliku 3 mm e trashë me përmasa 500x700 mm për të mbrojtur dyshemenë përpara kutisë së zjarrit.
Zëvendësoni çelikun me çdo dysheme tjetër të papërshkueshme nga zjarri, për shembull, me pllaka qeramike.
Masoneria: porositja dhe udhëzimet hap pas hapi
Sekuenca e punës duket si kjo:
Vendosni rreshtin e parë me 20 tulla, i cili duhet të jetë një drejtkëndësh ideal me një sipërfaqe rreptësisht horizontale.
Diagrami i rreshtit të parë
"Drejtkëndëshia" kontrollohet duke matur diagonalet - ato duhet të jenë të barabarta. Në mungesë të përvojës, rreshti duhet të shtrohet fillimisht pa llaç dhe vetëm atëherë, kur gjithçka të jetë rregulluar dhe kontrolluar, duhet të aplikohet llaçi. Trashësia e qepjeve duhet të jetë 5 mm.
Këshilla. Për ta bërë sobën të duket më tërheqëse, vendosni tulla të rrumbullakosura në qoshe. Ju nuk duhet t'i prisni ato vetë - blloqe të tilla shiten të gatshme.
Në rreshtin e dytë burojnë kapuçi i parë (i poshtëm) dhe dhoma e ventilatorit. Dy gjysmat e tullave vendosen pa llaç dhe shtyhen pak. Kur të përfundojë muratura, këto tulla do të duhet të hiqen, gjë që do të bëjë të mundur pastrimin e bazës së kapakut nga spërkatjet e llaçit dhe fragmenteve të tullave. Pas pastrimit, gjysmat vendosen në fund në tretësirë.
Diagrami i rreshtit të dytë
Kur shtrihet rreshti i dytë (kërkohen 14 tulla), instaloni derën e ventilatorit mbi të, duke e mbështetur me disa tulla. Korniza e derës duhet të jetë e mbështjellë me kordon azbesti, i cili do të veprojë në të njëjtën kohë si një mbyllës dhe bashkim zgjerimi. Fiksohet në tulla me anë të telit, i cili vendoset në tegela.
Duke e shtruar sipas skema 3 rresht (tullat e përfshira në të duhet të fiksojnë fort derën e ventilatorit), vazhdoni me vendosjen e 4-të. Këtu, përveç tullave qeramike, përdoren tulla prej balte - fillojmë të shtrojmë anën dhe muri i pasmë kutitë e zjarrit
Diagrami i rreshtit të tretë
Dera e ventilatorit është e mbuluar me tulla qeramike të gdhendura që shikojnë nga jashtë dhe tulla të latuara prej balte zjarri që shikojnë nga brenda. Ato duhet të ndahen nga një hendek termik prej 5 mm. Mund të organizohet në këtë mënyrë: midis tullave vendoset një ndarës prej kartoni të valëzuar - ka trashësinë e duhur; Kur ndizet, kartoni do të digjet dhe një hendek do të krijohet vetë. Boshllëqet e temperaturës duhet të sigurohen kudo ku tullat e zjarrit janë ngjitur me tullat qeramike.
Diagrami i rreshtit të katërt
Në rreshtin nr. 5, tullat prej balte të zjarrit që formojnë muret anësore të kutisë së zjarrit janë zhvendosur pak në mënyrë që tullat e rreshtit të 4-të të vendosura poshtë tyre të formojnë një raft 10–15 mm të gjerë për hekurën. Tullat duhet të zhvendosen larg në mënyrë që të ketë një hendek prej 5 mm midis tyre dhe grilës, e cila është e nevojshme për zgjerimin e lirë të metalit të ndezur.
Diagrami i rreshtit të pestë
Tulla që formon murin e përparmë duhet të pritet në një kënd.
Në të njëjtin rresht, fillon formimi i një kanali vertikal që lidh të dy kapakët.
Kur të vendoset rreshti, duhet të instaloni grilën në vendin e saj, duke mbushur hendekun midis tij dhe tullave me rërë.
Instalimi i shufrave të grilave
Paralelisht me vendosjen e rreshtit të 6-të, duhet të instaloni dhe rregulloni derën e zjarrit. Kontakti i drejtpërdrejtë i kornizës së tij me tulla nuk lejohet - është e nevojshme të vendosni një kordon asbesti si copë litari. Korniza e derës mund të fiksohet nga poshtë me tel, por kërkohet një element më i besueshëm nga lart - teli do të digjet shpejt. Në vend të kësaj, përdoret një shirit çeliku.
Diagrami i rreshtit të shtatëPasi të keni shtruar rreshtin nr. 8 sipas diagramit, vazhdoni me vendosjen e rreshtit të 9-të. Në këtë fazë, formohet një kanal që lidh kutinë e zjarrit me kapuçin e poshtëm. Ngjyra e jargavanit tregon tulla në muret anësore të kutisë së zjarrit, skajet e sipërme të së cilës duhet të jenë 10 mm nën rrafshin e rreshtit. Një shirit asbesti 10 mm i trashë do të duhet të vendoset në murin e majtë në mënyrë që të jetë në nivel me rrafshin e rreshtit.
Diagrami i rreshtit të tetë
Kushtojini vëmendje mënyrës sesi bllokohet dera e zjarrit: tullat priten në një kënd për të krijuar një muraturë "të kyçur".
Diagrami i rreshtit të nëntë
Gjatë shtrimit të rreshtit të 10-të, duhet të mbani mend se tullat qeramike duhet të vendosen pa llaç në rreshtimin e asbestit (ajo mbulon tullat e zjarrit në murin e kutisë së zjarrit).
Rreshti i dhjetë i rendit
Në kutinë e zjarrit përreth tulla qeramikeËshtë e nevojshme të bëni një prerje për pianurën. Dimensionet e saj duhet të jenë të tilla që të ketë një hendek të temperaturës prej 5 mm rreth pllakës, domethënë, tullat do të duhet të shkurtohen me rreth 10 mm. Dhe në zonën e kontaktit të pianurës me tulla prej balte, është e nevojshme të lini një hendek prej 10 mm. Këto tulla, të prera në një kënd, janë të vendosura në pjesën e përparme dhe në të djathtë (treguar në portokalli).
Nëse pllaka është e pajisur me brinjë ngurtësuese në fund, duhet të priten brazda shtesë në tullë për to në mënyrë që pllaka të mbështetet në tullë përgjatë gjithë skajit. Instaloni menjëherë pas vendosjes së rreshtit - në të ngopura llaç balte kordonin e asbestit. Boshllëqet midis pllakës dhe tullave janë të mbushura me rërë.
Pranë nr 11 fillojnë muret e dhomës së gatimit. Këtu është instaluar edhe një derë për të, korniza e së cilës duhet të mbështillet me kordon asbesti. Për fiksim, mund të përdorni përsëri tela.
Diagrami i rreshtit të njëmbëdhjetë
Rreshtat 12, 13 dhe 14 nuk kanë nevojë për komente - ne thjesht i shtrojmë ato sipas renditjes.
Pas vendosjes së tullave të rreshtit të 15-të, dhoma e gatimit mbulohet me një fletë çeliku 3 mm të trashë dhe 600x550 mm me një prerje për kanalin e shkarkimit. Pjesa e sipërme e fletës është e përforcuar me 4 pjesë këndi dhe një shirit çeliku. Tavani i çelikut parandalon që mbeturinat e ndryshme të vogla të futen në ushqim, të cilat mund të bien në të nga tullat.
Skema e rreshtit të 16-të
Kur rreshti është hedhur, valvulat janë instaluar në vend.
Instalimi i valvulave
Pas rreshtit të 17-të, fillon formimi i kapakut të sipërm (rreshti i 18-të). Edhe këtu, gjysmat pak të zgjatura duhet të lihen pa llaç; duke i hequr ato, do të jetë e mundur të pastrohet baza e kapakut nga llaçi dhe mbeturinat e ndryshme që ranë gjatë procesit të shtrimit. Pas pastrimit, tullat e hequra lyhen me llaç dhe në fund vendosen në vendin e tyre.
Rreshti i tetëmbëdhjetë i rendit është fillimi i formimit të kapakut
Rreshtat nga 19 deri në 27 janë vendosur në rregull.
Në rreshtin e 28-të është instaluar amortizuesi kryesor i oxhakut. Nën të, duhet të bëhen prerje në tulla me një thellësi prej 10 mm (treguar në jargavan) dhe një gjerësi të tillë që të mbetet një hendek i temperaturës prej 5 mm rreth trupit të valvulës.
Instalimi i një damperi të oxhakutNë rreshtat nr. 29 dhe 30 furra është e mbyllur, dhe në rreshtin nr. 31 fillon një tub i montuar me një kanal shkarkimi tymi në tullë (270x140 mm).
Formimi i tubit të shtresës së jashtme
Furra e përfunduar duhet të thahet plotësisht. Për ta bërë këtë, ajo mbahet për ca kohë me dyert dhe valvulat plotësisht të hapura. Gjërat do të shkojnë më shpejt nëse varni në kutinë e zjarrit një llambë me fuqi 200–400 W. Ai do të sigurojë jo vetëm nxehtësi, por edhe një rrjedhje të qëndrueshme konvektive, e cila një kohë të shkurtër do të largojë të gjithë lagështinë.
Zjarri i parë duhet të kryhet me një pjesë të vogël të karburantit - zjarri duhet së pari të ngurtësojë muret e kutisë së zjarrit.
Ju nuk duhet të filloni të përfundoni sobën para se të përfundojë sezoni i parë - veshje dekorative mund të dëmtohet gjatë proceseve të tkurrjes.
Funksionimi në mënyra të ndryshme
Në modalitetin e verës, soba e Kuznetsov kthehet nga një sobë për ngrohje dhe gatim në një sobë gatimi. Për ta bërë këtë, mjafton të hapni një valvul të veçantë (quhet valvula verore), pas së cilës gazrat e gripit do të hyjnë drejtpërdrejt në oxhak, duke anashkaluar kapakët. Prandaj, vetëm pianura do t'i nënshtrohet ngrohjes.
Temperatura brenda dhomës së gatimit mund të rregullohet nga një valvul i instaluar në kanalin e shkarkimit që shtrihet prej tij. Duke mbyllur valvulën dhe derën e dhomës, ajo mund të shndërrohet lehtësisht në furrë. Për lehtësinë e përdorimit, raftet për fletët e pjekjes mund të fiksohen në mure.
Nëse duhet ta ngrohni shpejt dhomën ose ta thani, hapni derën e dhomës së gatimit. Në të njëjtën kohë, temperatura në djegës mbetet mjaft e lartë për gatim.
Video: ndërtimi i një furrë me dy zile me duart tuaja - pjesa 1
Video: Pjesa 2
Furra e Kuznetsovit ka më të lartën karakteristikat teknike, por në të njëjtën kohë është mjaft i arritshëm për një master në klasën fillestare. Por prodhuesit me përvojë të sobave duhet të jenë të kujdesshëm - ata shpesh mbivlerësojnë njohuritë e tyre dhe bëjnë diçka në mënyrën e tyre, duke lënë pas dore rekomandimet e shpikësit. Devijime të tilla nuk lejohen - siç u tha, furra Kuznetsov llogaritet me saktësi të lartë dhe duhet të ndërtohet po aq saktë. Ndiqni udhëzimet në artikull dhe do të mbroheni nga gabimet.
Një sobë suedeze është e ngrohtë, shtëpi komode, Ushqim i shijshem. Përparësitë e rëndësishme të sobës: zonë e vogël, konsumi më i ulët i druve të zjarrit, kombinimi i një sobë ngrohëse dhe aftësi gatimi. Ne kemi përgatitur për ju udhëzime hap pas hapi me vizatime dhe porosi që ta palosni me duart tuaja.
Themeli - beton monolit
Materiale
Klasa e betonit B15 (M200) është e përshtatshme për themelin e furrës. Për të përgatitur një beton të tillë, përbërësit merren në proporcionin e mëposhtëm: çimento - 1 pjesë, gur i grimcuar - 4 pjesë, rërë - 2 pjesë.
Çimentoja duhet të merret të paktën M400. Agregati i trashë mund të jetë gur i grimcuar ose zhavorr, madhësia e grimcave të të cilave nuk i kalon 30 mm. Për punime konkrete Rëra me papastërti jo më shumë se 10% është e përshtatshme. Këto përfshijnë argjilën, mikën, origjinën organike dhe grimcat e pluhurit. Papastërtitë në agregatin e trashë duhet të jenë më pak se 2%.
Materialet e nevojshme për themelin mund të llogaritet bazuar në konsumin për 1 m 3 beton të përfunduar:
- Çimento M400 - 325 kg/m3.
- Rërë - 1300 kg/m3.
- Zhavorr (gur i grimcuar) - 1300 kg/m3.
- Ujë - 205 l/m3.
Mjetet
Për të kryer punë konkrete, duhet të keni një mjet me të cilin:
- shtrihu përzierje betoni(lopatë, mistri);
- kompakt (ngacmues, sonda);
- e lëmuar (dërrasë hekurosjeje, mistri, fino, hekur, qoshe).
 1 - dipstick; 2 - ngacmim i ngushtë; 3 - ngacmim i rrumbullakët; 4 - ngatërrim katror; 5 - dërrasë hekurosjeje; 6 - kruese; 7 - gjysmë rende; 8 — dërrasë hekurosjeje
Sekuenca e betonimit
Është shumë e rëndësishme të përcaktoni thellësinë në të cilën duhet të vendosni themelin për sobën. Kjo varet nga aftësia e tokës për t'i rezistuar ngarkesave në të (kapaciteti mbajtës). Ka mjaft toka me kapacitet mbajtës të dobët. Nën ndikimin e ngarkesave, ato mund të ndryshojnë strukturën e tyre origjinale (duke zhytur losin dhe përmbajnë kripëra të tretshme, argjilë të fryrë, me origjinë biologjike, si dhe të ngopur me ujë, duke u rritur në vëllim në dimër).
Kështu, për shembull, për rërat e imta (të balta), rërat me rërë, shkrifët dhe argjilat, në të cilat ujërat nëntokësore ndodhen mbi thellësinë e ngrirjes së tokës, fundi i themelit është caktuar nën këtë nivel. Thellësia e ngrirjes përcaktohet në bazë të rezultateve të vëzhgimeve afatgjata.
 1 - jastëk rërë; 2 - zhavorr; 3 - thellësia e ngrirjes; 4 - themeli monolit; 5 - hidroizolim; 6 — niveli i dyshemesë; 7 - punime me tulla
Ky është rasti nëse shtëpia mund të mos ngrohet në dimër. Nëse e gjithë shtëpia ngrohet periudha e dimrit, atëherë baza e themelit duhet të jetë në një thellësi prej më shumë se 50 cm nga paraqitja e truallit.
Në tokat e dendura me kapacitet të mirë mbajtës, themeli mund të betonohet pa kallep. Pastaj gërmohet një gropë saktësisht sipas madhësisë së themelit. Nëse toka shkërmoqet, formimi është i nevojshëm. Është bërë nga druri halor ose gjetherënës, i cili nuk i nënshtrohet shtrembërimit. Dërrasat merren me një trashësi prej të paktën 19 mm dhe një përmbajtje lagështie jo më shumë se 25%.
Në fund të vrimës nën themel, është bërë një jastëk me trashësi të paktën 15-20 cm me rërë dhe zhavorr, i cili është i ngjeshur.
Kur vendosni përzierjen e betonit, sigurohuni që ta shtypni ose ngjeshni për të lëshuar çdo flluskë ajri që shfaqet në të. Kjo rrit densitetin e betonit, dhe rrjedhimisht forcën.
Kujdesi për betonin e sapo shtruar konsiston në ruajtjen e temperaturës dhe lagështisë së kërkuar. Kjo është mbrojtje nga tharja e shpejtë e sipërfaqes së betonit në mot me erë dhe të nxehtë duke përdorur një lloj mbulese të lagësht (goskë, pëlhurë gomuar, tallash të lagur ose rërë).

Mbrojtja e betonit të freskët nga lagështia e tepërt, tharja dhe ftohja kryhet për një deri në dy javë në përputhje me temperaturën e ajrit të jashtëm. Gjëja më e rëndësishme është që betoni të fitojë të paktën gjysmën e forcës së tij të plotë.
Kallep mund të hiqet vetëm kur të jetë arritur forca e mjaftueshme e betonit (50%). Më shpesh, kjo ndodh jo më herët se 7-14 ditë në temperatura nga +5 në +20 °C. Sa më e lartë të jetë temperatura, aq më shpejt fiton forca.
Hidroizolimi vendoset në majë të betonit të ngurtësuar (2 shtresa materiali për çati). Madhësia e themelit duhet të merret 100 mm më e madhe në çdo skaj të furrës.
Sekuenca e ndërtimit të një furre të tipit suedez
Materiale
Për muratura e sobës ju duhet një tullë që do të përballojë temperaturat e larta. Këto përfshijnë tulla balte të zakonshme (GOST 390-96) dhe tulla zjarrduruese prej balte (GOST 530-2012).
E rëndësishme! Për punën në furrë, përdorimi i tullave silikate, të zbrazëta, të padjegura ose të plasaritura është i papranueshëm.
Në total, për një sobë të tipit suedez, duke përjashtuar tubat, ju nevojiten:
- Tulla balte - 505 copë.
- Tulla të papërshkueshme nga zjarri - 25 copë.
Furra mund të vendoset duke përdorur llaç balte-rërë, ose një llaç të gatshëm rezistent ndaj zjarrit për punën e furrës. Sot, dyqanet ofrojnë disa lloje të zgjidhjeve të tilla.
Një zgjidhje balte-rërë mund të përgatitet bazuar në proporcionin e mëposhtëm për argjilën me përmbajtje të ndryshme yndyre:
- Balta me vaj (2-4% rërë) - 1 pjesë balte: 2,5 pjesë rërë.
- Balta mesatare (15% rërë) - 1 pjesë balte: 1,5 pjesë rërë.
- Balta e dobët (30% rërë) - 1:1.
Për të përgatitur zgjidhjen, balta fillimisht ngjyhet për 24 orë, pastaj rëra i shtohet gradualisht në pjesë, duke e trazuar vazhdimisht derisa të jetë e qetë. Uji shtohet gjithashtu në pjesë. Në fund, duhet të shtoni ujë menjëherë para punës. Zgjidhja e argjilës duhet të rrëshqasë lehtësisht nga lopata, pa u përhapur.
aparate furre
- Dera e ventilatorit (140x140 mm) - 1 pc.
- Dera e zjarrit (210x250 mm) - 1 pc.
- Dera e pastrimit - 5 copë.
- Valvula e portës me vrimë (120x210 mm) - 1 pc.
- Furrë (300x365x450 mm) - 1 pc.
- Pllakë (410x710 mm) - 1 pc.
- Grini - 1 copë.
- Fletë metalike (750x500 mm) - 1 pc.
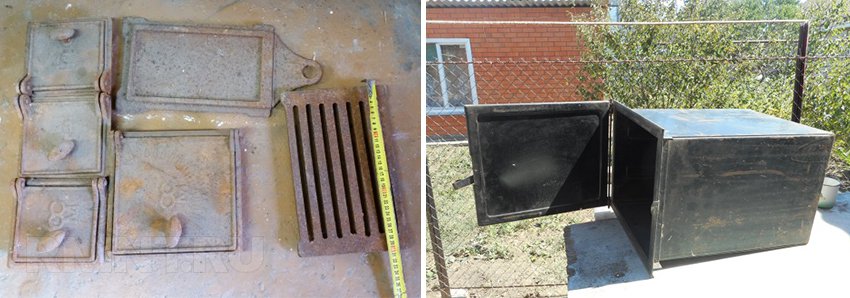
Furra mund të bëhet nga fletë çeliku me saldim. Për mbrojtje, sipërfaqja e jashtme është e veshur me smalt ose llak rezistent ndaj zjarrit.
Vendoset direkt nën kutinë e zjarrit një fletë metalike(750x500 mm) për çimento asbest.
Mjete për vendosjen e një furre
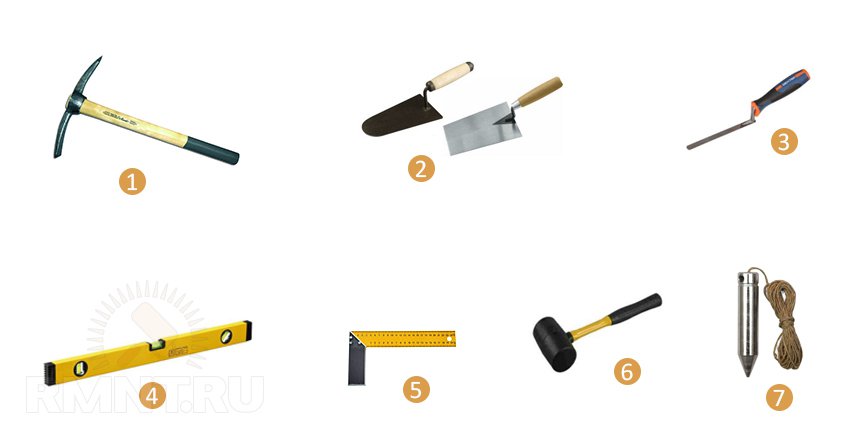 1 - kazmë; 2 - mistria të ndryshme; 3 - bashkim; 4 — niveli; 5 - katror; 6 - çekiç çekiç; 7 - linjë plumbash
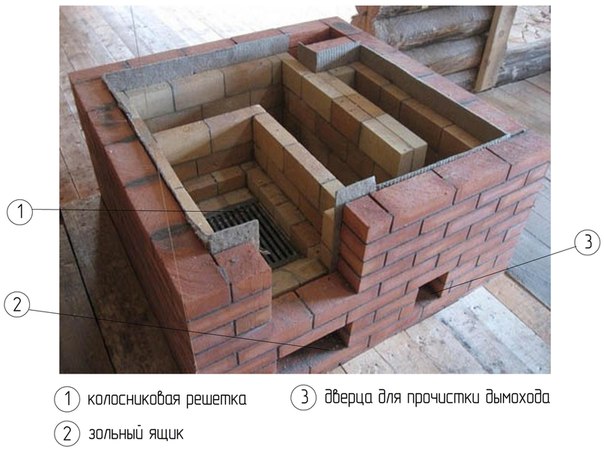
Kutia e zjarrit dhe qarkullimi i tymit (oxhaku) janë pjesët kryesore të trupit të sobës. Karburanti digjet në kutinë e zjarrit. Qarkullimi i tymit rrit sipërfaqen e brendshme të sobës, duke grumbulluar nxehtësinë në masën e saj dhe duke e transferuar atë në dhomën e nxehtë.
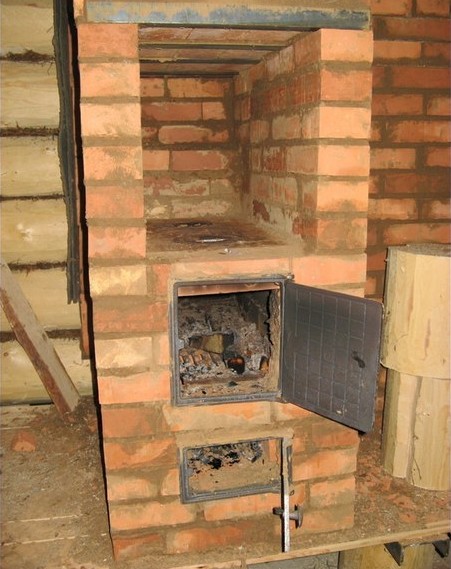
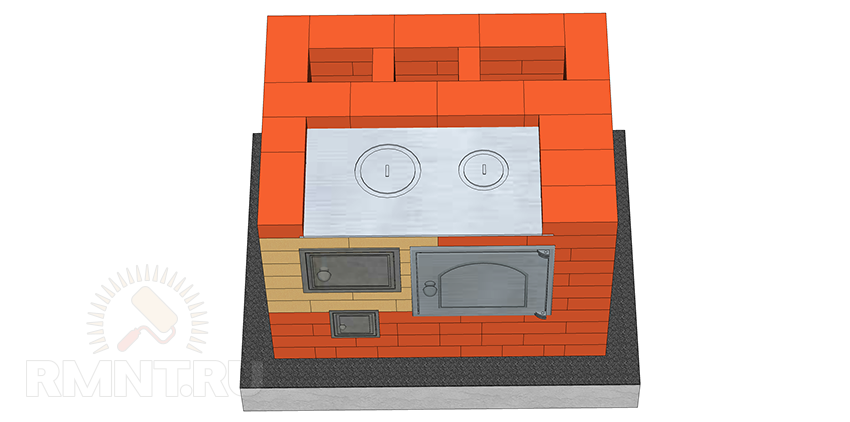
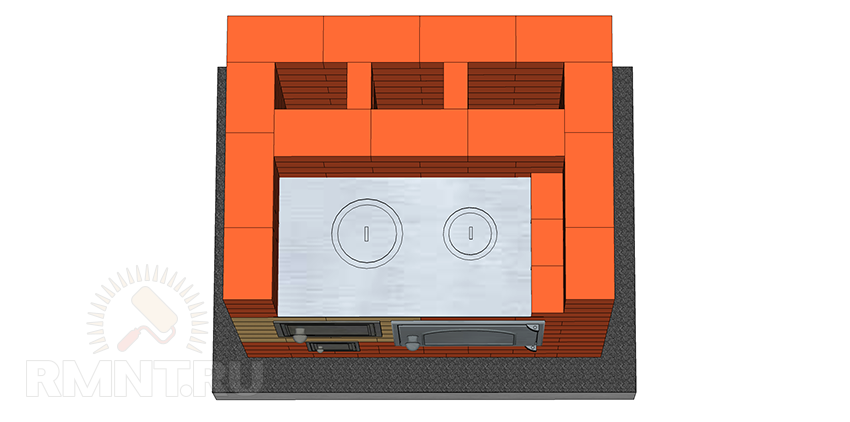
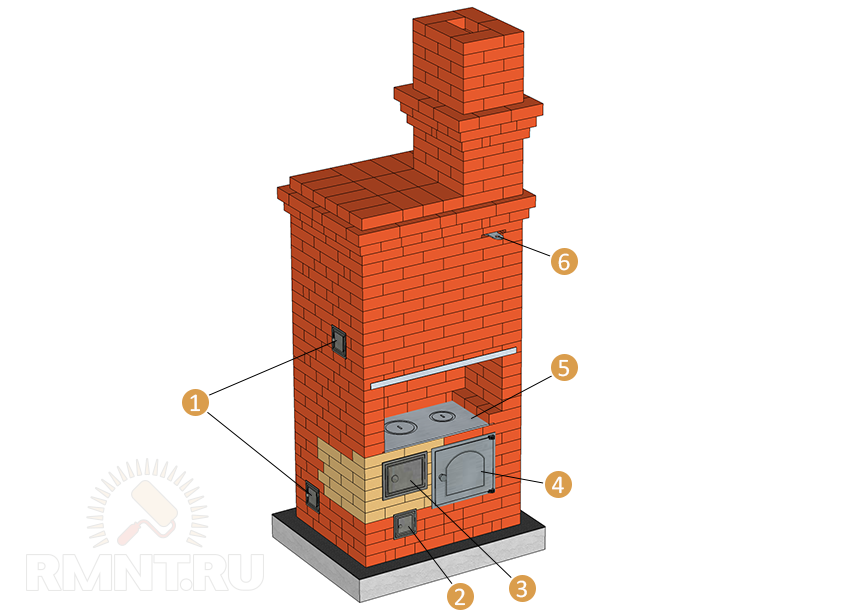 Pamje e jashtme e furrës: 1 - dyer pastrimi; 2 — dera e hirit; 3 - dera me djegie; 4 - furrë; 5 - pianurë; 6 - valvul
Instaluar në vatrën e kutisë së zjarrit hekura për hyrjen e ajrit në zjarr. Për të siguruar një proces normal të djegies, rryma në furre rregullohet nga një pozicion i caktuar i dyerve të djegies dhe hirit. Fuqia e nxehtësisë e sobës në fjalë Shvedka është 3200 kcal/orë. Ai përfshin një dhomë gatimi dhe një furrë.
Fillo puna e furrës e nevojshme vetëm nëse ka një mbulesë mbi vendndodhjen e synuar të furrës, të paktën përkohësisht. Këshillohet që fillimisht të bëni një përzgjedhje tullash për çdo rresht, duke i krehur dhe lidhur të thatë.
Porositë
Para fillimit të muraturës, është e nevojshme të kontrolloni të gjitha dimensionet e themelit dhe të përcaktoni orientimin e furrës, duke përfshirë vendin ku tubi do të kalojë përmes tavanit, si dhe çatisë. Menjëherë para punës, tullat e zakonshme prej balte ngjyhen për 2 minuta, dhe tullat prej balte vetëm shpëlahen.
Rreshtat e parë dhe të dytë janë të vendosura me qepje të fashuara të paktën 1/2 tulla. Për muraturën me tulla të zakonshme balte, kërkohet një bashkim prej më pak se 5 mm. Lejohet në rastin e përdorimit të tullave 3/4 për të fashuar 1/4 e tullave.
E rëndësishme! Muratura duhet të kryhet duke ruajtur vertikalitetin përgjatë vijës së plumbit dhe horizontalitetin përgjatë nivelit të të gjitha shtresave.
Rreshtat e tretë dhe të katërt formojnë dhomën e hirit. Këtu janë instaluar edhe 3 dyer pastrimi. Ato futen me një hendek prej 3-5 mm direkt gjatë punime murature. Hendeku është i mbushur me kordon asbesti. Pjesa e sipërme e dyerve duhet të jetë në nivel me nyjen horizontale të muraturës.
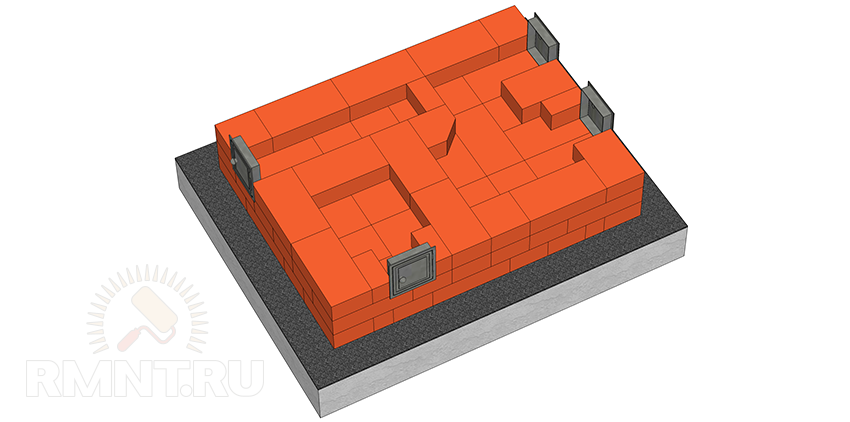

Në rreshtin e pestë, kutia e zjarrit është e shtruar me tulla zjarrduruese, trashësia e shtresës për të cilën nuk duhet të jetë më shumë se 3 mm. Këtu është instaluar edhe një grilë me një hendek prej 3-5 mm. Hapjet e grilave drejtohen përgjatë kutisë së zjarrit. Hendeku është i mbushur me rërë ose hi. Në këtë rresht është instaluar edhe një furrë. Formimi i oxhaqeve fillon në pjesën e pasme të furrës.
E rëndësishme! Nuk lejohet të lidhni tulla zjarrduruese dhe balte, pasi ato kanë shkallë të ndryshme zgjerimi nën ndikimin e temperaturës dhe mund të kontribuojnë në formimin e çarjeve.
Rreshtat e gjashtë, të shtatë, të tetë, të nëntë formojnë dhomën e djegies. Dera e dhomës së djegies është instaluar me një hendek (3-5 mm) të mbushur me kordon azbesti. Teli i vidhosur në derë është futur brenda punime me tulla. Tullat e zjarrit vendosen në buzë midis furrës dhe furrës.

Rreshti i dhjetë përfshin mbulimin e furrës. Ndarja ndërmjet furrës dhe furrës ngrihet me 1-2 cm Më pas vendoset në furrë një shtresë llaçi balte-rërë deri në nivelin e ndarjes. Një cep prej 1000x40x40 mm vendoset në anën e përparme nën pllakë.
Rreshti i njëmbëdhjetë. Pllaka vendoset dhe më pas formohen kanale tymi.
Rreshtat e dymbëdhjetë deri në gjashtëmbëdhjetë. Dhoma e gatimit dhe kanalet e oxhakut formohen, duke marrë parasysh lidhjen e qepjeve.


Rreshtat e shtatëmbëdhjetë, të tetëmbëdhjetë. Për të mbuluar dhomën e gatimit, tulla vendosen në shirita çeliku dhe qoshe. Një tel është vidhosur në to dhe futet në murature.
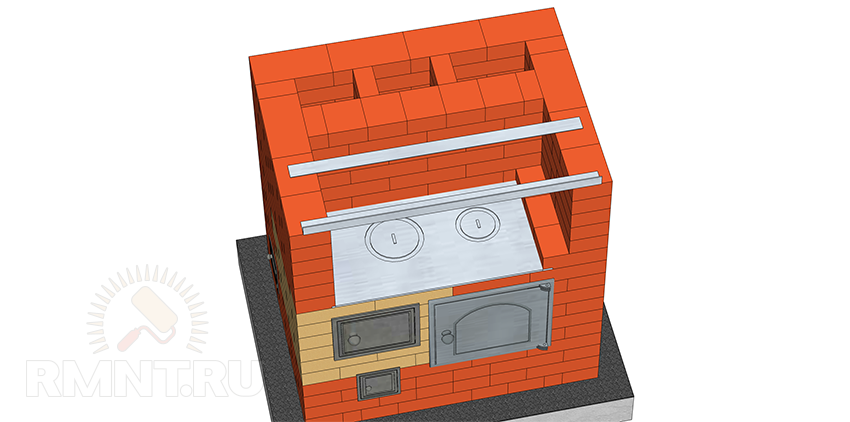
Dy dyer pastrimi janë instaluar në rreshtin e nëntëmbëdhjetë dhe të njëzetë.

Rreshtat e njëzet e një deri në njëzet e tetë formojnë oxhaqe sipas renditjes. Në rreshtin e njëzet e shtatë, një valvul është instaluar gjithashtu me një hendek (3-5 mm) dhe vuloset me një kordon asbesti.
![]()


Në rreshtin e njëzet e nëntë, muratura e sobës zgjerohet me 5 cm për kornizën. Të gjitha kanalet janë të bllokuara, përveç tubit.
Rreshti i tridhjetë sugjeron një zgjerim prej 5 cm të tjera.
Rreshti i tridhjetë e një. Madhësia e furrës zvogëlohet në madhësinë origjinale.

Karakteristikat e shtrimit të tubave
Më pas, vendoset një tub me madhësi pesë tulla. Tre rreshta në tavan, fillon vendosja e pushit të tubit për mbrojtje strukturat prej druri mbulesa nga gazrat e nxehtë. Trashësia e tubit në këtë vend duhet të jetë 1.5 tulla. Ata gjithashtu rrisin trashësinë e tubit kur kalojnë nëpër strukturat e çatisë prej druri. Një kapak metalik është instaluar në krye të tubit. E gjithë pjesa e jashtme e tubit është hedhur duke përdorur llaç murature çimento-rërë.
Lartësia e tubit mbi çati është hedhur sipas diagramit. Për të rritur tërheqjen, lartësia lidhet me distancën nga kreshta e çatisë.
Furra do të mbushë shtëpinë tuaj të dashur me ngrohtësi, rehati dhe mirësi!
Sot, sobat e ngrohjes dhe gatimit janë bërë jashtëzakonisht të njohura - në shumicën e shtëpive private ata ende preferojnë të instalojnë njësi tradicionale të ngrohjes. Vetëm njëqind vjet më parë do të ishte e vështirë të imagjinohej Vilë pa një sobë komode dhe të ngrohtë, të bërë me mjeshtëri dhe efikasitet. Të gjithë, pa përjashtim, i trajtonin me shumë vëmendje dhe përpiqeshin të ftonin vetëm mjeshtrit më të mirë për të bërë punën.

Vetëm njëqind vjet më parë ishte e vështirë të imagjinohej një shtëpi fshati pa një sobë komode dhe të ngrohtë, të bërë me mjeshtëri dhe cilësi të lartë.
Karakteristikat e skemës së porositjes
Rregullimi i secilës prej sobave të ngrohjes dhe gatimit është një skemë specifike me të cilën kushdo që ka vetëm aftësi minimale ndërtimi mund të montojë një njësi ngrohjeje me duart e veta, qoftë një sobë me oxhak apo një Barbecue.
Udhëzime të tilla, të hartuara nga prodhuesit mjeshtër të sobave, do të ndihmojnë në uljen e kostove kohore dhe financiare disa herë, ndërsa efikasiteti i procesit rritet vetëm me vëmendje të kujdesshme ndaj sekuencës së punës.
Rregullimi i furrës

Për të vendosur një sobë suedeze me një oxhak do t'ju duhet: tulla e kuqe, dera e zjarrit, dera e ventilatorit, dera e pastrimit, sobë prej gize, hekura, furra, valvula, qoshet dhe pllakat metalike.
Karakteristikat kryesore të porosisë
Varietetet moderne të modeleve bëjnë të mundur krijimin e një shumëllojshmërie të gjerë sobash, të tilla si një sobë me ngrohje të thjeshtë, një sobë me fireplace, një sobë Barbecue (në këtë version, efekti i Barbecue arrihet duke rregulluar më lart pianurë mbledhës tymi).
Përdorimi i porosive ju lejon të përfitoni kur punoni:
- Kosto e përballueshme e punës. Përdorimi i diagrameve të porosive, të cilat janë përpiluar nga prodhues profesionistë të sobave, ju lejon të kurseni seriozisht në shërbimet e specialistëve. Me ndihmën e tyre, edhe një person i patrajnuar mund të ndërtojë një sobë që funksionon siç duhet me duart e veta në një kohë të shkurtër.
- Një përzgjedhje e madhe e opsioneve të projektimit. Është e mundur të zgjidhni skemat për tradicionale soba për ngrohje, dhe për adhuruesit e specializuar të gatimit, furrës dhe madje edhe Barbecue.
- Diagrame të lehta për t'u kuptuar. Prodhuesit mjeshtër të sobave krijojnë procedura në atë mënyrë që kushdo që dëshiron të krijojë një pajisje të tillë me duart e veta mund t'i kuptojë ato.
Falë porosive është e mundur të përmirësohet cilësia e ndërtimit të furrave, është e mundur pajisja e çdo lloji dhe opsionet e projektimit. Për shembull, kohët e fundit një nga arritjet e industrisë së sobave ka qenë dizenjimi i një furre Barbecue. Barbekju me tulla mund të bëhen më së shumti lloje të ndryshme. Metodat e montimit të tyre me dizajne të ndryshme sobash zgjerojnë ndjeshëm mundësitë e një metode të tillë gatimi si Barbecue. Stufa e ngrohjes mund të bëhet jo vetëm me funksionalitet të lartë, por edhe në madhësi të ndryshme.
Thjeshtësia dhe efikasiteti i metodave për krijimin e furrave duke përdorur porosi kontribuojnë në rritjen e popullaritetit të një pune të tillë. Vizatimet e porosive hartohen në formën e diagrameve dhe me një demonstrim hap pas hapi të fazave të punës. E gjithë kjo është e nevojshme për të përfunduar me një sobë ngrohjeje të plotë që kryen në mënyrë të përsosur detyrat e saj.