Të gjithë ne shpesh e kapim veten duke kërkuar diçka të re në brendësinë e njohur të shtëpisë sonë. Zakonisht shtrihet në sipërfaqe mënyra më e thjeshtë- rirregullimi i mobiljeve. Por jo gjithmonë jep rezultatin e dëshiruar. Dhe pastaj një ide vjen në mendje: ju duhet të ndryshoni vetë mobiljet, dhe jo vendndodhjen e saj në dhomë.
Por sa shpesh mund të përballojmë të hedhim gjërat e vjetra dhe të blejmë të reja? Për më tepër, shumë pjesë të mobiljeve mund të mos jenë brenda buxhetit të familjes.
Ne dimë një mënyrë shumë më ekonomike dhe më të thjeshtë për të ndryshuar dhe rifreskuar brendësinë e shtëpisë tuaj. Kjo është lyerja e mobiljeve të vjetra.
Materialet dhe mjetet e nevojshme
Shpesh mobiljet e dashura të stilit sovjetik bëhen aq mirë sa mund të zgjasin për shumë vite, gjë që nuk mund të thuhet për modelet moderne. Përveç kësaj, orenditë antike të cilësisë së mirë tani janë më në modë se kurrë. Prandaj, lyerja e tij është zgjidhja optimale.
Si të lyeni mobiljet pa zhurmë dhe pluhur dhe të mos e ktheni banesën tuaj në një objekt lyerjeje që mban erë produktesh toksike? Për ta bërë këtë do të na duhet të rezervojmë mjetet e duhura dhe materialeve.
Për punën e pikturës ju nevojiten:
- Një mobilje që ka nevojë për lyerje;
- Shirit maskimi;
- Doreza;
- Bojë;
- Rul dhe furça;
- Tabaka për bojë.
Para se të filloni të lyeni, sipërfaqja e mobiljeve duhet të përgatitet. Kjo kërkon:
- Stuko;
- Rul dhe furça;
- Tabaka për bojë;
- Doreza;
- Syze mbrojtëse;
- Letër zmerile me kokërr të imët;
- Shpatull gome;
- Lëmues ose bllok druri.
Pasi të keni përgatitur më parë gjithçka që ju nevojitet, mund të shkoni në punë. Para se të lyeni mobiljet tuaja, duhet t'i përgatisni ato për të shmangur gabimet e mëtejshme.
Si të përgatisni mobilje për lyerje
Përgatitja e duhur e sipërfaqeve do të sigurojë lyerje me cilësi të lartë që do të shkëlqejë në diell dhe do të jetë e këndshme për syrin.
- Së pari, inspektoni me kujdes mobiljet që do të rivendosni për dëmtime të vogla. Nëse është e nevojshme, riparoni ose zëvendësoni mekanizmat e instaluar: . Grimcat e eksfoluara të llakut të vjetër duhet të hiqen. Hiqni dyert, nxirrni sirtarët dhe zhvidhosni dorezat dhe bravat nga jashtë.
- Lëmoni sipërfaqen (me shkëlqim dhe mat) me letër zmerile me kokërr të imët. Është kjo lloj letre zmerile që nuk do të lërë gërvishtje të thella që do të jetë e vështirë të mbulohen me abetare ose bojë. Për lehtësi më të madhe, mund të përdorni një mulli.
- Së pari ju duhet të mbuloni sipërfaqen e mobiljeve me një abetare, dhe vetëm atëherë, duke përdorur stuko, vulosni zonat problematike. Kjo do të sigurojë ngjitje të mirë të materialeve. Lyejeni sipërfaqen me vodka ose alkool - ato nuk lënë një film të rrëshqitshëm.
- Aplikojeni në mënyrë që të ngopet mirë çdo dëmtim të vogël, gërvishtje, çarje. Për këtë është më mirë të përdorni një furçë. Prisni derisa të thahet plotësisht.
- Duke përdorur një shpatull gome, aplikoni stuko në defektet e mobiljeve dhe mbyllni plotësisht.
- Pasi stuko të jetë tharë, lëmoni me rërë zonat ku e keni aplikuar. Kjo duhet të bëhet duke përdorur një makinë zmerile ose letër zmerile me grimca të imta të shtrirë mbi një bllok. Varësisht se sa të thella ishin defektet dhe çfarë shtrese stuko keni aplikuar, ky operacion mund të duhet të përsëritet disa herë.
- Kur këto punime të përfundojnë, hiqni pluhurin në sipërfaqe dhe lyejeni.
Këshillë: kur blini një abetare, përpiquni të zgjidhni një nuancë sa më afër ngjyrës që dëshironi të jenë mobiljet tuaja. Kjo jo vetëm që do të sigurojë një ngjyrë të barabartë, por do të kursejë edhe bojë.
Çfarë bojë për të pikturuar mobilje?
Verniqet që përdoren aktualisht për lyerje janë të llojeve të mëposhtme:
- Alkooli;
- Epoksi;
- Alkid;
- Nitrocelulozë;
- Me vaj;
- Poliuretani.
Llak, ndryshe nga boja, krijon një sipërfaqe me fortësi dhe qëndrueshmëri më të lartë. Por nëse jeni duke vendosur se me çfarë bojë do të lyeni mobiljet tuaja, atëherë bëni një zgjedhje nga gama e mëposhtme.
- Bojërat akrilike përdoren tradicionalisht në mesin e bojrave të mobiljeve. Ato janë më të qëndrueshme se të tjerët, thahen shpejt, janë të lehta për t'u përdorur dhe janë të përshtatshme për kuzhinë ose dhomën e fëmijëve. Përveç kësaj, ngjyra akrilike kanë një erë më pak të theksuar dhe hollohen lehtësisht me ujë, gjë që kursen materialin.
- Bojërat akrilike në kanaçe me spërkatje do ta thjeshtojnë dhe lehtësojnë shumë punën tuaj. Kjo bojë aplikohet në sipërfaqe lehtësisht dhe në mënyrë të barabartë dhe thahet më shpejt se boja konvencionale e aplikuar me furçë ose rul.
- Smalt bojëra llak, aplikuar në dru, i japin sipërfaqes shkëlqim dhe shkëlqim. Nëse dëshironi një efekt mat, atëherë bojërat e vajit do t'ju ndihmojnë për këtë.
- Bojërat transparente do t'ju ndihmojnë të ruani pamjen natyrale. Gama e gamës është shumë e madhe, dhe konsistenca ju lejon të përzieni nuanca të ndryshme me njëra-tjetrën, në mënyrë që të keni gjithmonë një zgjedhje në çfarë ngjyre të lyeni mobiljet.
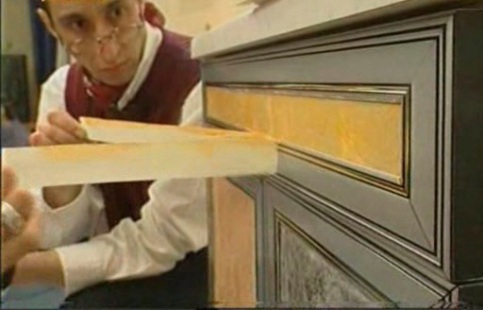
Lyerja e mobiljeve vetë (duke përdorur shembullin e një dollapi kuzhine prej druri)
Ju ndoshta keni mobilje në shtëpi që dëshironi të përditësoni. Më shpesh kjo është - kabinete kuzhine, pasi ato vuajnë veçanërisht nga lagështia dhe stresi mekanik.
Le të përpiqemi të pikturojmë këtë kabinet kuzhine si shembull. me duart e mia dhe do të siguroheni të pikturoni mobilje të vjetra Në fakt është mjaft e lehtë për t'u bërë në shtëpi.
Ju lutemi vini re: nëse blini dollapë kuzhine pa përfunduar, atëherë ka shumë të ngjarë që do të jenë mobilje thupër. Ky dru ka një strukturë të grimcuar dhe njolla duket e mrekullueshme mbi të. Për shembull, duke aplikuar njollë vishnje, mund të arrini lehtësisht një ngjyrë vishnje.
Faza 1: lëmoni drurin. Kjo është një fazë e rëndësishme e përgatitjes. Përdorni letër zmerile 120 grish dhe lëmoni lehtë drurin në drejtim të kokrrës për të shmangur gërvishtjet e sipërfaqes. Duke përdorur letër zmerile 220 grila, lëmoni përsëri për të hequr çdo gërvishtje të vogël dhe për ta bërë sipërfaqen të lëmuar.
Faza 2: aplikoni impregnim në dru. Para se ta bëni këtë, fshijeni plotësisht pluhurin nga sipërfaqja. Shtresa e aplikuar e impregnimit vepron si ngjitës dhe promovon ngjyrosje më uniforme. Lëreni impregnimin të thahet plotësisht.
Faza 3: aplikoni njollën. Është më mirë ta aplikoni me një furçë, duke përdorur lëvizje rrethore, në mënyrë që produkti të fërkohet në strukturën e drurit. Bëni kalimin përfundimtar në drejtim të kokrrës së drurit për të siguruar një përfundim të barabartë.
Si të pikturojmë mobiljet e vjetra?
Ndoshta ju kanë mbetur shumë mobilje të vjetra që nuk do t'i hidhnit dhe nuk keni ku t'i vendosni. Ai mbledh pluhur në shtëpinë e vendit, në garazh, në hambar. Dhe shumë pjesë të mobiljeve të tilla janë shumë të rehatshme, të lehta dhe material i lirë. Jepini atyre jete e re Ju thjesht mund ta lyeni me një ngjyrë të ndryshme dhe të rifreskoni veshjen. Përveç kësaj, rindërtimi me lyerje do të forcojë ndjeshëm sipërfaqen, e cila është e ndjeshme ndaj dëmtimeve të ndryshme për shkak të karakteristikave të saj teknike.
Para se të pikturoni mobiljet e chipboard, duhet të përgatitet me kujdes. Ka dy mënyra për të pastruar sipërfaqen:
- Metoda kimike. Ai përfshin përdorimin e specialeve kimikatet për të hequr veshjen e vjetër. Ju duhet të zgjidhni një produkt të tillë në varësi të llojit të veshjes së mëparshme. Sigurohuni që të përdorni doreza kur punoni.
- Metoda termike. Në këtë rast, trajtimi kryhet me ajër të nxehtë ose me avull. Për ta bërë këtë do t'ju duhet një tharëse flokësh. Drejtojeni në sipërfaqe dhe mbajeni derisa shtresa e bojës ose llakut të zbutet në mënyrë që të hiqet lehtësisht me një kruese.
Pas pastrimit, sipërfaqja duhet të vendoset dhe lëmohet me rërë.
Mënyra më e lehtë për të lyer mobiljet e vjetra të chipboard është përdorimi i kanaçeve me spërkatje. Do ta përfundoni më shpejt, dhe shtresa në sipërfaqe do të jetë e njëtrajtshme dhe e lëmuar. Bojërat me vaj ose alkid mund të jenë gjithashtu një opsion i shkëlqyer.
Këshillë: nëse përdorni furça kur lyeni mobiljet, është më mirë të blini të reja. Kushtojini vëmendje sa fort mbahen qimet. Nëse qimet fillojnë të bien gjatë punës, kjo do të ndikojë shumë keq në cilësinë e veshjes.
Zgjidhje interesante të brendshme (çfarë ngjyre për të pikturuar mobiljet)
Siç e dini, mobiljet e vjetra pikturohen jo vetëm për ta përditësuar, por edhe për t'u përshtatur me brendësinë. Tendencat e modës në dizajnin e shtëpisë mund të shkojnë mirë edhe me një mur të vjetër sovjetik nëse punoni pak në të.
Mjafton të rilyeni një mur të tillë, duke përdorur udhëzuesin në artikullin tonë dhe të luani me rregullimin e elementeve të tij.
Gjëja më e rëndësishme është të vendosni paraprakisht se në çfarë stili do të jetë. Dhe madje edhe muri klasik rumun i viteve '80, i mërzitshëm dhe jo i modës, mund të shndërrohet në një pjesë shumënivelëshe, plotësisht funksionale të dhomës, dhe jo vetëm në një mobilje.
Në fotot e mëposhtme mund të shihni shembuj se si mund të organizoni një mur të vjetër që të përputhet me lëvizjet e reja në modë në dizajn. Vini re se si ngjyra e re mobiljet dhe pajisjet e tyre janë në harmoni me ngjyrën e mureve në dhomë.
Këtu shihni një mur të vjetër që është rilyer me një ngjyrë tjetër:
Dhe këtu janë zgjidhjet se si të riorganizoni elementët e murit:
Këto foto do t'ju ndihmojnë të vendosni se si dëshironi të duken mobiljet tuaja të përditësuara.
Lyerja e mobiljeve, si çdo punë, ka sekretet e saj. Ata jo vetëm që do t'ju ndihmojnë të kaloni procesin më shpejt, por gjithashtu do të kursejnë para dhe do të sigurojnë ekzekutim të përsosur.
- Zgjidhni materialet (abetare, stuko, llak, bojë) nga një prodhues. Në këtë rast, ato do të garantohen të jenë të pajtueshme me njëri-tjetrin. Më shpesh, prodhuesi e zhvillon atë në përputhje me kushtet e funksionimit. Kjo do ta bëjë më të lehtë për ju që të zgjidhni materialin optimal.
- Mos kini frikë të luani me skema e ngjyrave. Ngjyrat e zgjedhura në mënyrë korrekte do të ndihmojnë në zgjerimin vizual të hapësirës. Kontrasti midis ngjyrave të mobiljeve dhe mureve do të krijojë një stil unik në dhomë në çdo drejtim.
- Para fillimit të punës, sigurohuni që të grumbulloni një rul dhe disa furça me trashësi të ndryshme. Përdorimi i një rul është më i përshtatshëm për pikturimin e sipërfaqeve të gjera, dhe furçat do të nevojiten për lyerjen e skajeve të pjesëve të mobiljeve dhe aksesorëve të përfundimit.
- Përdorni. Do t'ju ndihmojë të mbroni sipërfaqet tashmë të lyera dhe të thata nga boja. Nuk është shumë i përshtatshëm për të përdorur një tretës në raste të tilla - do të dëmtojë shtresën e bojës. Shiriti maskues do t'ju shpëtojë nga gabime të tilla.
- Në punimet e pikturës përdorni një maskë respirator ose ajroseni dhomën tërësisht! Edhe pse shumica e bojrave dhe llaqeve moderne janë jo toksike dhe nuk lëshojnë erëra të forta, kujdesi nuk është kurrë i tepërt.
Video rreth lyerjes së mobiljeve
Shpresojmë që ky artikull të jetë i dobishëm për ju kur vendosni të përditësoni mobiljet tuaja si kjo. në një mënyrë të thjeshtë si piktura. Siç mund ta shihni, në këtë mënyrë ju mund të transformoni plotësisht të gjithë shtëpinë, dhe jo vetëm një dollap apo mur.
Nëse keni ndonjë pyetje gjatë leximit, ju lutemi pyesni ato në komente. Ne do të jemi të lumtur t'ju përgjigjemi. Me siguri shumë nga lexuesit tanë kanë përvojë në një punë të tillë. Ndani me ne, na tregoni për veçoritë e procesit, çfarë vështirësish keni hasur dhe si i keni zgjidhur ato. Fat i mirë në punën tuaj dhe rehati në shtëpinë tuaj!
Chipboard sot është një nga materialet më të zakonshme në ndërtim dhe përfundim. Ajo përbën bazën e pjesëve të mobiljeve që ndonjëherë dëshironi t'i përditësoni. Zgjidhje e shkëlqyer Kjo është ajo për të cilën është ngjyrosja. Por së pari ju duhet të zgjidhni përbërjen e duhur dhe të mësoni se si ta aplikoni atë.
Zgjedhja e bojës dhe llojet e saj për chipboard
Nëse jeni përballur me pyetjen se si të pikturoni chipboard, atëherë duhet të kuptoni varietetet e përzierjeve të tilla. Ndër të tjera prodhuesit modernë Ato ofrojnë ngjyra akrilike, kompozime alkide dhe përzierje vaji. Ju mund të zgjidhni bojë në një kanaçe ose një përbërje bojë dhe llak që mund të aplikohet duke përdorur një pistoletë llak. Mjetet kryesore të përdorura janë furçat dhe rulat.
Pas lyerjes, një shtresë llak mund të aplikohet në sipërfaqe, e cila do të rrisë rezistencën e materialit ndaj dëmtimeve mekanike. Shumë shpesh, ekspertët këshillojnë të zgjidhni bojëra akrilike mbi të tjerët. Kjo për faktin se ato nuk kanë një erë të pakëndshme, janë me bazë uji dhe puna me përzierje të tilla është mjaft e thjeshtë.
Pas aplikimit, bojë akrilike thahet mjaft shpejt. Puna mund të kryhet direkt në apartament, gjë që nuk do të sjellë nevojën për të liruar dhomën, sepse nuk do të ketë aromë të pakëndshme. Meqenëse kjo përzierje është bërë në bazë uji, mund të hollohet me ujë nëse masa rezulton të jetë shumë e trashë. Puna me bojë është e lehtë, sepse goditjet e pasakta dhe rezultatet e lëvizjeve të pasakta mund të hiqen me një leckë të njomur në ujë.

Për të marrë veshjen më cilësore, para fillimit të lyerjes është e nevojshme që sipërfaqja të lyhet me një përbërje akrilike. Nëse pjesët e mobiljeve kanë elemente metalike dhe aksesorët që do të përdoren nga zjarr i hapur, atëherë duhet të lyhet me një bojë speciale kundër zjarrit për metal.
Nëse keni vendosur tashmë se si të pikturoni chipboard, atëherë duhet të zgjidhni një mjet. NË vende të vështira për t'u arritur Ah, është më mirë të trajtoni sipërfaqen me një furçë. Mjet për pikturë, qoftë rul apo furçë, duhet të projektohet për të punuar me ngjyra akrilike.

Cilësia e veshjes do të varet nga cilësia e mjetit të zgjedhur, kështu që nuk duhet të kurseni. Gjatë procesit, është e nevojshme të shpëlani rrotullat dhe furçat herë pas here, pa lejuar që materiali të thahet. sipërfaqe pune. Rekomandohet të blini paraprakisht disa furça me gjerësi të ndryshme, pasi ato mund të nevojiten për të trajtuar zona të caktuara.
Nuk është e mjaftueshme të dini se me çfarë bojë të pikturoni chipboard. Kjo është vetëm një pjesë e suksesit. Është gjithashtu e rëndësishme që sipërfaqja të përgatitet mirë. Për ta bërë këtë, është e domosdoshme riparimi i çarjeve që shfaqen shpesh në pjesët e mobiljeve të bëra nga chipboard. Kjo lejon që lagështia të hyjë në strukturë, duke bërë që materiali të fillojë të deformohet.
Për të kryer punën, duhet të mbushni shiringën me zam PVA dhe të vendosni gjilpërën. Hendeku midis çarjeve duhet të mbushet me përbërjen. Një kapëse është ngjitur më pas në aeroplan. Lihet një ose dy ditë. Pas kësaj, puna restauruese mund të vazhdojë.

Ju gjithashtu mund të shpëtoni nga çarjet duke përdorur stuko. Përzierja mund të aplikohet me një shpatull në 2 shtresa. E para shpërndahet në sipërfaqe në mënyrë sa më të barabartë dhe lihet derisa përbërja të thahet. Pas kësaj aplikohet një shtresë e dytë stuko.
Teknologjia e punës: priming
Përgjigja në pyetjen nëse chipboard mund të pikturohet është një "po". Para fillimit të punës për aplikimin e bojës, është e nevojshme të përgatitet sipërfaqja, e cila është një hap mjaft i rëndësishëm. Një rul i hollë është i përsosur për këtë. Pasi të jetë aplikuar abetarja, mobiljet ose materiali i chipboard duhet të lihen derisa të thahet.
Punë përgatitore
Nëse doni të dini se si të pikturoni chipboard me duart tuaja, atëherë duhet të njiheni me algoritmin për kryerjen e punës. Ai përfshin përgatitjen dhe aplikimin e mëvonshëm të veshjes. Në fazën e parë, është e nevojshme të hiqni nga sipërfaqja veshjet e vjetra si llaqet dhe bojërat. Për këtë duhet të përdoret letër zmerile. Lëkura duhet të ketë një kokërr të madhe dhe duhet të zhvendoset përgjatë kokrrës.

Më pas, duke përdorur një furçë të sheshtë, hiqni çdo pluhur të mbetur nga sipërfaqja. Në ato vende ku letra zmerile nuk ka arritur, është e nevojshme të trajtohet me letër zmerile me kokërr të imët. Pluhuri hiqet me të njëjtën furçë. Pas përfundimit të lëmimit, dhoma duhet të pastrohet. Të gjitha pjesët e sipërfaqes fshihen me një leckë. Mbeturinat nuk duhet të ngjiten në sipërfaqen e freskët, kështu që dhoma duhet të pastrohet tërësisht.
Masa shtesë për heqjen e veshjeve të vjetra
Nëse keni vendosur tashmë se si të pikturoni chipboard, është e rëndësishme të mendoni gjithashtu se si të përgatitni siç duhet sipërfaqen. Nga të vjetrat veshje dekorative Mund ta shpëtoni duke përdorur metoda kimike ose termike.
Metoda e parë përfshin trajtimin e chipboard me heqës. Ju mund të zgjidhni njërën prej tyre, duke marrë parasysh përbërjen e bojës së vjetër. Është e rëndësishme të respektoni kushtet e përdorimit për të shmangur telashet. në lidhje me metodë termike, atëherë përfshin përdorimin e avullit ose ajrit të nxehtë. Për një punë të tillë do t'ju duhet një tharëse flokësh dhe kruese; këto të fundit mund të zëvendësohen me shpatulla.

Rrjedha e ajrit të nxehtë duhet të drejtohet drejt sipërfaqes. Pasi boja të jetë zbutur, ajo mund të hiqet lehtësisht me një kruese. Është e rëndësishme të pajtoheni regjimi i temperaturës në mënyrë që të mos prishet chipboard. Për më tepër, sipërfaqja mund të vendoset dhe lëmohet me rërë. Kjo do ta shpëtojë produktin nga gërvishtjet dhe defektet që do të jenë të dukshme nën një shtresë bojë të freskët.
Përpara se të lyeni kartonin e vjetër të chip-it, mund ta lyeni dhe ta lyeni bazën. Për ta bërë këtë, mund të përdorni stuko elastike bazë akrilike. Kjo do të mbrojë produktin nga çarjet. Stuko aplikohet me një shpatull. Ju duhet të përpiqeni të krijoni një shtresë të barabartë. Pasi të jetë tharë përbërja, materiali përpunohet me letër lëmuese të grimcuar. Produkti lyhet me rërë derisa të hiqet vrazhdësia.
Procesi i ngjyrosjes
Nëse, duke menduar për pyetjen se si të pikturoni chipboard, vendosni të zgjidhni bojë akrilike, është e rëndësishme të kontrolloni përpara se të filloni nëse ajo ka konsistencën e kërkuar. Masa nuk duhet të jetë shumë e trashë apo e lëngshme. Ju mund të zgjidhni vetë numrin e shtresave. Pasi bojë të jetë tharë, mos nxitoni të montoni strukturën. Së pari duhet të llakohet. Zbatohet në sipërfaqe duke përdorur lëvizje stampimi duke përdorur një sfungjer. Për të arritur një efekt me shkëlqim, është e nevojshme të aplikoni llakun në dy ose tre shtresa. Pas përfundimit të procedurës së llakimit dhe tharjes së llakut, mobiljet mund të montohen.
Nëse dëshironi të lyeni mobiljet e chipboard me duart tuaja, duhet të pastroni sipërfaqen dhe ta degresoni atë. Duke përdorur letër zmerile, materiali zbutet në mënyrë që të mbeten gërvishtjet. Ato do t'ju lejojnë të arrini ngjitjen më të mirë të abetares në sipërfaqe. Abetarja mund të jetë edhe abetare automobilistike, e destinuar për parakolp.
Në fazën tjetër, mund të aplikoni një abetare akrilike. Sipërfaqja lyhet me rul ose furçë në disa shtresa, por nuk duhet të jetë më pak se dy. Shuma do të varet nga rezultati i dëshiruar. Disa njerëz preferojnë të shohin një fund të tejdukshëm, ndërsa të tjerët duan një ngjyrë të pasur dhe të dendur. Nëse pas aplikimit të shtresës së parë shihni pabarazi, atëherë lëmoni përsëri sipërfaqen me letër zmerile me kokërr të imët, pas së cilës mund të aplikoni bojë në disa shtresa.
Para se të lyeni një kabinet me pllaka chip, ka disa ndërlikime me të cilat duhet të njiheni. Për shembull, rekomandohet të trajtoni produktin përpara se të pikturoheni në mënyrë që zamja në tallash të mos avullojë substanca të dëmshme dhe sipërfaqja të ndalojë thithjen e lagështirës. Ky efekt mund të arrihet me impregnim depërtim i thellë. Mund të përdorni edhe llak NC, por preferohet impregnimi pasi është i padëmshëm.
Para llakimit, materiali trajtohet me impregnim me depërtim të thellë. Për të theksuar strukturën e drurit, mund të aplikoni pigment alkid ose patina angleze. Këto formulime janë krijuar për të theksuar strukturën.
Për të marrë një sipërfaqe të lëmuar pas lyerjes, duhet të përdorni një rul me gjumë të shkurtër, sepse flok te gjata do të lërë një model me teksturë. Me këtë mjet mund të arrini një efekt të veçantë. Tani ju e dini se si të pikturoni chipboard në shtëpi. Por duhet të keni parasysh edhe se çfarë ngjyre ka mobilia. Nëse është e errët, atëherë është më mirë të aplikoni përbërjen e bojës dhe llakut në dy shtresa dhe të përdorni një abetare të trashë, përndryshe hije e errët do të shfaqet përmes një shtrese bojë të freskët.
Përdorimi i ngjyrave të ndryshme gjatë lyerjes
Pas punë përgatitore mund të filloni të pikturoni. Duhet të ketë disa shtresa në mënyrë që struktura e aeroplanit të mos jetë e dukshme. Së pari, përdorni bojë që është një nuancë më e lehtë se ngjyra e zgjedhur. Pastaj bëhet puna me hijen kryesore. Furça duhet të zhvendoset në një drejtim në mënyrë që bojë të shpërndahet në mënyrë të barabartë. Nëse lyerja kryhet me disa ngjyra, rekomandohet përdorimi i shiritit maskues, i cili ngjitet në skajet në mënyrë që bojërat të mos përzihen.
Është e rëndësishme të përcaktohet saktë koha që do të jetë e mjaftueshme për tharjen e plotë të bojës. Kjo do të zgjasë rreth 2-3 ditë. Mos përdorni chipboard të palyer, pasi mund të lëshojë substanca të dëmshme gjatë punës.
Së fundi
Nëse keni frikë se një shtresë pluhuri do të jetë e dukshme në sipërfaqe pas lyerjes, atëherë është më mirë të përdorni llak NC, i cili aplikohet në dy shtresa. Por nëse mobiljet tashmë kanë një shtresë, atëherë zgjidhje ideale do të bëhet llak vaji PF-283. Nëse dëshironi t'i jepni veshjes një hije të caktuar, atëherë është mirë të përdorni llak alkid të lyer, i cili ofrohet për shitje në një larmi të gjerë. Për të marrë një efekt me shkëlqim, rekomandohet përdorimi i llakut të jahteve; me të, mobiljet do të duken të përsosura.
Nuk është gjithmonë e mundur të zëvendësoni mobiljet e vjetruara me të reja, ose të zëvendësoni një dysheme të mprehtë dhe të konsumuar nga chipboard me parket ose laminat të shtrenjtë. Një mënyrë për të rivendosur një shtresë të vjetër është të pikturoni chipboard. Një detyrë kaq e thjeshtë ka edhe grackat e saj, kështu që ju duhet të dini se si të përgatisni siç duhet sipërfaqen dhe të aplikoni bojë dhe llak. Pajtueshmëria me teknologjinë do t'ju lejojë të bëni punën në mënyrë efikase dhe të bukur, dhe veshja do të jetë rezistente ndaj gërryerjes, gërvishtjeve dhe delaminimit.
Përzgjedhja e materialeve dhe mjeteve për lyerjen e mobiljeve të chipboard
Nëse vendosni të rilyeni vetë mobiljet e vjetra të chipboard, filloni me gjënë kryesore - planifikim të kujdesshëm. Mendoni për imazhin tuaj të ardhshëm deri në detajet më të vogla. Çfarë saktësisht dëshironi të shihni: një sipërfaqe me shkëlqim si pasqyrë, por monokromatike ngjyra të ndezura ylber, patina mat me shumëfish hije pastel, teknika speciale (decoupage dhe të tjera) ose ngjyrosje e thjeshtë nën lisin e njollosur, dru tik ose wenge. A keni nevojë të zëvendësoni pajisje ose pjesë? Kontrolloni përputhshmërinë e toneve të zgjedhura duke përdorur rrotën e ngjyrave të stilistit.
Faza tjetër është zgjedhja e materialeve. Në varësi të projektit do t'ju duhet:
- Mjetet: furça të sheshta të gjera dhe të ngushta, rula me shkumë gome dhe veluri me grumbull të shkurtër, shirit maskues, kaçavida, letër zmerile të trashë dhe të imët, tabaka për bojë, ngjitës universal, shpatull, tharëse flokësh.
- Kimikatet e ndërtimit: stuko druri akrilik, tretës, heqja e të vjetrës veshje me bojë.
- LMB: abetare ngjitëse për dru dhe chipboard, bojë mobiljesh akrilike ose alkide, pasta ngjyrosëse, impregnim ngjyrues dhe llak.
- Materiale ndihmëse: lecka të buta, doreza, pajisje të reja.
Abetarja jo vetëm që zvogëlon konsumin e bojës (Lakra GF-021), por edhe nivelon sipërfaqen, e forcon atë (Helios Tessarol, Dufatex-Grund, Dyostar), dhe disa përmbajnë aditivë antiseptikë (Belinka Base).
Për të rilyer mobiljet, nuk mjafton të shkoni në dyqan dhe të merrni bojën e parë buxhetore që hasni. Duhet të zgjidhni me kujdes, sepse fasada e përditësuar duhet të zgjasë të paktën 5-7 vjet. Prandaj, është më mirë të shmangni PF-115 të lirë të prodhimit të panjohur me një përmbajtje të lartë plumbi - është e lehtë të helmoheni, por e vështirë për t'u rikuperuar. Formulimet e vajitËshtë më mirë të merret nga prodhuesit e besuar: ngjyra Raztsvet, Yaroslavl, Tex, Dyo, Tikkurila, Dulux. Ju mund të blini smalte dhe llaqe mobiljesh të testuara me kohë nga Galamix, Raduga, Novbytkhim.
E njëjta gjë vlen edhe për smaltet akrilike (me bazë uji) dhe alkid, por këtu zgjedhja zgjerohet për të përfshirë aerosolet. Këto të fundit janë shumë të përshtatshme për aplikim në veshjet e laminuara, pasi ato ofrojnë një shtresë të përkryer të lëmuar pa pika.
Bojrat akrilike me bazë uji janë gjithashtu të mira, sepse ato mund të hollohen dhe lahen me ujë derisa të thahen, dhe të lyhen me çdo ngjyrë duke përdorur pigmente.
Një pikë tjetër - llogaritja sasia e kërkuar bojra. Para blerjes, duhet të matni sipërfaqen e dërrasës së chipit që duhet të pikturohet dhe ta shumëzoni atë me numrin e vlerësuar të shtresave. Mesatarisht, konsumi është 1 litër për 5-6 metra katrorë. m.

Procesi i zgjedhjes së ngjyrës dhe llakut është i thjeshtë. Ato gjithashtu ndryshojnë në bazë. Fortësia e veshjes varet nga përmbajtja e polimerit të poliuretanit, kështu që është më mirë të zgjidhni llaqe mobiljesh alkid-uretani ose të posaçme me bazë uji - ato përmbajnë aditivë shtesë që ofrojnë rezistencë ndaj goditjes dhe rezistencë ndaj gërryerjes (Lakra, Alpina, Pinotex, Dyo , Tikkurila). Përzierjet e ngjyrosjes duhet të kenë përshkueshmëri të mirë dhe të japin një ton uniform pa njolla ose vija të bardha (Belinka, Practic, Helios).
Shpesh, për ngjyrosjen e bërë vetë, përdorni vaj tharjeje ose një njollë të thjeshtë për produktet prej druri.
Përgatitja e sipërfaqeve të mobiljeve të bëra nga chipboard dhe chipboard të laminuara
Procesi i përgatitjes së fasadës përfshin hapat e mëposhtëm:
- Demontimi- Zhvidhosni të gjitha pajisjet, nxirrni ose hiqni të gjithë sirtarët, shtesat dhe elementët e tjerë;
- Heqja e një shtrese të vjetër(e laminuar ose e lyer): letër zmerile (së pari me rërë me lëvizje të përafërt, fshirëse, të gjera, më pas nivelohet me letër zmerile me kokërr të imët), pastruese gërryese sipas udhëzimeve (Pufas, Dufa) ose ngroheni me kujdes me tharëse flokësh dhe hiqeni me një shpatull. ose kruese;
- Degresimi dhe pastrimi. Fillimisht mund të pastroni pluhurin me një furçë të gjerë të sheshtë, më pas përdorni një leckë të lagur me ujë ose tretës për të pastruar sipërfaqen e fasadës nga mbeturinat dhe mbetjet e veshjes së vjetër;
- Radhitje: Mbushni të gjitha çarjet dhe vrimat me stuko akrilike. Këshillohet që të aplikoni 1 shtresë primer përpara se të filloni të bëni më mirë pabarazitë. Më pas, për butësi të përsosur, kaloni sërish me letër lëmuese dhe fshijeni me një leckë të lagur;
- Mbushje: Aplikoni 1-2 shtresa primer dhe lëreni të thahet.
Në fund, sigurohuni që të fshini mbeturinat nga dhoma ku po kryhet rinovimi, fshijini të gjitha sipërfaqet (tavolina, karrige, dysheme, pragjet e dritareve, etj.) në mënyrë që pluhuri dhe mbetjet e veshjeve të hequra të mos njollosen aksidentalisht. fasada e përgatitur.
Teknologjia e aplikimit të bojës dhe llakut në mobilje
Pra, mund të filloni të lyeni mobiljet. Së pari, duhet të kontrolloni datën e skadencës së materialit të bojës. Nëse smalti (llak) është trashur ose tharë, duhet ta holloni me ujë ose një tretës sipas udhëzimeve dhe ta përzieni plotësisht.
Aplikoni shtresën e parë (në sfond) të smaltit me një rul ose furçë dhe lëreni të thahet për 24 orë. Pastaj ose lyejeni sipërfaqen përsëri, ose ngjitni me kujdes dhe fort shiritin maskues në përputhje me idenë e dizajnit ose një shabllon me një model dhe mbulojeni me një shtresë të dytë. Koha e tharjes varet nga prodhuesi, por, si rregull, është të paktën një ditë.
Nëse mbulimi i markës së zgjedhur është i dobët dhe ngjyra origjinale shfaqet përmes bojës, atëherë mund dhe duhet të aplikoni veshjen edhe një herë. Shkëlqimi i pasqyrës arrihet me një shtresë shtesë të llakut universal akrilik ose alkid.
Koha totale e tharjes duhet të jetë së paku 3-4 ditë. Vetëm në këtë rast veshja e mobiljeve do të jetë e cilësisë së mirë dhe e qëndrueshme.
Impregnimi i lyerjes dhe ngjyrosjes kryhet sipas të njëjtës skemë. Dallimi është se ky proces kërkon pastërti të përsosur të sipërfaqes dhe dhomës; çdo grimcë pluhuri mund të anulojë të gjitha përpjekjet.
Ngjyrosja e dyshemeve të chipboard: materialet dhe fazat e punës
Një nga më mënyra efektive ruajeni integritetin e mbulesës së dyshemesë me pllaka chip dhe jepini karakteristika të forta të larta - lyejeni vetë me smalt dyshemeje ose llak parketi me cilësi të lartë. Për më tepër, nuk është e nevojshme të kufizoheni vetëm në një ngjyrë. Duke luajtur me hije, ju mund të zgjeroni vizualisht hapësirën, të vendosni thekse të ndritshme dhe të zononi dhomën. Dhe një teknikë e tillë e thjeshtë si klishe me modele do t'ju lejojë të krijoni një dysheme projektuesi brenda disa ditësh.
Kompleti i kërkuar i mjeteve dhe materialeve përfshin:

Abetarja e përdorur është e njëjtë si për mobiljet, por boja duhet të projektohet posaçërisht për dyshemenë. Akriliku i thjeshtë konsumohet shpejt, humbet shkëlqimin dhe atraktivitetin e tij pamjen.
Për të rilyer mbulesën e dyshemesë, duhet të zgjidhni smaltin me karakteristika të përmirësuara cilësore (rezistencë ndaj goditjes, rezistencë ndaj zbehjes, gërvishtje).
Përbërjet alkide mund të përdoren vetëm nëse shtresa e fundit është llak. Por edhe në këtë rast, një llak i thjeshtë druri ose një universal si NC nuk do të funksionojë. Ky duhet të jetë llak parketi me aditivë poliuretani (Practic, Dyo, Belinka, Marshall), të cilat ofrojnë rezistencë të shtuar të sipërfaqes ndaj gërryerjes dhe stresit mekanik. Bojë vaji PF-266 (Lakra, Yarko, Rastsvet, Kryeteknolog) dhe smaltet e dyshemeve polimer (Dufa, Dulux, Tikkurila) kanë të njëjtat veti.
Ju duhet të përgatisni me kujdes një dysheme të dërrasës për lyerje, pasi çdo defekt do të shfaqet pothuajse menjëherë dhe nuk mund të korrigjohet.
Puna përfshin fazat e mëposhtme:
- Kontrollimi i dyshemesë për të çara, defekte, gërvishtje, çarje. Kërcitja eliminohet me mbërthyes shtesë, patate të skuqura dhe gropa vendosen dhe boshllëqet midis fletëve mbyllen.
- Inspektimi i lidhësve: i gjithë pajisja ekzaminohet për forcë, ato të spikatura duhet të ngjiten me çekiç, ato të lirshme duhet të vulosen me zam ose ngjitës.
- Degresimi dhe lëmimi i chipboard: hiqeni me tretës njolla të yndyrshme, papastërtia, më pas pllaka lyhet me letër zmerile të imët, sidomos në fuga. Në fund, fshijeni tërësisht me një leckë të lagur.
- Astartimi: abetarja ngopëse aplikohet në 2 shtresa, më pas dyshemeja kontrollohet sërish për defekte.
Cilësia e punës restauruese varet jo vetëm nga kualifikimet (ose mungesa e tyre) e mjeshtrit, por edhe nga cilësia e materialeve të përdorura. Vetëm markat e provuara me cilësi të lartë garantojnë një jetë të gjatë shërbimi të veshjes dhe rezistencën e saj ndaj çdo ngarkese mekanike.
Bojë ose llak aplikohet në 2-3 shtresa me furçë, rul ose pistoletë llak në përputhje me udhëzimet. Përzgjedhja ose aplikimi i elementeve shtesë bëhet me një furçë të vogël të veçantë. Midis shtresave, vrazhdësia mund të hiqet me letër lëmuese.
Detaji kryesor i çdo (ose pothuajse çdo) të brendshme është mobilje. Roli i tij në organizimin e pamjes së brendshme të një apartamenti apo shtëpie është i vështirë të mbivlerësohet. Prandaj, të gjithë i kushtojmë rëndësi të madhe elementeve të arredimit të shtëpive tona. Por gjatë përdorimit, mobiljet, si çdo gjë tjetër, e humbasin atë specifikimet dhe pamjen. Me një fjalë, herët a vonë, secili prej nesh vjen në përfundimin zhgënjyes se një detaj ka filluar të bjerë jashtë ansambli të mobiljeve.
Zëvendësimi i kësaj pjese (blerja e një të re) nuk çon gjithmonë në rezultatin e dëshiruar dhe një zgjidhje e tillë radikale nuk është gjithmonë e mundur. Për më tepër, shpesh përfundimi zhgënjyes i përmendur më parë është pasojë e faktit se thjesht keni dashur të ndryshoni diçka në mjedis. Në këtë situatë, është më mirë t'i jepet përparësi një metode më pak të shtrenjtë të azhurnimit të brendshëm. Ju mund të rilyeni elementët e mobiljeve dhe në këtë mënyrë jo vetëm t'u jepni atyre një pamje të re lloji i ri, por edhe për të zgjatur jetën e shërbimit të këtyre produkteve.
Industria moderne përdor një shumëllojshmëri të gjerë materialesh për të bërë mobilje. Ky artikull do të flasë për mënyrën e lyerjes së chipboard, metodat e lyerjes dhe mjetet dhe materialet e nevojshme për të përfunduar këtë punë.
Chipboard, bordi grimcash, përdoret gjerësisht për prodhimin e mobiljeve. Ngjyrosja e chipboard-it ka një sërë karakteristikash themelore që janë pasojë e teknologjisë së prodhimit të këtij materiali. Është bërë nga copa druri, të cilat shtypen së bashku me rrëshira të veçanta. Pikturimi i chipboard me duart tuaja nuk do të kërkojë ndonjë njohuri ose aftësi të veçantë nga ju.

Aplikimi i bojës në chipboard, sipas algoritmit, nuk është shumë i ndryshëm nga pikturimi i materialeve të tjera (ose MDF). Ashtu si në raste të tjera, algoritmi përfshin hapat e mëposhtëm tradicional:
- Përgatitja e sipërfaqes;
- Zgjedhja e llojit dhe ngjyrës së bojës;
- Veshje;
- Mbrojtja e veshjes.
Përgatitja e sipërfaqes
Në fazën e përgatitjes së pjesëve të mobiljeve për pikturë, është e nevojshme t'i lironi ato nga pajisjet. ato. nëse po flasim, atëherë duhet të hiqni dorezat, të hiqni dyert, etj.
Para fillimit të çmontimit, vlerësoni rreziqet që lidhen me problemet e mundshme kur çmontoni dhe, veçanërisht, kur instaloni kabinetin pas lyerjes. Pasi të kemi çliruar produktin nga artikujt "të lidhur", fillojmë të përgatisim sipërfaqet për lyerje. Përgatitja e chipboard për pikturë përbëhet nga tre faza:
- Heqja e bojës së vjetër;
- Eliminimi defekte të vogla sipërfaqet;
- Mbushje.
Hiqni shtresën e vjetër të bojës duke përdorur letër zmerile të trashë. Është e nevojshme të hiqni me kujdes të gjitha bojërat dhe gjurmët e ndotjes në sipërfaqe. Nuk lejohet përdorimi i asnjë solucioni për heqjen e bojës, sepse... do të dëmtojë strukturën e materialit.
Procesi i heqjes së bojës përfshin sasi e madhe pluhuri. Është mirë të përdorni një fshesë me korrent për ta hequr atë.
Videoja tregon se si janë bërë mobiljet nga chipboard:
Nuk rekomandohet përdorimi i leckave për këto, veçanërisht ato të lagura, sepse... në këtë rast, ju nuk do të hiqni pluhurin, por do ta bllokoni atë në poret e materialit, gjë që do të përkeqësojë ndjeshëm cilësinë e sipërfaqes.
Pasi të jetë hequr plotësisht shtresa e bojës së vjetër, sipërfaqja duhet të trajtohet me letër zmerile me kokërr të imët. Qëllimi i këtij operacioni është t'i japë sipërfaqes lëmimin maksimal.
Nëse ka gjurmë të dëmtimit mekanik në sipërfaqe, këshillohet riparimi i tyre. Për ta bërë këtë, është më mirë të përdorni një përzierje të ashklave të vogla të drurit dhe zam (për shembull, PVA). Në mungesë të njërës, pabarazitë mund t'i trajtoni me stuko druri. Pasi stuko të jetë tharë, lëmoni përsëri sipërfaqen me letër zmerile të imët.
Hapi tjetër është përgatitja e sipërfaqes. Për ta bërë këtë, duhet të përdorni një abetare akrilike, e cila karakterizohet nga ngjitshmëri e lartë. Primeri duhet të aplikohet në një shtresë të hollë duke përdorur një furçë bojë ose rul. Kur abetarja të jetë tharë plotësisht, mund të filloni të aplikoni bojë.
Zgjedhja e bojës
Nga zgjedhja e duhur bojë varet drejtpërdrejt nga cilësia e veshjes. Kur zgjidhni bojë për chipboard, rekomandohet t'i jepni përparësi ngjyrave akrilike. Këto bojëra krijojnë një shtresë të qëndrueshme dhe me cilësi të lartë. Një avantazh i rëndësishëm i këtyre bojrave është mirëdashësia e tyre mjedisore - ato janë bërë në bazë të ujit. Nuk kanë, tradicionale për shumicën e bojrave të tjera, erë e pakëndshme. Këto bojëra janë të lehta për t'u përdorur, por kërkojnë trajtim të kujdesshëm. Një shtresë jo e tharë mund të dëmtohet lehtësisht nga lëvizja e pakujdesshme.
Boja përgatitet duke përzier masën e thatë me ujë. Prodhuesi tregon përmasat e përzierjes në paketim. Rekomandohet përzierja e bojës në dy faza. Përzieni plotësisht përmbajtjen e qeses me ujë derisa konsistenca e kërkuar të jetë uniforme dhe lëreni përzierjen të "pushojë" për disa minuta. Pas kësaj, përzieni përsëri plotësisht.

Zgjedhja e ngjyrës së bojës varet tërësisht nga preferencat tuaja të shijes. Industria moderne prodhon ngjyra akrilike me ngjyra dhe nuanca të ndryshme.
Aplikimi i bojës
Ju mund të aplikoni bojë akrilike në sipërfaqen e chipboard me një furçë ose rul. Varet nga ju që të zgjidhni; nuk ka rekomandime për këtë çështje. Çfarëdo mjeti që përdorni, duhet t'i kushtoni vëmendje cilësisë së tij. Nuk ia vlen të kursesh. Rrotullat dhe furçat e lira me dëshirë dhe bujari "zbukurojnë" veshjen me grumbullin e tyre, gjë që jo gjithmonë ka një efekt të dobishëm në cilësinë e veshjes dhe pamjen e saj.
Bojë duhet të aplikohet me lëvizje të njëanshme të furçës ose rulit. Në këtë rast, do të merrni një model të barabartë veshjeje. Kjo kërkesë është fakultative. Ju mund të dëshironi që sipërfaqja të duket sikur është rilyer disa herë, atëherë bojë duhet të aplikohet në lëvizje shumëdrejtimëshe.
Ju gjithashtu përcaktoni vetë numrin e shtresave të bojës. Por çdo shtresë e re duhet të aplikohet vetëm pasi shtresa e mëparshme të jetë tharë plotësisht.
Mbrojtja e veshjes
Me të gjitha avantazhet e tyre, bojërat akrilike thahen relativisht shpejt. Prandaj, veshja duhet të aplikohet në disa shtresa.
Llakimi i chipboard bëhet duke përdorur një sfungjer shkumë. Llak nuk ka nevojë të "lyhet" mbi sipërfaqe. Zbatohet me lëvizje të buta “stampuese”.
Pasi shtresa e fundit e llakut të jetë tharë, mund të filloni të montoni mobiljet.
NË përfundim modern Ka shumë materiale që kryejnë një funksion specifik, një nga më të zakonshmet prej të cilave është chipboard.
Të material ndërtimor mund të përdoret si veshje për mure, dysheme ose mobilje kabineti. Për të mos lejuar që brendësia të duket monotone dhe e mërzitshme, pllaka e chip-it është e lyer me smalt të ndritshëm sintetikë.
Çfarë është chipboard
Chipboard është një material ndërtimi që prodhohet nga derdhja e nxehtë dhe shtypja e produkteve të drurit duke përdorur lidhës. E thënë thjesht, këto janë patate të skuqura dhe tallash të mëdha që ngjiten së bashku dhe rrotullohen përmes një makinerie llamarine. Ka shumë lloje të dërrasave të shtypura, për shembull chipboard i laminuar, i cili është një fletë druri e mbuluar me film PVC ose shtresë tjetër mbrojtëse.
Pllaka chip mund të përdoret në një dhomë të thatë për përfundimin e mureve ose dyshemeve, si dhe si bazë për kabinet dhe mobilje të veshur me susta, e cila më pas është e mbuluar me pëlhurë. Më shpesh, chipboard i laminuar përdoret për të mbledhur një gardërobë ose mobilje kuzhine, pasi sipërfaqja e saj nuk kërkon pikturë ose përfundim shtesë. Shumë prodhues prodhojnë panele të ngjashme për fasadat e kabineteve me tekstura dhe modele të ndryshme, por baza e këtyre materialeve mbetet e njëjtë.
Nëse përdoret një panel i thjeshtë chipboard, atëherë për të siguruar qëndrueshmërinë e strukturës është e nevojshme të pikturohet shtresa e sipërme, si dhe impregnim me një përbërje antiseptike. E gjithë puna duhet të kryhet me materiale të përshtatshme që janë të destinuara posaçërisht për këtë qëllim.
Mjetet e pikturës
Gjatë funksionimit, lagështia, yndyrat dhe pluhuri futen në pllaka, gjë që çon në konsumimin e sipërfaqes. A është e mundur të pikturohen panelet e chipboard? Sigurisht që mundeni, për këtë ju duhet të përdorni bojë speciale dhe të ndiqni teknologjinë e aplikimit.
Për të kryer pikturën, duhet të përgatisni një sërë mjetesh, të cilat përfshijnë:
- një furçë me madhësi të mesme, do të nevojitet për pikturimin e vendeve të vështira për t'u arritur, qoshet dhe fundin e panelit;
- një rul me shkumë ose shtojcë të ndjerë për lyerjen e zonës kryesore;
- shirit maskues që përdoret për të kufizuar zonat me ngjyra të ndryshme ose zona që nuk mund të pikturohen;
- letër zmerile. Është më mirë të përdorni disa lloje të tij, duke lëvizur nga fraksionet e mëdha në më të vogla, duke hequr një shtresë të hollë të bojës së vjetër dhe duke niveluar sipërfaqen;
- rul rul. Sigurisht, ju mund të bëni pa të, por kur e përdorni, bashkëngjitja e rulit është plotësisht e ngopur me bojë, dhe nuk ka asnjë boshllëk në chipboard, ngjyra bëhet e pasur dhe e barabartë;
- Për çdo rast, duhet të përgatisni një shpatull metalik, pasi mund t'ju duhet të nivelizoni sipërfaqen me stuko.
Të gjitha mjetet e listuara janë të disponueshme; mund t'i blini në çdo dyqan harduerësh dhe t'i lyeni vetë pllakat e grirave.
Materialet e nevojshme
Përveç mjeteve, do t'ju nevojiten materiale për pikturë, të cilat përfshijnë tretës, abetare, bojë dhe stuko.
Tretësi është i nevojshëm për të hequr bojën ose llakun e vjetër, nëse po flasim për mobilje të përdorura, si dhe për të degosur sipërfaqen para lyerjes. Do të nevojitet një abetare për të niveluar panelin dhe për ta ngopur atë, gjë që do të parandalojë thithjen e tepërt të bojës në chipboard dhe do të ndihmojë në krijimin e një shtrese më të barabartë.
Lyerja nuk mund të ndodhë pa përdorimin e bojrave dhe llaqeve. Për të rivendosur veshjen, mund të përdorni smalt akrilik ose me bazë uji. Të dy llojet e bojës kanë avantazhet e tyre, për shembull, akriliku konsiderohet i tharjes së shpejtë dhe ju lejon të përfundoni punën në një kohë të shkurtër.
Ju mund të keni nevojë për stuko për të zbutur patate të skuqura dhe gërvishtjet. Ky material Shitet në formë të gatshme për përdorim dhe në kontakt me sipërfaqen prej druri trashet dhe formon një shtresë monolit. Ka edhe materiale stuko të thata që duhet të hollohen.
Përveç materialeve të listuara të pikturës, ka edhe shumë aditivë dhe llaqe të ndryshme që përmirësojnë vetitë e bojës, gjë që rrit jetën e saj të shërbimit.
Zgjedhja e bojës
Kjo çështje duhet të trajtohet në detaje, pasi lloji i bojës së marrë do të varet nga zgjedhja e llojit të bojës.
Për restaurimin ose lyerjen parësore të paneleve të chipboard, smalti akrilik përdoret më shpesh, pasi ngjitet mirë në dru, dhe për të arritur viskozitetin e dëshiruar, mund të hollohet me ujë të zakonshëm. Përdoret gjithashtu smalt alkid, i cili ka ngjitje të lartë, rezistencë ndaj konsumit dhe rezistencë ndaj ujit.
Për të rregulluar ngjyrën, lejohet përdorimi i nuancave që i shtohen bojës. Përbërja që rezulton përzihet plotësisht me dorë ose duke përdorur një stërvitje.
Ka smalt në formën e një aerosoli, aplikimi i tyre nuk kërkon furça dhe rul; pikturimi kryhet duke shtrydhur përbërjen nga një kanaçe nën shtypje e lartë. Për të aplikuar smalt të lëngshëm, mund të përdorni një njësi kompresori me një pistoletë speciale spërkatës të mundësuar nga ajri i kompresuar, dhe shtresat do të jenë shumë më të lëmuara pa formimin e njollave.
Restaurimi i mobiljeve të kabinetit
Për prodhimin e mobiljeve të kabinetit, përdoren chipboard të laminuara dhe të thjeshta. Fasadat dhe pjesa e përparme e kabineteve zakonisht përfundohen me chipboard të laminuar, pasi ajo ka rritur vetitë mbrojtëse dhe rezistencën ndaj lagështirës. Kjo shtresëështë vazhdimisht në kontakt me ndotës dhe lagështi të ndryshme, kështu që duhet të mbrohet shtesë me llak.
Për të pikturuar panelet e chipboard në shtëpi, duhet të kryeni një numër hapash:
- përgatitja e sipërfaqes. Në këtë fazë, veshja pastrohet nga bojë dhe llak i vjetër, si dhe paneli rrafshohet në të gjithë zonën për të hequr çarjet dhe patate të skuqura. Për ta bërë këtë, mund të përdorni letër zmerile me trashësi mesatare; është e rëndësishme të mos lini gërvishtje të mëdha, pasi bojë nuk është në gjendje t'i riparojë ato;
- Mbyllni gërvishtjet dhe patate të skuqura të mëdha me një pastë të veçantë, përpara se ta aplikoni, duhet të pastroni sipërfaqen nga pluhuri dhe ta lyeni atë me një tretës. Stuko aplikohet në një shtresë të hollë, lyhet me rërë pas tharjes;
- në fazën tjetër është e nevojshme të lyhet paneli me një abetare; nëse përthithet mirë, atëherë mund të aplikohen disa shtresa. Abetarja ju lejon të kurseni smaltin, pasi bojë nuk do të ngopë chipboard;
- duke aplikuar smaltin në panel duke spërkatur ose me dorë me një rul. Të gjitha lëvizjet duhet të jenë të qetë dhe të qëndrueshme, nga lart poshtë. Pas aplikimit të shtresës së parë, duhet të prisni derisa smalti të vendoset dhe vetëm atëherë të përsërisni operacionin;
- nëse është e nevojshme, shtresa përfundimtare do të jetë një llak i pastër që formohet mbulesë mbrojtëse dhe do të zgjasë jetën e shërbimit të përbërjes kryesore.
Gjatë kryerjes së punës, është e rëndësishme të respektoni masat e sigurisë dhe të mbroni sistemin e frymëmarrjes nga aromat e dëmshme; gjithashtu duhet t'i kushtoni vëmendje kushteve në të cilat kryhet lyerja. Dhoma duhet të jetë pa pluhur dhe lagështia e lartë, duhet të ajroset.
Karakteristikat e chipboard të laminuara
Dallimi kryesor midis chipboard të laminuar dhe një paneli të thjeshtë është sipërfaqja e saj e jashtme, e cila mund të përbëhet nga letër e laminuar ose film PVC. Falë kësaj mbrojtjeje, bordi nuk ka frikë nga ekspozimi ndaj lagështirës ose kontakti i drejtpërdrejtë me ujin, dhe gjithashtu është rezistent ndaj dëmtimeve mekanike.
Por, për të pikturuar chipboard të laminuar, duhet të ndiqni një numër rregullash. Për shembull, kur lëmoni një përfundim, nëse e teproni, mund ta hiqni plotësisht petëzimin, gjë që do të çojë në shkatërrimin e derës së kabinetit. Do të duhet të ndryshohet plotësisht ose veshja të restaurohet duke e ngjitur me një film të veçantë. Nuk është e nevojshme ta lyeni me rërë ose të hiqni shtresën e sipërme, por lani tërësisht chipboard dhe lyeni me bojëra që janë projektuar posaçërisht për sipërfaqe komplekse të llakuara.