Decoupage, mariage, grillage, voyage... Ketika saya mengatakan bahwa saya melakukan decoupage, orang-orang entah bagaimana melunakkan, mengaburkan, dan bahkan mulai mengambil hati mereka sendiri. Sama seperti “goltepa” Bunda Balzaminova. Dan tanpa sadar saya menunjukkan “goltepa” ini sebagai tanda kecukupan zaman. Faktanya, “Saya merajut kaus kaki” atau “Saya menjahit silang” tidak membangkitkan minat dan rasa hormat yang sama.
Dan Anda memasukkan semacam "holtepa" (sekarang ada banyak: tambal sulam, quilting, quilling, felting, scrap - maafkan saya, Tuhan - pemesanan, dll.), dan Anda menemukan respons di antara pendatang baru Eurasia terhadap Moskow. Dan Anda melihat gambaran ajaib dan mempesona tentang “mediasi budaya” di Rusia: mereka akan memasukkan “benih” ke dalam saku Anda, memasukkan “stepper” ke dalam sepatu Anda, menulis “kartof-markof” pada label harga, mengeluarkan “bubuk” mangkuk”, nyanyikan lagu tentang “arintir”, ucapkan hal-hal suci "abanamat" dan lari untuk melakukan decoupage...
Dan di setiap rumah Anda dapat melakukan decoupage, decoupage, dan decoupage ulang banyak hal yang lama, jelek, membosankan, membosankan. Dan biarlah ada pengrajin berpengalaman, dan bahkan dengan ijazah dan - ya Tuhan! - reputasi internasional, dan biarlah gambar yang cantik dengan hal-hal indah seperti itu, tidak ada alasan untuk melepaskan keinginan dan kreasimu.
Saya melakukan semua hal ini sebelum saya memiliki blog. Oleh karena itu, tidak ada kelas master.
(Dan lagi tentang pasien... "Kelas master" adalah semacam kata bodoh yang disalin dari budaya asing dan bahasa asing. "Kelas master" dengan topik "kertas-lem-kayu", "gadis-gambar-a -bunga”, “duduk-kursi-indah”...).Apa yang istimewa dari teks ini? Kombinasi teknologi dan emosi. Betapa bahagianya aku, betapa kesalnya aku, betapa aku mencobanya, betapa aku berkata pada diriku sendiri “tidak pernah”, lalu berkata “bagaimana jika”. Ini akan menjadi kelas master - tentang topik tersebut "wanita-tidak kompeten-decoupage-belajar-selesai!"
Jika ini membantu siapa pun, saya akan senang. Dan saya sudah merasa baik.
BANGKU.
Pengalaman pertama adalah bangku dari Ikea. Alasannya adalah artikel bergambar di majalah kerajinan tangan. Pramuniaga di salon seni memilih semua bahan untukku, tersenyum penuh pengertian setelah penjelasanku. Minimal minimal dan termurah.
Dibuat dengan:
Dua botol cat akrilik - biru cerah dan kuning-krem (ditulis "warna gading"),
Kuas lem sintetis datar,
Kuas datar yang lebih murah untuk pernis,
Kuas cat sintetis datar (pramuniaga yang cerdas terus menekan kuas datar ini),
lem murah untuk decoupage,
Pernis akrilik dalam botol,
Kartu decoupage dengan bayi (yaitu selembar kertas sederhana bergambar, hanya saja kertasnya agak lebih tipis dari kertas tulis biasa),
Dan serbet yang mencuat di tempat serbet.
Seluruh pekerjaan memakan waktu 2 jam, termasuk menunggu pengeringan. Dan betapa gemetarnya saya, merendam potongan kertas dari kartu decoupage ke dalam air, lalu menyekanya dengan lap! Dan betapa senangnya saya karena mereka dihaluskan secara merata dengan sikat datar dan direkatkan tanpa gelembung! Amelie dari film dengan nama yang sama senang memasukkan tangannya ke dalam kantong sereal, di sini - kenikmatan sentuhan yang sama hidup. Selain kuas, Anda juga bisa menghaluskan potongan kertas dan mengoleskan olesan dengan jari.
Saya tidak mengampelas atau melapisi. Saya bahkan tidak tahu bahwa ini perlu dilakukan. Tapi bangkunya rata, alhamdulillah. Ya! Saya merakitnya sendiri!
Semuanya berhasil. Sayapnya segera tumbuh. Tapi tidak ada rencana, saya merobek-robek gambar itu semampu saya, dan hanya menempelkan serbet ke lubangnya. Ternyata cara pengeleman ini disebut decopatch. (Halo Tuan Jourdain!).
Setelah digunakan, tinja menjadi lebih indah: robek di tempat yang seharusnya, ternoda di tempat yang tepat, dan menjadi gelap. Keluarganya menyayangi anak-anak ini dan menyebut mereka “orang kelaparan”. Tetap saja, ternyata lebih menyenangkan daripada melukis atau mewarnai biasa.
Pengalamannya begini:
Anda membutuhkan cat akrilik dan pernis akrilik. Ingat kata "akrilik". Akrilik - tidak berbau. Segala sesuatu yang akrilik dicuci dengan sabun dan air, tidak diperlukan bahan kimia.
Anda memerlukan kuas sintetis datar (saya suka #12 dan #14). Kemudian kuas bulat dan kipas muncul di koleksi saya. Menurut legenda sejarah seni, kuas kipas ditemukan oleh Leonardo, dan kuas datar ditemukan oleh kaum Impresionis.
- Jika rencana kerja mencakup pengecatan permukaan besar (kaki kursi, permukaan benda lain, dll.), maka Anda dapat membeli kuas datar besar di toko perangkat keras atau perangkat keras biasa. Harganya sangat mahal di sana. Jumlah kuas tersebut melebihi 20: No. 20, No. 22, dst.
Anda perlu lem untuk decoupage (lalu saya mencoba PVA biasa, saya tidak menyukainya).
Kertas harus direndam sebelum direkatkan. Tunggu sampai menggulung menjadi tabung dan terbuka. Lalu tepuk-tepuk kertas tersebut dengan kain, dan kertas itu menempel dengan sempurna.
Saya belum pernah memoles apa pun sebelumnya, tapi ternyata bagus dan indah.
Pekerjaannya tidak lebih sulit dari aplikasi di taman kanak-kanak.
Benar, Anda harus menunggu sampai semua lapisan mengering secara bergantian (cat - satu, lem - dua, lapisan pernis pertama - tiga, lapisan pernis kedua - empat). Dan ini membutuhkan daya tahan, seperti halnya seorang pramuka.
PINTU.
Pengalaman buruk, harus saya akui.
Setelah bangku, saya menjadi lebih berani dan memegang pintu. Tanpa melepas dari engselnya! Dan segera dengan serbet! Saya mengulanginya lebih dari sekali sampai saya menyadari bahwa tidak ada yang bisa diperbaiki. Serbetnya kusut, sobek, dan tidak rata (karena beratnya!). Namun pengalaman negatif juga merupakan pengalaman. Ini adalah obat untuk kesombongan. Aku melihat ke pintu dan mencela diri sendiri. Dan mawar ini juga! Lalu, tentu saja, saya akan mengumpulkan kekuatan dan mengulanginya.
Secara umum, ada banyak hal vulgar dalam jenis dekorasi ini, dan Anda tidak dapat menyembunyikannya: mawar, ladang lavender, gadis dengan dan tanpa hati, anak anjing, anak kucing, anak sapi, domba, emas, perunggu, kilau-kilau -kilauan... Jarang sekali Anda menemukan hal-hal yang penulisnya secara diam-diam memiliki cita rasa yang sempurna. Saya tidak memilikinya. Seperti pemotong dan perekat yang tidak berpengalaman, saya bergegas menyusuri jalan yang sudah dibuat, dan ada tradisi “anjing laut”.
Pengalamannya begini:
- “Serbet untuk decoupage” adalah fiksi; Ini adalah serbet biasa yang terdiri dari beberapa lapisan. Untuk decoupage, Anda perlu merobeknya lapisan atas dengan gambar. Anda bisa menggunakan jarum untuk mengupas serbet. Dan beberapa serbet terkelupas jika Anda hanya meniup bagian pinggirnya.
Serbet ini dijual di mana-mana: di toko perangkat keras, supermarket, toko decoupage online, toko kerajinan, dll.
Ada lem khusus untuk serbet (juga pernis), ketika bekerja dengan lem ini, serbet tidak punya waktu untuk basah, meregang dan sobek (saya kemudian mencobanya, mencoba membenarkan pintu ini).
Desain dari serbet dapat dipotong dengan gunting kecil, pisau bedah (tentu saja bukan yang medis, tetapi yang dijual di toko untuk decoupage atau tambal sulam), atau Anda dapat merobeknya. Elemen yang sangat kecil ditarik keluar menggunakan tusuk gigi: Anda perlu menyodok ujung basah di sekitar desain dan dengan hati-hati mengeluarkannya dari serbet.
______________________________________
(Dibuat ulang setelah dua setengah tahun. pintu tua Itu sudah lukisan ke-4, dan saya harus mendempul permukaannya, mengisi retakan dengan dempul, memaku kembali papan yang lepas, mengampelas tanpa henti, dll. Untuk menyamarkan ketidakrataan, craquelure diciptakan: di pintu itu sendiri, di bilah, di anak tangga.Dan lagi mawar! Apa yang akan kamu lakukan? Ke mana harus pergi? Mosaik antik, kurcaci, rumah, jam, poster iklan bergambar gadis, pemandangan kota dengan Menara Eiffel dan Big Ben - ini akan terlihat lebih buruk lagi di pintu utilitas. Saya mengaplikasikannya dan melihat - ternyata lebih buruk... Dan bunga-bunga besar menutupi ketidakrataan pintu. Juga merupakan nilai tambah.
Pirus dicampur dari cat akrilik putih dan hijau dalam dua warna.
Craquelure di pintu dan riser.
Di bawah craquelure ada cat warna-warni: coklat, emas, hijau.
Ada serbet di bar. Motif sobek dengan bunga.
_____________________________________________
Kemudian saya beralih ke bentuk-bentuk kecil yang sepadan dengan harga diri saya.
KOTAK UNTUK KECERDASAN DAN KERTAS.
Saya belajar banyak dan melakukan banyak hal untuk pertama kalinya.
Saya menemukan ada blanko untuk decoupage dan sangat terkejut. Saya membeli sebuah kotak kayu. Dan kartu nasi dengan gambar untuk decoupage. Dan pernis untuk craquelure satu langkah, yaitu dalam bahasa Rusia - retak.
Craquelure mengejutkan saya dengan proses dan efeknya. Anda mengaplikasikan cat berwarna gelap, biarkan mengering, lalu aplikasikan pernis craquelure, biarkan mengering sesuai petunjuk pabrik, lalu cat tipis. Dan retakan muncul tepat di bawah kuas. Kenikmatan yang luar biasa, kegembiraan yang tulus! Intriknya ada di depan mata Anda: apa yang akan terjadi, bagaimana penyebarannya? Tapi cat tipis harus diaplikasikan dengan hati-hati dan hanya dalam satu lapisan! Jika tidak, Anda akan mendapatkan coretan, noda, dan kekacauan. Anda perlu melatih tangan Anda dan mempelajari cara membuat sapuan rata dengan kuas datar.
Untuk pertama kalinya saya mencoba memercik dengan sepotong karet busa (lihat langit biru).
Saya mencoba merekatkan kertas nasi untuk pertama kalinya. Sangat mudah untuk merobeknya dan menempelkannya. Dan tidak perlu merendamnya.
Untuk pertama kalinya saya menggosok pinggirannya dengan amplas.
Menurut pendapat saya, itu ternyata Provence. Artinya, daerah dusun, sebuah provinsi. Perancis. (Saya tidak menyebut nama, itu gaya).
Gaya decoupage adalah topik yang sangat lucu. Provence, gaya Victoria, shabby chic, kota sederhana, dll. - sungguh luar biasa bagaimana mereka mengembangkan wawasan dan pengetahuan mereka di bidang pemasaran pasar. Dalam hal ini, kisah munculnya gaya shabby chic sangatlah lucu dan indikatif: seorang wanita Amerika yang gesit menerima paten untuk barang-barang dengan craquelure, lecet dan mawar, dan hasilnya adalah “shabby chic” yang sangat laris.
Dan Provence yang indah ini berdiri di teras nenek saya: itu adalah lemari buatan sendiri yang dicat putih, dibuat pada periode miskin pascaperang. Dan saya menggambar bunga di atasnya dan menulis segala macam kata.
Pengalamannya begini:
Butuh tanah! Permukaan di depan decoupage diperlukan amplas dengan amplas dan prime.
Kata yang buruk, dari semacam pekerjaan penggalian. Tapi ternyata ini omong kosong lagi: kamu hanya perlu melapisi permukaannya dengan selapis atau selapis cat akrilik tipis atau primer akrilik (itulah yang dijual, begitulah sebutannya; tapi kalau salah paham, itu campuran. cat dan dempul).
Untuk apa? Pertama, lebih sedikit cat dan lem yang terbuang: tidak terserap dalam jumlah besar ke permukaan berpori (kayu, karton). Kedua, permukaan menjadi lebih halus. Ketiga, pola serbet tipis dan kartu decoupage pada permukaan tanah yang terang akan terlihat di semua detail.
Namun Anda bisa menolak primer jika, misalnya, Anda benar-benar ingin melestarikan dan menonjolkan permukaan kayu yang indah dan rumit, dll. Itu semua tergantung keinginan dan niat.
Amplas adalah teman decoupage. Permukaan dan lapisan perlu diampelas. Saya terutama menggunakan kertas dengan dua angka nol: 100, 200, 400, 500, 600. No. 1000, yang disukai banyak orang, adalah untuk pekerjaan mikroskopis.
Amplas kasar sangat diperlukan jika Anda perlu mempersiapkan decoupage hal lama(dengan cat lama, pernis lama, kotoran) atau permukaan kayu yang belum siap. Jika kayu diampelas terlebih dahulu dengan amplas kasar kemudian dengan amplas halus, maka kayu menjadi halus sempurna. Anda juga perlu mengampelas lapisan pernis di akhir pekerjaan (yang disebut pernis akhir). Anda juga bisa menggunakan amplas untuk membuat pinggirannya terkelupas.
Sangat menarik untuk membuat sudut dan tepian yang aus. Anda perlu mengoleskan lapisan cat pertama (biasanya gelap), biarkan mengering, gosok tempat yang dipilih dengan lilin apa pun, lalu oleskan cat lain (biasanya terang), biarkan mengering, lalu gosok tempat yang sama dengan amplas halus, tanpa sangat mendesak. Pekerjaan yang sangat bagus! Untuk mata dan tangan!
Kertas nasi untuk decoupage sungguh menyenangkan. Dalam segala hal (Ada bahan alami lain yang digunakan untuk membuat kertas decoupage).
Ada blanko untuk decoupage. Dan ada toko perangkat keras yang menjual yang belum diolah kerajinan kayu (talenan, tempat roti, sendok, spatula, tempat garam, bangku, kursi makan bayi, rak, dll.) yang dapat dipisahkan. Harganya lebih murah daripada blanko khusus.
Pernis Craquelure tidak mahal (ada yang Rusia).
BERDIRI UNTUK PISAU.
Saya berlari keliling apartemen untuk menemukan sesuatu yang bisa dibuat ulang. Saya menemukan tempat pisau yang pernisnya sudah lama terkelupas.
Dan dia mengulangi semuanya: dia menghilangkan pernis dan kotoran dengan amplas kasar - melapisinya - mengoleskan lapisan cat gelap - menutupinya dengan pernis craquelure - berjalan di sepanjang tepinya dengan lilin parafin - dengan hati-hati mengoleskan cat tipis dengan sapuan dari atas ke bawah dengan sikat datar - hati-hati menggosok tepinya dengan amplas halus (dengan sedikit gerakan ke satu arah), yang mudah terkelupas - saya merekatkan motif dengan bunga dan produk makanan- Saya mewarnai tepi gambar dengan botol - Saya mengaplikasikan 2 lapis pernis.
Untuk pertama kalinya saya menggunakan underpainting, yaitu saya cukup mengecat tepi selembar kertas dengan botol dengan kuas dan karet busa (lebih kecil dari yang diperlukan). Dan lagi-lagi saya terkejut: meski warnanya tidak sama dengan gambar, tetap saja hasilnya bagus. Bayangan atau noda alami.
Saya tahu dan melihat apa yang terjadi dalam gaya “dia mengedipkan matanya ke arahku dan tidak berkata apa-apa”, “Yura, Yura, aku bodoh sekali” Dan "Burung bulbul Rusia adalah burung yang mulia." Saya tahu dan melihat. Tapi aku masih menyukainya.
Inilah kelebihan decoupage - prosesnya mengarah pada kegembiraan dan kelembutan, terlepas dari ketergantungan langsung pada hasilnya.
Pengalaman:
Saya menemukan ada dempul kayu; Saya membeli sebuah kotak kecil di toko perangkat keras dan, setelah membersihkan permukaannya dengan amplas, menyegel logo timbul tersebut. Dan secara umum, saya menjadi "salah satu milik saya" di toko perangkat keras. Penjualnya sudah menggoda: “Nak, kenapa kamu butuh amplas?” Dan saya menggunakan akalnya: "Mengapa tidak lima ratus? Baiklah, mari kita beri enam ratus. Apakah Anda punya lembaran atau meteran?"
Untuk pengecatan bagian bawah, saya membeli satu set kuas: kuas bulat anak-anak biasa dan kuas murah. Dalam hal ini, tidak masalah apakah itu sintetis atau alami.
Mangkuk kayu.
Aku mencintainya, menyentuh dan meremasnya. Ternyata halus dan mulus, karena saya pernis dan diampelas, dipernis dan diampelas...
Saya menggunakan kertas nasi di bagian dalam yang hangat, dan serbet di bagian luar yang dingin. Inilah niatnya. Saya memahami kata ini tepat di mulut saya - "untuk-dipikirkan". Artinya, pemikirannya belum lahir, tapi antisipasinya, gambarannya, sudah ada.
Dan di sini saya akhirnya menghilangkan rasa takut saya terhadap serbet. Tidak peduli bagaimana Anda merekatkannya, betapapun canggihnya Anda, tetap saja akan berakhir dengan kerutan. Namun ternyata Anda perlu melakukan ini: biarkan mengering, tutupi dengan beberapa lapis pernis dan amplas dengan amplas halus. Seluruh operasi ini harus diulang beberapa kali.
Saya membuat mangkuk ini selama beberapa hari, membiarkan pernis mengering. Saya mengampelas dan memolesnya sekitar enam kali.
Aku menyimpan permen di dalamnya...
BAKI.
Nah, di mana kita tanpa nampan!
Satu nampan hanya berwarna putih dan tidak ada apa-apa, dua lainnya sudah tua dan lusuh, terbuat dari jerami yang dipres.
Saya membuang semua yang saya bisa ke nampan ini. Anda mungkin meragukan keterampilan dan rasanya (saya sendiri meragukannya), tetapi sarapan menjadi lebih menyenangkan.
Untuk pertama kalinya saya mencoba craquelure yang berbeda - dua langkah. Kedengarannya lebih rumit, tetapi lebih sederhana: aplikasikan pernis pertama dari set, lalu pernis kedua dari set (begitulah cara menjualnya). Retakan akan muncul, dan perlu “dikembangkan”, yaitu sesuatu yang digosokkan ke dalam retakan tersebut. Apakah ini sesuatu: purpurin (bubuk halus warna yang berbeda), cat minyak, aspal (ini adalah sampah berminyak berwarna gelap dalam botol atau tabung), eye shadow, pensil yang hancur, semir sepatu, dll. Pertama, Anda perlu menggosoknya dengan jari, kuas atau penyeka kapas, lalu sikat kelebihannya dan bersihkan.
Saya membeli warna ungu keemasan dan menggosokkannya ke dalam nampan dengan marah. Oleh karena itu, semuanya terbuat dari emas dan terkadang tampak bertentangan dengan sifat Rusia. Dan saya mengoleskan eye shadow gelap ke area terang.
Kupu-kupu dari serbet.
Retakan pada warna merah berwarna ungu, pada retakan terang - eye shadow.
Motif serbet di sekelilingnya.
Baki setelah dua tahun. Seperti yang Anda lihat, ini berhasil.
Tepi baki dilapisi dengan plastik lembut, mirip karet; Catnya sudah terkelupas sedikit. Juga oke.
Pengalamannya begini:
Kalau permukaan kayunya tidak dipoles, tapi langsung dicat dengan cat akrilik, kayunya akan terlihat tembus pandang, dan bagus sekali.
Lebih baik membeli craquelure dua langkah dalam satu set (ini sangat penting bagi mereka yang tidak memahami kimia dan tidak ingin repot dengan pemilihan pernis).
Munculnya retakan adalah topik khusus dalam decoupage. Misalnya setelah aspal dan cat minyak Anda tidak bisa menggunakan pernis akrilik biasa. Jika Anda tertarik untuk mengumpulkan pengetahuan di bidangnya ilmu pengetahuan yang hebat kimia - Anda dapat berkembang ke arah ini. Saya tidak tertarik. Oleh karena itu, saya mengembangkannya dengan warna ungu, atau bayangan, atau stylus, atau semir sepatu berwarna.
Baki yang dilapisi pernis akrilik berfungsi. Hanya saja, jangan mencucinya di bawah air mengalir. Dan jika Anda mencucinya, segera bersihkan.
KOTAK DENGAN MALAIKAT.
Saya mencoba daun emas untuk pertama kalinya. Kata “potal” dan “mordan” terlintas di telingaku, dan aku terpesona. Ternyata tidak ada yang istimewa. Saya membeli potal dalam bentuk lembaran; Ternyata itu adalah kertas tipis. Dan Mordan ternyata lem tipis.
Pertama, Anda perlu mengoleskan Mordan, biarkan mengering, tetapi jangan sampai kering (pada label tertulis berapa lama harus menunggu). Lalu ambil daun emasnya... Mudah untuk mengatakan - ambillah. Cobalah! Ia tipis, dan bahkan tersengat listrik, dan terlebih lagi, ia dapat ditekuk dengan sedikit tarikan napas. Anda bisa menggunakan pinset. Untuk mengoptimalkan prosesnya, Anda bisa menyiapkan kotak kecil berpenutup untuk meletakkan potongan daun emas. Tutup semua jendela dan jangan hirup dia! Kemudian tempelkan daun emas tersebut dalam potongan-potongan pada tempat yang diinginkan dan ditutup dengan pernis. Para profesional berpengalaman menyarankan untuk menggunakan kuas khusus (saya lupa apa namanya): bulat di pangkalnya dan dipotong rata di bagian bulunya. Mereka “mengisi” potal, yaitu mereka menyodoknya dengan hati-hati dan lembut. Tapi saya punya permukaan yang kecil, dan saya puas dengan kuas datar. Mereka digunakan untuk mengisi daun emas yang tegak lurus dengan permukaan. Tidak perlu memperhatikan fakta bahwa daun emasnya hancur dan robek; menempelkannya dengan “tambalan” adalah hal biasa. Kemudian biarkan mengering mengikuti petunjuk lem. Lalu gunakan sikat lembut dan gerakan lembut untuk menghilangkan kelebihan emas. Yang tersisa hanya di tempat lemnya berada. Saya tidak tahu kenapa, tapi itu menyenangkan!..
Daun emas yang sudah direkatkan kemudian digosok dengan amplas agar emas tampak tua. Saya menggosoknya sebaik mungkin. Jika kriteria penilaian pekerjaan adalah Keabadian, Seni dan profesionalisme pemulih, maka pengalaman saya merekatkan daun emas sangat buruk. Dan jika Anda tidak melambung tinggi, tetapi mengevaluasinya dari sudut pandang utilitarianisme dan kesenangan Anda sendiri, maka saya hebat, dan hasilnya indah.
Saya terutama menyukai bagaimana kilaunya terbang ke seluruh apartemen untuk waktu yang lama dan menempel pada segala hal dan semua orang!
Kali ini ternyata gaya Victoria. Ini bukan lagi gaya orang Perancis, tapi gaya orang dusun Inggris. Keunikannya adalah corak gelap, penyepuhan berlebih, dan gambar cantik dengan pretensi.
Di dalam.
Saya menyadari bahwa beberapa kayu kosong dibuat dengan buruk. Di sini: lem mencuat dari jahitannya (di beberapa tempat - seluruhnya menetes) dan tidak menghasilkan amplas. Setelah melewati noda, lem ini berubah warna menjadi merah. Saya harus gila-gilaan dan mengecat semua sudut dengan cat yang warnanya serupa.
Pengalamannya begini:
Tidak ada yang ribet dalam merekatkan daun emas, Anda hanya perlu mengikuti petunjuk dari produsen lem Mordan.
Pewarna kayu murah dari toko perkakas bagus sekali, dan banyak sekali warnanya! Dan itu juga bisa dicampur.
Kosong besar dari toko decoupage tidak sebanding dengan harga jualnya. Saya tersinggung selamanya.
KOTAK DENGAN "SPRING".
Saat membuat item ini, saya menyadari bahwa tidak mungkin merusak apa pun dengan decoupage. Anda selalu dapat mengulanginya. Hanya saja, jangan panik.
Idenya didasarkan pada materi - kartu nasi. Bekerja dengannya sungguh menyenangkan. Sesuai dengan ukurannya "Musim Semi" oleh Botticelli.
Jika dilihat dari simbolismenya, maka ini adalah himne untuk pemetikan bunga secara paksa dan segala jenis kekerasan terhadap jiwa dan raga perempuan, yang harus ia terima dan pelajari untuk dinikmati. Dengan kata lain, ini adalah upaya untuk menggabungkan dalam diri seorang wanita baik bidadari pagan yang telanjang dan tidak rumit, serta Perawan Maria yang pendiam dan bermoral tinggi (pandangan dunia Renaisans! Kami adalah orang Kristen, tetapi kami sangat menyukai paganisme tubuh Yunani-Romawi! ). Dan betapa manisnya isyarat laki-laki yang naif: Nak, hidupmu singkat, cepatlah!.. Di sebelah kanan masih musim semi, dan di sebelah kiri sudah musim gugur. Sesuai ide pemesan, lukisan itu perlu digantung di atas tempat tidur adik laki-lakinya yang sedang mempersiapkan pernikahan. Kata-kata perpisahan, bisa dikatakan begitu.
Awalnya saya sangat ingin membuat bagian samping seperti ini: letakkan lapisan bawah cat dengan transisi dari satu warna ke warna lain, lalu pernis craquelure, lalu cat tipis, lagi dengan transisi halus. Dan tidak ada yang terjadi. Garis-garisnya keluar, seperti kasur.
Saya menangis dan menangis dan membuatnya kembali. Saya menempelkan serbet dengan rumput dan ikal di atasnya, daun emas dalam potongan-potongan, menggosoknya dengan amplas di tempat yang berbeda dan dengan intensitas yang berbeda, dan semuanya berubah: permukaan yang tua, kotor, tidak rata dari barang yang seharusnya digunakan! Inilah yang saya inginkan.
(Dan jika Anda merasa putus asa yang tidak dapat diatasi, Anda dapat mengambil amplas dan merobek semuanya. Permukaan kerja hanya akan menjadi lebih halus).
Saya meninggalkan garis-garis di bagian bawah.
KOTAK UNTUK PENSIL DAN BARANG TERTULIS.
Namun Anda mendapatkan lebih banyak kesenangan dengan mendekorasi barang-barang bekas. Alternatifnya luar biasa: sampah atau keindahan. Dan pada saat yang sama Anda merasakan manfaatnya sebagai pribadi dan sebagai wanita.
Apakah karena decoupage telah menangkap luasnya Tanah Air kita karena jatuh di tanah subur tradisi Soviet: waslap dari celana ketat, ikan dari selang infus, keranjang dari kawat warna-warni, blus dari benang konveyor katun longgar?
Dan ternyata itu adalah “perangkat pria” untuk sebuah meja.
Sekali lagi saya menggunakan kertas nasi, serbet, cat akrilik, dan craquelure satu langkah. Itu saja.
Sangat sulit untuk mengecat wadah kecil seperti itu dari dalam: Anda mencoba cara ini, cara ini, dengan kuas dan spons...
Pengalamannya begini:
Plastik perlu digosok dengan amplas, lalu diaplikasikan primer. Lebih baik melakukannya dalam beberapa langkah, dan semuanya akan berhasil.
Karton tebal juga dapat dipisahkan, tetapi primer harus diaplikasikan dalam lapisan tipis dan dibiarkan kering. Jika tidak, karton akan basah.
KARDUS.
Dan terkadang tidak ada jalan keluar. Hanya decoupage!
Misalnya saja cerita ini. Saya membeli meja Jerman untuk mesin jahit, yang harganya menakutkan untuk dikatakan. Dan kompartemen aksesoris ditutup dengan karton yang terbuat dari serutan pres. Anda tidak dapat memahami otak orang Jerman mereka dan memahami mengapa perlu menggunakan elemen dari bahan daur ulang yang semacam itu. Mungkin, mereka menyelamatkan alam dan menunjukkan bagaimana mereka menyelamatkannya.
Sekarang saya menata meja, duduk untuk menjahit dan berkata: "Halo, gadis-gadis!"
Saya merobek serbet dan mengaplikasikannya dengan elemen.
Gadis-gadis di atas serbet.
Cat akrilik di sepanjang kontur gambar.
RAK DENGAN KOMIK.
Hal ini membuatku bahagia. Ada rak yang benar-benar hancur tempat bunga-bunga ditempatkan di musim panas, dan di musim dingin dibiarkan terkena angin dan embun beku. Dan itu dibuat dengan hati-hati seperti wadah kayu untuk sayuran.
Dan ide itu lahir dari kepenatan bunga dan pemandangan lucu kartu decoupage.
Komik!!! Kertasnya tipis dan mudah ditempel. Setelah basah kuyup dengan air, tidak sobek, melainkan meregang seperti kartu decoupage. Anda dapat memotong, merobek, dan menempelkannya sesuka Anda. Makalahnya tidak perlu ditipiskan, karena ini komik, dan tidak perlu menyembunyikan fakta bahwa ini komik. (Saya tahu bahwa aerobatik tertinggi dalam decoupage adalah ketika tidak ada alasan untuk memperhatikan kertas yang direkatkan).
Satu-satunya hal yang membuat saya takut adalah setelah basah, sisi sebaliknya terlihat. Namun saat gambar mengering, tidak ada bekas gambar sebaliknya yang tersisa. Mudah diperbaiki: jika ada elemen yang robek, Anda hanya perlu memotong dan menempelkan elemen kolase lainnya, lalu memolesnya.
Untuk bersenang-senang dan semacam “ide”, saya mencoba mendekorasi ketiga rak dengan warna berbeda: bagian atas sebagian besar berwarna coklat, bagian tengah berwarna biru, dan bagian bawah berwarna merah. Unsur 1) dipotong, 2) disobek, 3) dipotong dengan gunting zag-zag.
Saya juga menua partisi dan kakinya: setelah mengecat, saya menggunakan amplas di bagian tepi dan bidangnya.
Setelah saya renovasi, barang eksklusif ini tidak lagi dibawa ke balkon...
Pengalaman:
Tidak perlu terikat pada bahan khusus untuk decoupage; ide dan materi ada dimana-mana; ini adalah majalah, koran, perangko, kartu pos, buku sobek, kemasan, bungkus permen, kertas dinding, lembaran musik, amplop, foto, dll. Mereka yang banyak melakukan decoupage dan dengan cara yang canggih mencetak gambar dari Internet pada printer.
Namun dalam hal ini, penipisan kertas diperlukan. Metode pertama adalah basah: tutupi gambar yang diinginkan dengan beberapa lapis pernis akrilik, biarkan mengering, basahi kertas di sisi belakang dan gulung lapisan yang tidak perlu dengan hati-hati. Metode kering: sekali lagi, perbaiki gambar yang diinginkan dengan beberapa lapis pernis, dan tempelkan selotip di sisi belakang dan kupas dengan hati-hati bersama dengan lapisan kertas, dan seterusnya beberapa kali.
Trik-trik ini memerlukan keterampilan, tetapi setelah penjarangan yang terkenal ini, Anda memahami bahwa Anda tidak perlu membentak anak-anak jika mereka keluar dengan tongkat dan lingkaran yang bengkok.
Anda tidak hanya perlu mengunjungi salon seni dan toko khusus untuk decoupage, tetapi juga bengkel konstruksi dan reparasi biasa. Di sana Anda dapat membeli: cat akrilik putih, primer akrilik, pernis akrilik, kuas datar untuk permukaan besar, amplas, gelembung dengan "warna" (Anda perlu menambahkannya ke cat putih untuk mendapatkan warna yang diinginkan), cat dan pernis dalam bentuk semprotan, pernis craquelure. Bagaimana dengan harganya! Satu ember penuh pernis (saya mencoba bahasa Rusia dan Finlandia) harganya sama dengan sebotol cairan tipis. salon.
Jika barangnya besar dan kotor, lebih baik menyiapkannya untuk decoupage di balkon (di teras, di tempat terbuka). Banyak debu amplas yang beterbangan!
RAK KAMAR MANDI.
Ini pertama kalinya aku benar-benar melakukannya hal yang bermanfaat. Kami membutuhkan rak untuk kamar mandi, tetapi tidak ingin menggunakan kaca.
Dan decoupage!
Saya segera merasa siap untuk suatu prestasi: Saya dengan berani mengambil gergaji ukir dan memotong rak-rak dengan bentuk yang diinginkan dari papan laminasi. Kemudian dia meratakan dan mengampelasnya sendiri, lalu mendekorasinya.
Saya sudah lama berteman dengan serbet dan bahkan belajar membawanya utuh, dan tidak sepotong-sepotong.
Rak-rak tersebut telah digunakan selama satu tahun sekarang, dan tidak terjadi apa-apa karena air atau uap.
Lihat dari bawah.
Lihat dari atas.
Pengalamannya begini:
Wanita Rusia dari Internet sungguh jenius! (Saya tidak tahu tentang yang lain, saya membaca bahasa Rusia). Mereka telah menemukan cara untuk memindahkan seluruh serbet. Ada yang “metode kikir”, ada yang menggunakan sikat kipas, dan ada yang “metode kering”.
Metode sikat kipas ditujukan untuk kaum masokis. Dan “file” dan “dry” adalah hal yang cerdas dan sama-sama menguntungkan.
Serbet dipindahkan ke rak menggunakan file - file plastik biasa untuk kertas. Serbet harus diletakkan menghadap ke bawah pada file. Dan kemudian letakkan di bawah aliran tipis air dingin. Putar kikir secara perlahan dan hati-hati, ratakan serbet basah dan keluarkan gelembung. Kemudian letakkan file dengan serbet menghadap ke bawah pada permukaan yang akan dihias. Dan, tanpa menghapus file, ratakan gambar dengan jari Anda. Mulai dari pusat. Plastik akan melindungi serbet dari deformasi. Keajaiban, keselarasan sempurna! Dan kemudian, perlahan, curi file tersebut, gerakkan secara horizontal, seperti stiker. Dan pada akhirnya - tutupi serbet basah yang sudah menempel dengan lem decoupage atau pernis lem khusus untuk serbet.
Bagaimana dengan pinggiran serbet? Biarkan mengering dan “potong” dengan amplas halus. Tepinya halus, seperti setelah pisau bedah.
Memindahkan seluruh serbet mungkin tidak berhasil pada kali pertama, tetapi kemudian akan seperti di ban berjalan.
Decoupage kotak adalah cabang menjahit yang relatif baru dan belum banyak dipelajari, yang secara bertahap mendapatkan popularitas luas di kalangan wanita yang membutuhkan dari seluruh dunia. Tidak masalah apa sebenarnya yang akan diberi angin kedua, hal lama atau hal yang benar-benar baru! Hal utama adalah wanita yang membutuhkan memiliki inspirasi yang tak tergoyahkan dan keinginan untuk membuat dunia ini setidaknya sedikit lebih indah.
Praktik ini lebih cocok bagi mereka yang tinggal di sektor swasta. Sebuah kotak yang dihias dengan nakal dan aneh pasti akan cocok dengan interiornya dan mencirikan pemiliknya sebagai orang-orang dengan selera yang baik. Saat ini tidak banyak variasi pabrik pada tema kotak surat. Oleh karena itu, bidang ini masih bebas untuk berkreasi.

Untuk membuat kotak itu benar-benar bergaya, Anda perlu mempertimbangkan fitur-fitur berikut:
- Lebih baik memilih warna netral yang tidak akan mengiritasi seiring waktu;
- Anda tidak boleh menghemat bahan, karena kotak surat dipasang selama satu tahun;
- Cat dan dekorasi cenderung luntur karena pengaruh faktor eksternal, sehingga kotak harus dilapisi dengan pernis pelindung.
Penting untuk diingat bahwa decoupage hanyalah metode dekorasi! Tidak perlu menemukan kembali roda dan mencoba mengubah hal paling biasa yang tidak dapat dikenali lagi. Kotak surat. Seharusnya nyaman bagi pemilik dan tukang pos untuk menanganinya.
Untuk kebutuhan apa pun: decoupage kotak antik
Desain antik suatu produk sudah dipraktikkan sejak lama, sehingga para perajin juga harus memperhatikan tren saat ini.
Dalam hal ini, Anda dapat menua secara artifisial:
- Peti mati;
- Kotak perkakas;
- Wadah untuk segala hal kecil yang berguna.

Penting untuk dipahami bahwa benda itu sendiri tidak akan terlihat begitu cemerlang jika tidak selaras dengan dunia luar. Dalam konsep serupa harus dilakukan elemen yang menyertainya. Maka sebuah kotak yang didekorasi dengan gaya antik akan terlihat jauh lebih menguntungkan.
Selain itu, kotak seperti itu bisa menjadi hadiah luar biasa yang tidak mungkin ditemukan di antara produk jadi. Ini dapat disesuaikan dengan selera Anda atau, sebagai alternatif, disesuaikan sepenuhnya dengan kebutuhan orang yang menerima kejutan. Bagaimanapun, kekaguman tidak akan membuat Anda menunggu!
Decoupage bergaya dari kotak bumbu
Setiap nyonya rumah yang baik memiliki gudang sejumlah besar rempah-rempah yang perlu disimpan di suatu tempat.
Untuk keperluan ini biasanya digunakan kaleng dan kotak biasa, penampilan yang meninggalkan banyak hal yang diinginkan.
Hal yang sama sekali berbeda adalah kotak khusus untuk bumbu, dihias menggunakan teknik decoupage.

Itu harus memenuhi persyaratan berikut:
- Tutup rapat dan kedap udara untuk mencegah masuknya bau asing ke dalam;
- Andal melindungi konten dari kelembapan dan kelembapan;
- Memiliki beberapa kompartemen untuk menyimpan berbagai bumbu.
Tergantung pada kebutuhan Anda, Anda dapat memvariasikan ukuran kotak. Bagi sebagian orang, produk yang sangat kecil cocok, sementara yang lain membutuhkan wadah dengan beberapa lantai. Mendekorasi setiap produk tidak akan sulit sama sekali.
Decoupage kotak sayur: sederhana dan indah
Tempat penyimpanan sayuran seringkali tidak diperhatikan. Namun, saat berada di dalam rumah pesanan sempurna, Saya ingin semua komponennya selaras dengan lingkungan.
Persyaratan berikut berlaku untuk kotak buah dan sayuran:
- Produk harus dapat diandalkan dan kuat;
- Disarankan untuk membagi ruang secara sektoral;
- Kotak harus ditutup, tetapi ventilasi harus diatur pada bidangnya.

Jika Anda berencana untuk menggunakannya secara permanen, kotaknya bisa dibuat dengan ukuran berapa pun. Namun, jika harus memindahkannya secara berkala, sebaiknya jangan mengambil volume yang terlalu besar. Lebih baik membuat beberapa produk kompak yang akan menampung sayuran dan buah-buahan secara terpisah.
Decoupage kotak anggur yang spektakuler
Menyimpan anggur adalah seni yang telah dikuasai sepenuhnya oleh para pecinta sejati. Bagi yang tidak memiliki banyak koleksi wine bisa membuat kotak kecil yang dihias dengan teknik decoupage.
Opsi desain berikut sempurna untuk tujuan ini:
- Figur abstrak ringan yang akan menonjolkan warna botol;
- Nuansa yang kaya;
- Bentuk multi-warna yang mewah.

Penting untuk mempertimbangkan di mana tepatnya kotak itu akan ditempatkan agar sesuai dengan konsep keseluruhan. Selain itu, kotak anggur DIY bisa menjadi aksen cerah yang akan memberikan tampilan nakal pada keseluruhan interior.
Tersedia kosong: kotak decoupage
Blanko untuk menjahit dapat dibuat dengan tangan Anda sendiri, yang cukup sederhana dan terjangkau. Anda hanya perlu menyusun kotak yang optimal dan mengecatnya sesuai selera Anda. Basisnya bisa berupa rangka rak atau pengganti jenis logam.
Namun, tidak semua orang dapat membuat elemen seperti itu sendiri, jadi Anda juga dapat membeli kotak di toko bertema, misalnya Ikea. Di sana Anda dapat memilih produk untuk setiap selera! Dan baru kemudian hiasi dengan gaya yang Anda suka dan berbagai warna.

Saat bekerja, Anda perlu menyiapkan:
- Waktu senggang;
- Kesabaran;
- Bahan untuk kerajinan tangan tersedia dalam jumlah yang cukup.
Aturan untuk kotak decoupage (video)
Jika kesulitan muncul, Anda dapat menggunakan kelas master tematik sebagai dasar, di mana wanita berpengalaman yang membutuhkan akan menjawab semua pertanyaan. Terkadang cukup bagi seseorang untuk memutuskan suatu gaya dan imajinasinya akan terwujud di masa depan.
Seiring bertambahnya pengalaman, saya terus berbagi dengan Anda semua tahapan kelahiran berbagai kotak saya. Di kelas master ini kita akan membuat kotak untuk menyimpan segala macam peralatan.
Saya mulai membuat dinding samping dari MDF untuk laci masa depan kita.

Proses pengerjaan sedang berlangsung. Saya menghilangkan kelebihan MDF menggunakan obeng dan alat amplas.

Di sini, “sisinya” hampir siap.

Saya sedang menggambar pena masa depan.

Dan juga, dengan menggunakan obeng, saya menghilangkan kelebihannya.

Di sini, semua bagian kotak kami sudah siap.

Sebelum Anda mulai merakit kotak, Anda perlu membuat lubang di dinding samping untuk pegangannya.

Dengan menggunakan bor, saya mengebor lubang dan memasukkan pegangannya, tentu saja, melumasi tempat ini dengan baik dengan lem Kristal.

Saya merekatkan kotak itu, lalu merobohkan semua dinding dengan paku.

Kotaknya sudah dirakit!

Saya perlu menutup lubang jelek yang ditinggalkan oleh bor. Oleh karena itu, saya mengoles dempul dengan lem PVA.

Inilah lubang-lubangnya.

Begitulah cara menutup-nutupinya. Tapi ini pertama kalinya. Setelah kering, saya aplikasikan kembali larutan tersebut, lalu setelah kering untuk kedua kalinya, saya mengampelas area tersebut.

Dari sepotong kecil MDF Anda perlu membuat elemen dekoratif, yang nantinya akan menghiasi bagian depan kotak.

Saya melakukannya! Ngomong-ngomong: barang-barang seperti itu di toko seni berharga 128 rubel/potong. Dan saya melakukannya dalam 5-7 menit. Jadi mengapa membayar seseorang?

Kali ini saya memutuskan untuk tidak mendempul bodinya, tapi langsung mengecatnya. Oleh karena itu, untuk memulainya, saya menyiapkan seluruh permukaan. Setelah cat dasar, pastikan untuk mengampelas seluruh permukaan kotak.

Saya mulai melukis. Saya mencampur cat akrilik putih untuk dinding dan langit-langit (ditunjukkan pada foto di bawah) dengan primer dan menambahkan warna (hitam dan coklat).

Saya tidak suka menunggu, jadi saya menggunakan pengering rambut untuk mempercepat proses pengeringan! Setelah kering, amplas sedikit dengan amplas halus jika diperlukan.

Dengan sebatang lilin saya “berjalan” di sepanjang ujung dan tepinya.


Ini setelah melukis sekali.

Dan ini setelah pengecatan dua kali. Menunggu sampai benar-benar kering. Pengering rambut untuk menyelamatkan!

Amplas halus ke seluruh badan.

Saya mulai merekatkan kertas nasi.

Saya menandainya dengan pensil sisi belakang kartu-kartu tersebut memiliki kontur yang diinginkan dan dengan hati-hati merobeknya dengan tangan saya.

Saya melumasi badan dengan PVA dan merekatkan kartu ke atasnya.

Jika kartu sedikit melampaui tepinya, silakan ambil amplas dan hilangkan kelebihannya.

Kami juga menutupi bagian atas peta dengan PVA. Foto menunjukkan bagaimana warna kartu PVA yang baru dilapisi berubah dan apa warnanya setelah PVA mengering.

Saya merekatkan elemen dekoratif.

Saya belum punya cetakan plester. Anda harus membeli bunga polimer ini.


Dia menutupi seluruh badan kotak dengan enamel mutiara dan mengecat semuanya.

Ketika kotaknya sudah siap, saya menyadari bahwa kotak itu memerlukan semacam pasangan. Dan saya memutuskan untuk membuat kotak kecil juga.

Saya ternyata seorang gadis kecil.

Dan beginilah tampilan kotak saya setelah hampir dua hari saya bekerja.


Saat ini, decoupage digunakan dalam desain objek yang sangat berbeda: murni dekoratif dan fungsional. Berkat banyaknya bahan untuk dekorasi dan kemampuan untuk memilih tema desain apa pun, teknik sederhana namun efektif ini sangat ideal untuk mendekorasi produk untuk menyimpan barang-barang pribadi. Dengan cara apa dan dengan cara apa Anda dapat membuat decoupage kotak yang indah - baca artikelnya.
Untuk membuat kotak dekoratif, digunakan blanko - kotak dengan kompartemen, padat atau berukir, dapat dipindahkan, fleksibel atau penutup independen tanpa penutup luar dan dekorasi dalam ruangan. Blankonya bisa besar atau kecil, terbuat dari kayu, triplek, MDF. Produk dari kayu alami Mereka dicirikan oleh kekuatan tinggi dan ramah lingkungan, ketika blanko yang terbuat dari kayu lapis dan MDF harganya murah.
Anda dapat membuat sendiri blanko dengan berbagai bentuk dan ukuran dari papier-mâché.
Ada jenis yang berbeda blanko dengan berbagai bentuk, ukuran dan konfigurasi untuk berbagai keperluan. Jadi, blanko dengan balok yang dapat ditarik dengan sepuluh kompartemen cocok untuk menyimpan barang-barang kecil (misalnya cincin), dapat didekorasi dengan gaya "Peti Barbie", yang dekorasinya dapat menggunakan kain merah muda, kilauan, cermin , dll. dan sangat cocok untuk segala kesempatan. sebagai hadiah untuk seorang gadis kecil. Dan desain enam kompartemen dapat berfungsi sebagai tempat yang elegan untuk menyimpan kantong teh.
Di toko online Anda dapat menemukan blanko peti mati dan blanko kotak pensil (prinsip pengoperasian kotak ini didasarkan pada perluasan kompartemen penyimpanan), blanko apel (diameternya bisa berbeda), kotak berpalang berupa kotak untuk decoupage dalam gaya loteng, hati kosong.
Bagian yang kosong dapat dibuat dengan tangan Anda sendiri menggunakan anyaman tabung koran pada bingkai yang terbuat dari karton tebal, dipotong dari zucchini dekoratif.
Aksesoris untuk kotak decoupage
Elemen desain kotak mencakup semua detail yang bersifat dekoratif dan terapan. Jadi, aksesori untuk kotak decoupage secara kondisional dibagi menjadi dekoratif-fungsional dan dekoratif eksklusif. Jenis produk pertama mencakup semua jenis kunci, sudut, loop, kaki, dll., jenis kedua mencakup pembatas, gambar, tekstil, kilauan, payet, dll.

Perbatasan untuk kotak
Untuk mendekorasi kotak, Anda dapat menggunakan pembatas untuk kerajinan tangan - blanko fungsional yang dapat menghiasi sekeliling tutup dan sisi kotak. Perbatasan dapat berupa pita bermotif dengan pola bunga atau geometris, atau garis-garis dengan berbagai gambar (dari bunga, buah-buahan dan sayuran, hingga ayam jantan, anjing, alat-alat musik dll.)
Gambar untuk kotak decoupage
Gambar untuk dekorasi kotak dapat diwakili oleh serbet kertas biasa, serbet nasi, stiker, potongan koran, majalah, buku, cetakan pada kertas biasa dan kertas foto, serta kartu decoupage. Bekerja dengan siapa pun elemen dekoratif, dari yang disajikan, memiliki nuansa dan ciri khas tersendiri. Jadi, gambar dari serbet nasi tidak dipotong dengan gunting, tetapi dirobek dengan tangan, dan cetakan serta kartu decoupage dengan kepadatan tinggi diaplikasikan “ditanam” dengan menggunakan pernis.
Cara decoupage kotak kayu
Decoupage kotak kayu adalah Keputusan terbaik Untuk pekerjaan mandiri dekorator pemula. Teknik ini membutuhkan keterampilan, bahan dan waktu yang minimal, namun tetap menjamin hasil yang efektif dan menarik. Untuk decoupage kotak kayu persegi biasa, kita memerlukan kartu decoupage agar sesuai dengan tutupnya, lem dan pernis untuk decoupage, cat akrilik coklat muda dan cat agar sesuai dengan serbet, media kaca, craquelure dua langkah, amplas kasar, kuas, kikir .

Untuk melakukan decoupage, Anda perlu:
- Ampelas permukaan kotak dan tutup tutupnya dengan selotip, di mana gambar akan ditempatkan di masa depan.
- Lapisi seluruh tepi kotak dengan cat akrilik coklat muda dan media kaca.
- Sesuai dengan pola kayunya, tambahkan cat agar sesuai dengan warna serbet (juga diencerkan dengan bahan kaca).
- Setelah cat mengering, amplas bagian pinggir kotak hingga putih.
- Tempatkan gambar pada file, bagian dalam ke luar, basahi dengan air
- Tempatkan desain pada tutupnya, keluarkan kikir, dan cat desain dengan lem.
- Ampelas tepi gambar dan tutupi dengan craquelure dalam dua lapisan, keringkan di antaranya.
- Pernis produk jadi.
Kotak decoupage perunggu: kelas master
Lukisan perunggu adalah pekerjaan yang agak rumit dan melelahkan yang memungkinkan Anda mendapatkan pola yang meniru permukaan mineral hijau cerah. Untuk melakukan decoupage jenis ini, Anda memerlukan: kartu decoupage atau serbet dengan motif perunggu yang sesuai skema warna, cat akrilik (hitam, putih, pirus, hijau tua dan muda), penghambat pengeringan akrilik, karton tebal, gunting, kuas sintetis, pigmen emas, spons busa, amplas, kantong plastik, pernis glossy untuk decoupage.
Kami membuat kotak:
- Kami menyiapkan permukaan benda kerja untuk dekorasi.
- Dengan menggunakan spons busa, lapisi seluruh permukaan kotak dengan cat putih bercampur hijau muda.
- Kami mengampelas lapisan tersebut dan melapisinya dengan pernis.
- Kami mengaplikasikan cat pirus pada permukaan kotak dengan menggunakan guratan (meninggalkan ruang kosong) dan menekan guratan tersebut dengan kantong plastik untuk mendapatkan cetakan yang tidak standar.
- Kami mengambil cat hijau tua dan menambahkan cipratan hitam ke dalamnya, menerapkannya dengan cara yang sama pada area yang sudah dicat dengan pirus.
- Kami mengambil karton, menempelkannya pada guratan dan melepaskannya, menariknya ke samping.
- Kami memperbaiki hasilnya dengan pernis.
- Kami menambahkan retarder ke setiap cat dan, dengan menggunakan karton melengkung, menerapkan sapuan, bergantian cat terang dengan pirus dan gelap.
- Kami memperbaiki hasilnya dengan pernis fiksatif.
- Setelah produk benar-benar kering, rekatkan serbet, tambahkan pigmen emas pada kontur yang menonjol dan pernis produk.

Dengan menggunakan teknik ini, kotak persegi panjang dan bulat atau oval dapat dihias. Jenis dekorasi ini membutuhkan ketekunan dan banyak waktu, namun memungkinkan Anda menciptakan produk yang sangat indah dan unik dengan permukaan yang meniru perunggu.
Untuk menguasai teknik decoupage ini dengan sempurna, Anda harus menyelesaikan pelajaran khusus penulis dan mengikuti kursus seperti, misalnya, Olga Sukhova.
Decoupage Tahun Baru untuk kotak itu
Kotak Tahun Baru dapat didekorasi mirip dengan dekorasi tradisional dengan serbet atau decoupage dengan cetakan pernis. Cara kedua menjamin perpaduan gambar yang maksimal dengan permukaan kotak.
Cetakan pernis disiapkan sebagai berikut:
- Kami menutupi gambar yang dicetak pada kertas foto glossy (dengan kelonggaran) dengan pernis akrilik dalam empat lapisan dengan interval pengeringan satu atau dua menit.
- Rendam hasil cetakan dalam air, lalu letakkan sisi kertasnya di atas meja.
- Dengan menggunakan jarum, pisahkan lapisan film atas dari kertas.
- Kami mentransfer gambar film ke file yang menghadap ke dalam.

Setelah mendekorasi permukaan kotak dengan warna Tahun Baru, Anda perlu melapisi gambar di area yang diinginkan dan menghapus file. Gambar harus diperbaiki dengan lem, menerapkan guratan dari tengah ke pinggiran.Sebagai hiasan untuk mendekorasi kotak, Anda dapat menggunakan kilauan, payet, glitter, salju buatan dan es (semolina, dempul dekoratif, lem instan). Produk jadi harus dipernis.
Saat menutupi kotak dengan pernis, Anda perlu memastikan ada celah antara tutup dan kotak: pernis tidak boleh masuk ke celah tersebut, jika tidak dekorasi dapat rusak saat dibuka.
Decoupage antik dari kotak bundar
Decoupage kotak bundar antik adalah cara sederhana dan indah untuk mendapatkan produk menarik yang akan terlihat bagus negara Perancis pedalaman Untuk membuat decoupage vintage kita membutuhkan serbet dengan bunga besar, akrilik coklat dan cat putih, pigmen emas, lilin, PVA, kuas, spons busa, pernis decoupage.
Kami mendesain kotak langkah demi langkah:
- Amplas permukaan kotak dengan hati-hati dan aplikasikan akrilik coklat dalam beberapa lapisan.
- Kami menutupi tepi setengah lingkaran kotak dengan lilin.
- Oleskan akrilik putih menggunakan spons busa.
- Kami mengampelas area yang diberi lilin hingga alasnya berwarna coklat.
- Oleskan kain kering pada permukaan kotak dan rekatkan dengan PVA. Dengan cara ini kami mendekorasi benda kerja sepenuhnya.
- Setelah aplikasi mengering, kami mengaplikasikan akrilik coklat dengan spons, dan kemudian pigmen emas, pada tepi yang menonjol pada tutup dan bagian bawah kotak.
- Kami melapisi produk dengan pernis fiksatif untuk decoupage atau pernis kapal pesiar.

Jika diinginkan, bagian dalam kotak dapat dihias dengan kain yang sesuai desain umum motif, aplikasikan desain bunga menggunakan stensil.
Kelas master tentang bagaimana lagi Anda dapat membuat permukaan vintage menjadi tua dapat ditemukan di Saluran Youtube"Decoupage dari Anna Turchina".
Untuk dekorasi kotak bergaya vintage yang banyak, Anda dapat menggunakan bunga lavender kering dan mawar polimer. Bagian tengah tutup kotak dapat dihias dengan malaikat plester.
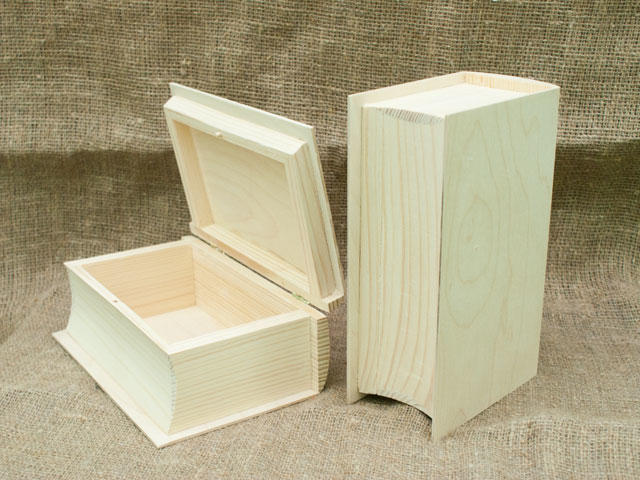
Buku kotak: decoupage
Untuk mendekorasi kotak berbentuk buku, Anda memerlukan blanko biasa, garpu meja, pisau palet, cat akrilik, kuas, dempul dekoratif berwarna pinus, lem, pernis decoupage, kartu decoupage, amplas, spons busa , kikir, selotip, dan sudut dekoratif.
Mari kita mulai:
- Kami mengampelas permukaan dan menutupi penutup atas dan bawah serta samping dengan engsel dengan akrilik putih.
- Setelah akrilik mengering, rekatkan kartu decoupage menggunakan file (metodenya dijelaskan di kelas master decoupage Tahun Baru) ke permukaan yang dicat.
- Kami memodelkan halaman: oleskan dempul ke tepi sisi depan dengan lapisan tiga milimeter dan gunakan garpu untuk menembus halaman alur.
- Kami mewarnai alur kering, dicampur dengan warna hitam, coklat cat akrilik, tambahkan pigmen emas.
- Kami menghiasi sudut-sudut buku dengan elemen ukiran dan tempa.
- Jika diinginkan, kami melakukan desain interior (kami menghias permukaan bagian dalam dengan serbet decoupage, kain, teks, dll.)

Bukunya sudah siap!
Ide untuk kotak decoupage
Decoupage kotak memungkinkan Anda mewujudkan ide kreatif apa pun, karena desainnya dapat dilakukan baik dengan menggunakan bahan tradisional (kain, serbet kertas), serta cara improvisasi yang mudah ditemukan di rumah (misalnya zucchini kecil, garam meja).

Jadi, sebagai decoupage untuk kotak anak-anak, Anda dapat menggunakan dekorasi tradisional dengan serbet dan stiker, dan decoupage asli pada kulit telur: metode ini memungkinkan Anda mendapatkan mosaik tiga dimensi yang unik, sangat menarik. Untuk kotak teh, kotak kosong lurus dengan enam kompartemen dan decoupage dengan stensil mungkin cocok, dan untuk kotak pernikahan - hati kosong dan decoupage dengan foto pengantin baru.
Ide decoupage orisinal dapat ditemukan di situs web “Fair of Masters”.
Kotak decoupage (video)
Kotak-kotak yang dibuat dengan tangan menggunakan teknik decoupage adalah produk yang sangat indah dan unik yang dapat menjadi hadiah yang sangat baik untuk pernikahan, ulang tahun atau hari jadi, baik untuk wanita maupun pria, elemen interior yang unik dan praktis. Dapatkan inspirasi dari foto decoupage dan segeralah menuju karya kreatif yang menarik!
Saat ini, kotak decoupage mendapatkan lebih banyak penggemar, dan hal ini tidak mengherankan. Lagipula decoupage memungkinkan Anda tidak hanya untuk mengekspresikan Anda Keterampilan kreatif dengan tanganmu sendiri, tetapi dapatkan juga hal yang menarik. Bahkan buku-buku terkait pun bermunculan untuk dijual. Apa itu decoupage? Ini adalah teknik khusus yang dapat digunakan untuk mentransfer gambar apa pun ke permukaan. Pada artikel ini kita akan melihat teknik decoupage untuk sebuah kotak.
Alat yang diperlukan untuk kotak decoupage
Teknik decoupage kotak melibatkan penggunaan item berikut:
- menyiapkan kotak (Anda dapat menggunakan blanko yang dibeli di toko khusus);
- serbet untuk teknik decoupage;
- ampelas;
- lem PVA;
- lem decoupage;
- cat akrilik;
- spons;
- jumbai;
- Obeng;
- pita perekat atau selotip;
- berbagai elemen dekoratif;
- primer akrilik.
Teknik decoupage kotak
Jadi, setelah mengumpulkan alat yang diperlukan, yuk langsung berkreasi. Mungkin bahan yang paling ideal untuk decoupage adalah kayu. Pada saat yang sama, dengan menggunakan teknik ini Anda dapat mengolah kotak teh dan permukaan plastik. Apapun bahan yang Anda pilih, bagaimanapun, kotaknya harus disiapkan terlebih dahulu. Untuk melakukan ini, kami merawat permukaan kotak dengan amplas.
Benda kerja kemudian dapat dipoles menggunakan primer akrilik.
Elemen logam paling baik dilepas menggunakan obeng. Tahap selanjutnya adalah mengencangkan benda kerja. Untuk melakukan ini, cat kotak itu dengan cat akrilik.
Langkah selanjutnya adalah memindahkan desain secara langsung ke permukaan benda kerja. Gambar-gambar tersebut untuk ditransfer dapat dibeli di toko khusus. Untuk melakukan ini, kami memisahkan dengan tangan kami sendiri lapisan atas serbet decoupage tempat desain diterapkan. Kami merobek elemen gambar dengan tangan kami. Setelah meletakkan serbet di area kotak yang diinginkan, oleskan lem untuk decoupage.
Diamkan hingga benar-benar kering. Oleskan pernis di atasnya dalam beberapa lapisan. Tahap selanjutnya adalah mendekorasi kotak dengan tangan Anda sendiri.
Pertama, kami mengembalikan semua elemen yang dihapus pada pekerjaan tahap pertama. Mendekorasi kotak hanya bergantung pada gaya yang dipilih untuk decoupage. Selain itu, produk dapat dihaluskan dengan teknik craquelure.
Untuk lebih memahami urutan tindakan, tonton video di akhir artikel.
Ide untuk kotak decoupage
Decoupage kotak adalah aktivitas kreatif, jadi meskipun Anda mengikuti instruksi yang jelas, Anda akan mendapatkan sesuatu yang orisinal. Mari kita lihat ide dasar yang digunakan saat memisahkan kotak. Di antara yang paling populer:
- antik;